Printing
Printing your plot is the process of sending the plot image to an output device, print spooler, or a file. Typically the output device is a printer, but it may be a plotter, film recorder, file or typesetter. If you are creating files for use in another program, you should use Tecplot 360’s option (accessed via the menu) to create your files— includes all the supported print file types, as well as several standard graphics formats. See Exporting Plots for complete details.
Plot Printing
To print a plot, select "Print" from the menu.

Tecplot 360 supports the standard printer drivers for the supported operating systems.
The dialog has the following options:
- Format
-
Indicates the printer chosen to print the plot. You can choose a different printer in the dialog.
- Print Setup
-
Calls up the Print Setup Dialog in which you can choose a printer and other printing settings.
- Color
-
Select this check box for color output; deselect the check box for monochrome output.
- Render Type
-
- Vector
-
Select this option to create print output using the drawing commands of the printer. The printer renders the plot, yielding higher resolution, but some plot options are not available.
Vector graphics formats do not support: - Image
-
Select this option to create print output using an image. Rendering is done by Tecplot 360 at the specified resolution, usually less than the printer’s resolution. However, all plot options are available.
To preserve quality of color in your plot (translucency, contour flooding with Smooth or Smooth with creases shading, or continuous contour flooding), select the render type.
To preserve the quality of text in your plot, select the render type. - Force Extra Sorting for all 3D Frames
-
This option is available when the Vector option has been selected and overrides the setting in the Advanced 3D Control dialog. If this check box is not selected, Tecplot 360 will choose sorting algorithms based on the advanced 3D options that were chosen for each frame. When printing 3D plots in a vector graphics format, Tecplot 360 must sort the objects so that it can draw those farthest from the screen first and those closest to the screen last. By default, Tecplot 360 uses a quick sorting algorithm. This is not always accurate and does not detect problems such as intersecting objects. If Extra Sorting is selected, Tecplot 360 uses a slower, more accurate approach that detects and resolves such problems.
- Resolution (dpi)
-
Available when the Image option is selected. Enter the resolution in terms of dpi in the text field. Larger resolutions may result in an out-of-memory condition, or produce very large files. Lower resolutions may yield less-attractive output images.
| Control-P is the shortcut command for the dialog. |
Setup
You can set various parameters relating to the paper, including paper size and orientation, using the dialog or the dialog. A change to your paper settings in either the dialog or the dialog will automatically update the other.
Printing Setup for Windows
Print Setup Dialog
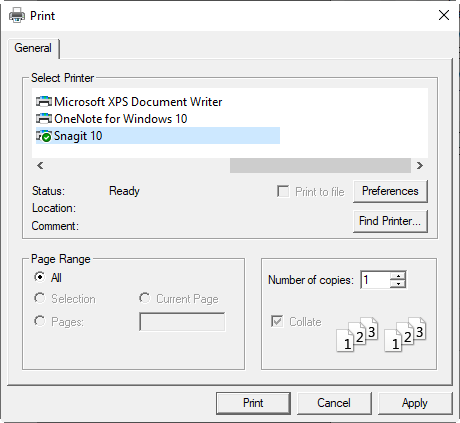
On Windows platforms, use the dialog to set up your paper. The dialog is accessed via the dialog (accessed via the menu) and has the following options:

- Printer
-
Choose the printer and set its properties.
- Paper
-
Specify the paper size and source tray using the following drop-downs:
- Size
-
Select the paper size. The choices are printer-dependent.
- Source
-
Choose a paper tray from the drop-down.
- Orientation
-
Specify one of the following options:
- Portrait
-
The horizontal axis of the plot is aligned with the short side of the paper.
- Landscape
-
The vertical axis of the plot is aligned with the short side of the paper.
By default, Tecplot 360 uses the standard Windows print drivers. You can choose to use Tecplot’s print drivers by adding the following line to your tecplot.cfg file:
$!INTERFACE USETECPLOTPRINTDRIVERS=YESIf you use Tecplot’s print drivers, you will use the dialog for subsequent printing.
Paper Setup Dialog

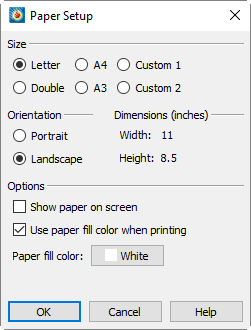
To adjust the paper size, orientation, and background color for your plots, select the option from the menu. The current settings for these options are reflected in the representation of the paper in the workspace. (To view the paper, select the "Show Paper on Screen" check box in either the dialog or the dialog (accessed via the menu). This check box is selected by default.)
The dialog, in contrast with the dialog on Windows platforms, offers you only six paper sizes. These may not be compatible with the paper sizes your printer supports. You cannot select from multiple paper trays with the dialog. You may set screen display options and fill colors with the dialog.
The following options are available in the dialog:
- Size
-
Choose the size of the paper from the following six selections:
-
Letter (8.5 x 11 inches).
-
Double (11 x 17 inches).
-
A4 (21x 29.7 cm).
-
A3 (29.7 x 42 cm).
-
Custom 1 (8.5 x 14 inches).
-
Custom 2 (8 x 10 inches).
-
On Windows systems, paper size is overwritten with the size selected in if that size does not exist in Tecplot 360.
You can customize all six paper sizes in the configuration file, as well as their hard-clip limits. The hard-clip limits are the lines on the edges of the paper that show where your printer cannot print. You can set the hard-clip limits to larger values for use as guides in placing your plots on the paper.
- Orientation
-
Choose the paper orientation. You have two options: Portrait and Landscape. In Portrait orientation, the long axis of the paper is aligned with the vertical axis of the plot. In Landscape orientation, the long axis of the paper is aligned with the horizontal axis of the plot.
- Paper Fill Color
-
Select a color to use for the paper background. This color is used to display the paper in the workspace. You can select the check box when Printing to have Tecplot 360 print this background color on the hard-copy as well.
Printing Setup for Linux
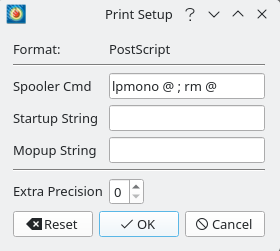
The Print Setup dialog on Linux operating systems includes a field for entering a spool command, along with startup and mopup strings. Contact your system administrator if you have any questions about how to set up these commands.

- Spool Command
-
Printers on Linux systems are accessed via print spoolers that manage the print queue. Typically you use either the
lporlprcommands to send files to the print spooler. There may be command-line options that need to be set on your system, as well, such as a flag to specify a particular printer.In the text field, enter the appropriate spool command for your system, using the
@symbol to represent a file name.For example, suppose you routinely use the following spool command to print a file named
myfile.ps:"lpr -m -r myfile.ps". The appropriate spooler command to enter in the Spooler Cmd field is then"lpr -m -r @".When printing to a spooler, Tecplot 360 creates temporary files with names of the form tp??????, where the?'sare randomly generated characters. Tecplot 360 does not delete these temporary files automatically; commands to do so should be included in your spool command. In our example, the-rflag says to remove the file when done. - Startup and Mopup Strings
-
A startup string is an initialization string that sets up your output device to accept the plot created by Tecplot 360. A mopup string is a reset signal that tells your output device that the special output has ended. For most devices no startup or mopup strings are needed.
Enter the appropriate startup string or mopup string in the appropriate text field. Special characters are generated by using Macro Codes (such as
"%E"for the escape character and"^nnn"for any ASCII character with a decimal ordinal value of nnn). Check your printer documentation for the appropriate strings. - Extra Precision
-
For PostScript output, you can control the numerical precision used in your print files. files contain numbers that define sizes and positions of pieces of the plot on the output paper. These numbers are defined as integers between zero and about 8,000. Usually, this provides sufficient resolution for most output devices. Occasionally, you may need more resolution. For example, printing to a high-resolution output device like a Linotronic typesetter may require more precision; making print output with very small cells or elements may also require more precision.
To increase the precision of the output, increase the value in the field of the dialog. You specify one value for all formats that supports precision control. The precision is defined as the number of digits to the right of the decimal. Normally, precision is zero. The disadvantage of setting precision high is that the print files increase in size. The higher the setting, the larger your print files, but the more accurate the plot.The maximum setting for the precision is eight.