Animation
Tecplot 360 provides a variety of methods for creating animated plots and exporting them to movie or sequences of static image files files for playback at a later time. The basic animation methods available include:
- Animation Tools
-
Create animations using the menu, the Slice Details dialog, or the Streamtraces dialog. The animation can be viewed within Tecplot 360 or exported to a movie file.
- Movie File Creation with Macros
-
Use a macro to perform multiple, repetitive changes, and write each image to a movie file.
Animation Tools
Use a built-in animation tool to have Tecplot 360 cycle through your data, automatically displaying zones, slices, or streamtraces one after the other. The following plot elements may be animated using the dialogs in the menu:
| When you need a particular size for your animation image, such as 300 by 250 pixels, first resize your frame to the desired width and height. Then export only the active frame. |
Time Animation
To animate over time, simply press the play  button in the Plot sidebar
or in the dialog. (This dialog can be
launched from the Animate menu or by clicking the
 button above the
Solution Time slider in the Plot sidebar.) The active frame will be
animated from the current time step to the last time step. The current
Solution Time determines which transient zones are displayed in the active frame.
The slider control can be used to interactively change the Current
Solution Time.
| This option is available for transient field plot data only. |
The dialog has the following options:
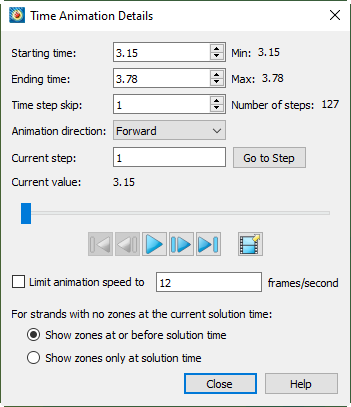
- Starting Time
-
Enter the value of the first solution time to include in the animation. If the Solution Time entered does not exist, the nearest Solution Time less than the entered time is used, or the first solution time if no such time exists. The default value is the first Solution Time. The value of the first Solution Time in the dataset is displayed in .
- Ending Time
-
Enter the value of the last Solution Time to include in the animation. If the Solution Time entered does not exist, the nearest Solution Time less than the entered time is used. The default value is the last Solution Time. The value of the last Solution Time in the dataset is displayed in .
- Time Step Skip
-
Enter the skip number between time steps. A value of 2 results in every other time steps being animated, a value of 3 animates every 3 time steps, and so on.
- Number of Steps
-
Displays the number of time steps in the data between the Start Time and the End Time.
- Animation direction
-
Select the direction for the animation: forward, backward, loop (forward repeatedly), or bounce (forward, then backward, then forward, then backward…).
- Current Step
-
This field displays the time step for the active frame of the animation. The field is updated while an animation is in progress.
- Go To
-
Use the button to jump to the animation step entered in the Current Step field.
- Slider
-
The slider can be dragged to change the current solution time. The following buttons may also be used.
-
 - Jumps to the value in Start Time.
 -
 – Moves one step toward the value in Start Time.
 -
 – Plays the animation as specified by the Animation
direction field. The Play button becomes a Pause button while the animation is
playing.
 -
 – Moves toward the value in End Time.
 -
 – Jumps to the value in End Time.
Click the filmstrip icon to export the animation to a file. See Animation Export. Note that some of the settings in this dialog (such as direction and speed) do not apply when exporting to a file. Instead, you may add these effects later using a video editor, if desired.
-
- Limit Animation Speed to
-
Toggle-on to limit the animation speed to the value specified in the text box.
- For strands with no zones at the current solution time
-
Determines what is shown when no zones with a given Strand ID exist at the current solution time, within a small time tolerance:
-
Show zones at or before solution time (default)- Show zones for the closest prior solution time where the zone with that Strand ID does exist.
-
Show zones only at solution time: Only show zones for the current solution time.
Note that, in addition to the above setting, the fieldmap must be active for it to be shown.
-
IJK-plane Animation
Use the dialog to display all or a specified subset of the IJK-planes in the current dataset, one at a time. You can choose to animate either the I, J, or K-planes.
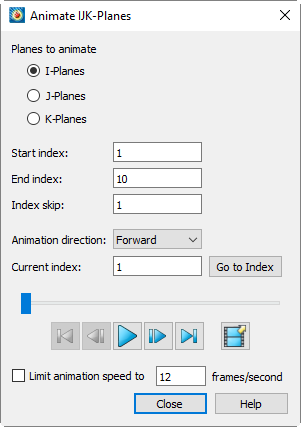
To animate IJK-planes, select "IJK-planes" from the menu. The dialog has the following options:
- Planes to Animate
-
Specify the set of planes to animate: I, J, or K-planes.
- Initial Index, End Index, Index Skip
-
Specify an Initial Index (the first plane you want to display), an End Index (the last plane you want to display), and an Index Skip in the fields provided. A skip of 1 displays every index, 2 displays every other index, etc.
- Animation direction
-
Select the direction for the animation: forward, backward, loop (forward repeatedly), or bounce (forward, then backward, then forward, then backward…).
- Current Index
-
Displays the number of the current plane index, which can be edited. Click after editing to move to the chosen step.
- Slider
-
The slider can be dragged to change the current plane index. The following buttons may also be used.
-
 - Jumps to the first index.
 -
 – Moves one step toward the first index.
 -
 – Plays the animation as specified by the Animation
direction field. The Play button becomes a Pause button while the animation is
playing.
 -
 – Moves toward the last index.
 -
 – Jumps to the last index.
Click the filmstrip icon to export the animation to a file. See Animation Export. Note that some of the settings in this dialog (such as direction and speed) do not apply when exporting to a file. Instead, you may add these effects later using a video editor, if desired.
-
- Limit Animation Speed to
-
Toggle-on to limit the animation speed to the value specified.
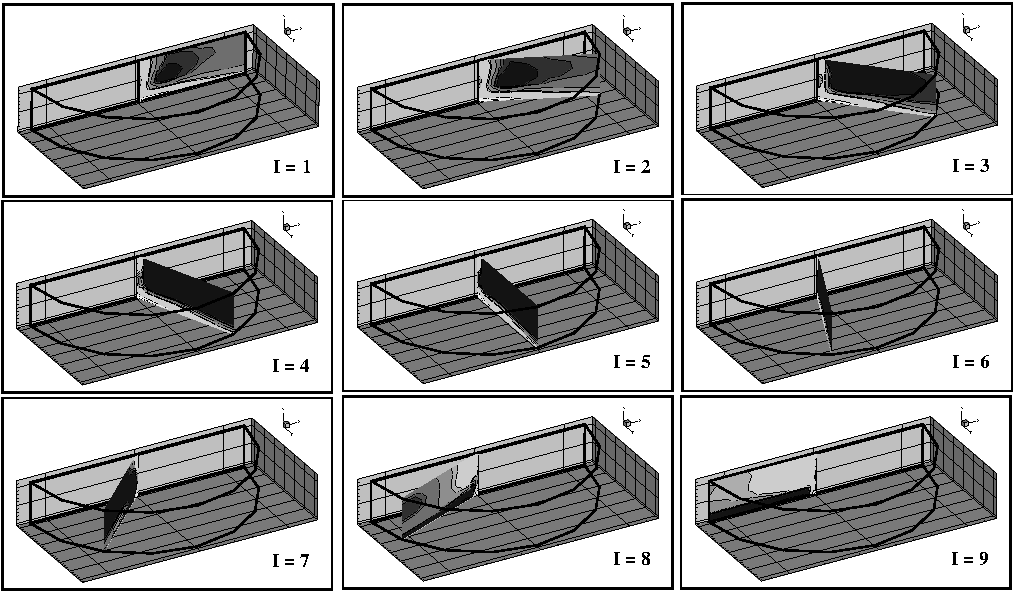
Figure 1 shows an example of animating I-planes in an IJK-ordered zone.
| To restore the workspace back to its normal view after the IJK animation, go to . |
IJK Blanking Animation
Use the Animation page of the dialog () to animate a sequence of Tecplot 360 renderings, starting with an initial set of blanked IJK indices and proceeding in a series of interpolated steps to a final set of blanked IJK indices.
To animate a sequence of IJK blankings, you must first turn on IJK blanking using the checkbox at the top of the IJK Blanking dialog. For more information on initially setting up IJK blanking, see IJK Blanking.
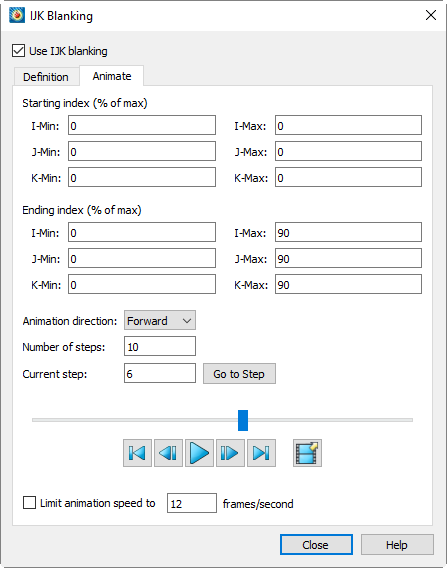
The Animation page of the IJK Blanking dialog has the following settings:
- Starting Index (% of Max)
-
Specify an initial set of blanked IJK-indices in the text fields. Enter a range of indices for: I, J, and K (index values are entered as percentages of the maximum index).
- Ending Index (% of Max)
-
Specify a final set of blanked IJK-indices. Enter a range of indices for each: I, J, and K.
- Animation direction
-
Select the direction for the animation: forward, backward, loop (forward repeatedly), or bounce (forward, then backward, then forward, then backward…).
- Number of Steps
-
Specify the number of steps. The minimum is two.
- Current Step
-
Displays the number of the current step, which can be edited. Click after editing to move to the chosen step.
- Slider
-
The slider can be dragged to change the current step. The following buttons may also be used.
-
 - Jumps to the first step.
 -
 – Moves one step toward the first step.
 -
 – Plays the animation as specified by the Animation
direction field. The Play button becomes a Pause button while the animation is
playing.
 -
 – Moves toward the last step.
 -
 – Jumps to the last step.
Click the filmstrip icon to export the animation to a file. See Animation Export. Note that some of the settings in this dialog (such as direction and speed) do not apply when exporting to a file. Instead, you may add these effects later using a video editor, if desired.
-
- Limit Animation Speed to
-
Toggle-on to limit the animation speed to the value specified in the field.
Iso-surfaces Animation
Use the Animation page of the dialog to define iso-surfaces to animate either on screen or to a file. You can reach this page directly by choosing "Iso-Surfaces" from the menu, or you can open the dialog from the menu or Plot sidebar and click the Animation tab.
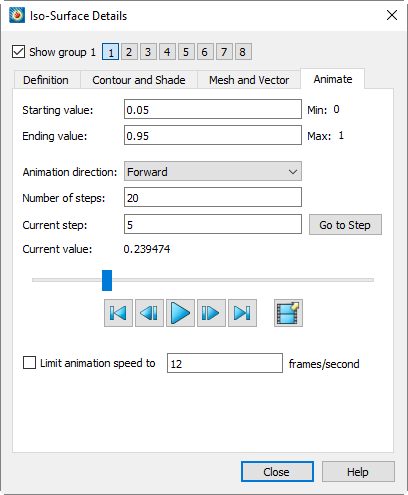
- Starting Value
-
The starting iso-surface value for the animation.
- Ending Value
-
The ending iso-surface value for the animation.
- Animation direction
-
Select the direction for the animation: forward, backward, loop (forward repeatedly), or bounce (forward, then backward, then forward, then backward…).
- Number of steps
-
The range defined by the Starting and Ending value fields above is divided into the specified number of steps for the animation.
- Current Step
-
Indicates the active step of the animation. You can jump to a specific step by entering the desired value and clicking .
- Current Value
-
Displays the iso-surface value at the current step.
- Slider
-
The slider can be dragged to change the current step. The following buttons may also be used.
-
 - Jumps to the first step.
 -
 – Moves one step toward the first step.
 -
 – Plays the animation as specified by the Animation
direction field. The Play button becomes a Pause button while the animation is
playing.
 -
 – Moves toward the last step.
 -
 – Jumps to the last step.
Click the filmstrip icon to export the animation to a file. See Animation Export. Note that some of the settings in this dialog (such as direction and speed) do not apply when exporting to a file. Instead, you may add these effects later using a video editor, if desired.
-
- Limit Animation Speed to
-
Toggle-on to limit the animation speed to the value specified in the field.
Mapping Animation
Use the dialog to display all or a specified subset of the XY or Polar Line mappings defined in the active frame, one at a time.
To animate mapping, select "Mappings" from the menu. The dialog has the following options:
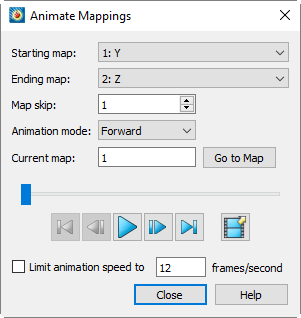
- Start Map
-
Specify the first line mapping you want displayed.
- End Map
-
Specify the last line mapping you want displayed.
- Map Skip
-
Specify the number of maps to skip per step.
- Animation Mode
-
Select whether to animate forward, backward, loop (forward, then back to the beginning for another pass forward), or bounce (forward, then backward, then forward, then backward…).
- Current Map
-
Indicates the map currently displayed. You may jump to a different map by editing the value in the text box and clicking .
- Slider
-
The slider can be dragged to change the current step. The following buttons may also be used.
-
 - Jumps to the first map.
 -
 – Moves one step toward the first map.
 -
 – Plays the animation as specified by the Animation
mode field. The Play button becomes a Pause button while the animation is
playing.
 -
 – Moves toward the last map.
 -
 – Jumps to the last map.
Click the filmstrip icon to export the animation to a file. See Animation Export. Note that some of the settings in this dialog (such as direction and speed) do not apply when exporting to a file. Instead, you may add these effects later using a video editor, if desired.
-
- Limit Animation Speed to
-
To limit the animation speed, toggle on the checkbox and enter a frame speed value in the text box.
Slice Animation
To animate slices, choose . You may also get to this feature by opening the dialog from the menu or the Plot sidebar and choosing the Animate page.
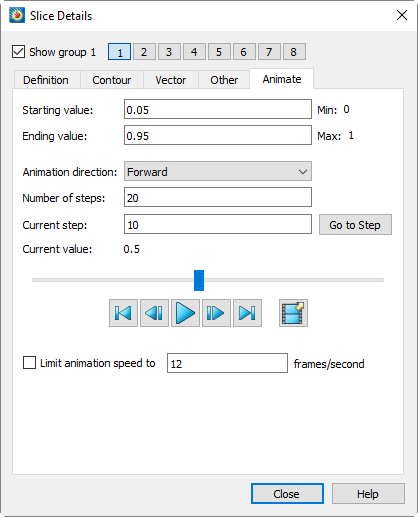
Specify a Starting Value, an Ending Value, and the Number of Steps in the fields provided.
| Only the primary slice of the current slice group (specified on the Position page) is changed during animations. The start and end slice and any intermediate slices of the current slice group are unchanged. It is possible that the animated primary slice will overlap the start slice, end slice, or an intermediate slice. The animation will proceed, without changing those values. |
For arbitrary slices, the start and end origin positions are specified in XYZ coordinates. Arbitrary slices are oriented using the normal defined on the Definition page of the Slice Details dialog (see Arbitrary Slice Orientation). The slice’s origin point is moved between the start and end origins specified here; at each step of the animation, the slice is drawn through the origin point and oriented against the normal.
After choosing the starting and ending positions and the number of steps, you can animate on the screen or export the animation to a file using the following options:
- Animation Direction
-
Select whether to animate forward, backward, loop (forward, then back to the beginning for another pass forward), or bounce (forward, then backward, then forward, then backward…).
- Current Step
-
Indicates the active step of the animation. This may be edited to jump to a specific step. Click the button to display the entered time step in the workspace.
- Current Value or Origin
-
Displays the value being varied (e.g. X for an X-plane slice) at the current step. For arbitrary slices, shows the XYZ coordinates of the slice origin (through which the slice will be drawn) at the current step.
- Slider
-
The slider can be dragged to change the current step. The following buttons may also be used.
-
 - Jumps to the first step.
 -
 – Moves one step toward the first step.
 -
 – Plays the animation as specified by the Animation
direction field. The Play button becomes a Pause button while the animation is
playing.
 -
 – Moves toward the last step.
 -
 – Jumps to the last step.
Click the filmstrip icon to export the animation to a file. See Animation Export. Note that some of the settings in this dialog (such as direction and speed) do not apply when exporting to a file. Instead, you may add these effects later using a video editor, if desired.
-
- Limit Animation Speed
-
Toggle-on to limit the animation speed to the value specified in the text field.
Streamtrace Animation
To animate your streamtraces, choose You may also access this feature by opening the Streamtrace Details dialog from the Plot menu or the Plot sidebar and switching to the Animate page.
| When you animate streamtraces, timing markers are automatically turned on. You can change the appearance of these markers in the Streamtrace Details dialog. See Timing Page for details. |
Specify the number of steps per cycle and the number of cycles in the fields provided on the page of the dialog.
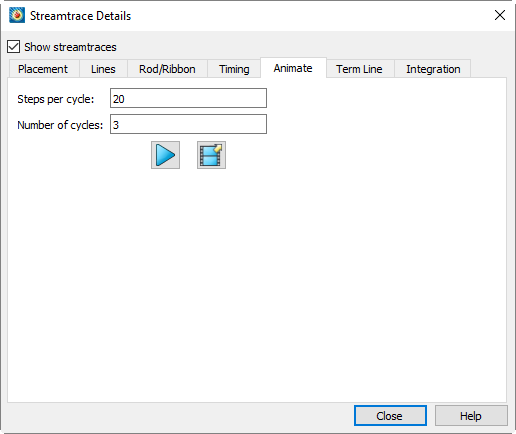
Click the Play button to view the streamtrace animation on the screen, or click the filmstrip icon to export the animation to a file. See Animation Export.
Zone Animation
To animate zones, select "Zones" from the menu. From the dialog, specify the animation mode, Start Zone, End Zone, and Zone Skip in the fields provided.
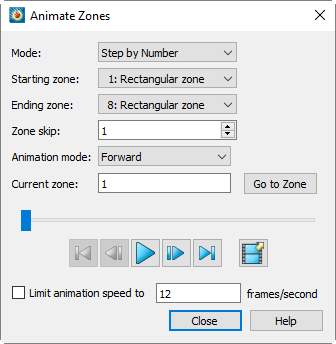
You can animate to a file or "On Screen". (See also Animation Export.)
Use the drop-down menu to select one of the following two options:
- Step by Number
-
Animate all zones from the first zone to the last zone with a skip specified in the Zone Skip field. A Zone Skip of 1 animates all zones.
- Group Step by Number
-
Animate zones in groups (as specified by the Group Size field). For example, a Group Size of 2 will animate all zones in groups of 2 (i.e. zones 1 and 2, followed by zones 3 and 4, and so on).
The following fields are also available:
- Starting zone
-
The first zone in the animation.
- Ending zone
-
The last zone in the animation.
- Zone Skip or Group Size
-
The label on this field changes depending on the setting of the Mode drop-down menu, described previously. Decides the increment for switching zones (for Step by Number) or the size of the zone group (for Group Step by Number).
- Animation Mode
-
Select whether to animate forward, backward, loop (forward, then back to the beginning for another pass forward), or bounce (forward, then backward, then forward, then backward…).
- Current Zone
-
Indicates the zone displayed. This may be edited to jump to a specific zone; click Go to Zone after editing.
- Slider
-
The slider can be dragged to change the current step. The following buttons may also be used.
-
 - Jumps to the first zone.
 -
 – Moves one step toward the first zone.
 -
 – Plays the animation as specified by the Animation
Mode field. The Play button becomes a Pause button while the animation is
playing.
 -
 – Moves toward the last zone.
 -
 – Jumps to the last zone.
Click the filmstrip icon to export the animation to a file. See Animation Export. Note that some of the settings in this dialog (such as direction and speed) do not apply when exporting to a file. Instead, you may add these effects later using a video editor, if desired.
-
- Limit Animation Speed
-
Toggle-on to limit the animation speed to the value specified in the text field.
| The Animate Zones dialog is not available for transient datasets. |
Movie File Creation with Macros
The Tecplot macro language expands the capabilities of the standard animation features. The macro commands allow you to do anything you can do interactively—and more. You can also use loops to repeatedly rotate 3D objects, cycle from one active zone to another, and so on, to create your movie. See Macros for further information about the Tecplot macro language.
A typical macro file for making movies has the following form:
#!MC 1410
... optional commands to set up the first image
$!EXPORTSETUP
  EXPORTFORMAT = AVI
  EXPORTFNAME = "mymovie.avi"
$!EXPORTSTART
  EXPORTREGION = CURRENTFRAME
$!LOOP 50
  ... commands to set up next image
  $!REDRAWALL
  $!EXPORTNEXTFRAME
$!ENDLOOP
$!EXPORTFINISH
For example, the following macro file can be used to animate zones:
#!MC 1410
#
# Set up Export file type and file name.
#
$!EXPORTSETUP
  EXPORTFORMAT = AVI
  EXPORTFNAME = "C:\temp\timeseries.avi"
#
# Begin Animating
#
$!LOOP |NUMZONES|
  #
  # The |Loop| variable is equal to the current
  # loop cycle number.
  #
  $!ACTIVEFIELDZONES = [|Loop|]
  $!REDRAWALL
  #
  # This series of $!IF statements ensures
  # that a new AVI file will be created when
  # the macro is started.
  #
  $!IF |Loop| == 1
    $!EXPORTSTART
      EXPORTREGION = CURRENTFRAME
  $!ENDIF
  $!IF |Loop| != 1
    $!EXPORTNEXTFRAME
  $!ENDIF
$!ENDLOOP
$!EXPORTFINISH
Advanced Animation Techniques
Text Changes
There may be times when you want to include information in your animation which tells viewers about the time step, current zones, or a mapping. There are two ways this can be done.
Using Dynamic Text
The best way to do this is to add dynamic text to your text box. See Dynamic Text.
Attaching Text to Zones
This method works best if you are animating zones. First, create several
text strings in your data file, and use the ZN= parameter
to attach each text string to a zone or mapping. You should have a
separate text string for each zone that will be used in your animation.
For example
ZONE T= "Temp. distribution, Distance = 0.5 m" I=51, J=51 F=POINT
.
.
.
.....list of variable values........
.
.
.
TEXT X=70, Y=90, T= "Distance = 0.5 m", F=COURIER, CS=FRAME, H=2, ZN=1
ZONE T= "Temp. distribution, Distance = 1.0 m" I=51, J=51 F=POINT
.
.
.
.....list of variable values........
.
.
.
TEXT X=70, Y=90, T= "Distance = 1.0 m", F=COURIER, CS=FRAME, H=2, ZN=2
You can also use Tecplot 360’s dynamic text feature (see Dynamic Text) to insert a zone name into your text strings. For example:
ZONE T= "Distance= 1.0 m" I=51, J=51 F=POINT
.
.
.
.....list of variable values....
.
.
.
TEXT X=70, Y=90, T= "&(ZONENAME:2)", F=COURIER, CS=FRAME, H=2, ZN=2
Multiple Frame Animation
Synchronized animation of plots in multiple frames requires the use of a
macro. Macros can use the $!FRAMECONTROL commands to
switch between each frame. The following template demonstrates how this
is done with a layout where each frame contains a similar plot:
#!MC 1410
##Set the number of images (movie frames) in the animation.
$!VARSET |NumCycles| = 10
$!EXPORTSETUP
  EXPORTFORMAT = RASTERMETAFILE
  EXPORTSETUP EXPORTFNAME = "2frames.rm"
  BITDUMPREGION = ALLFRAMES
.
.....Insert commands to set up first frame, if necessary.
.
## Outer loop
$!LOOP |NumCycles|
  ## Inner loop cycles through each frame in the current layout.
  $!LOOP |NumFrames|
    .
    .....Insert commands here to change the plot in the active frame.
    .
    ## Push the top (active) frame to the back.
    $!FrameControl MoveToBottomByNumber
      Frame = |NumFrames|
    #
    ## Activate new top frame
    $!FrameControl ActivateTop
  $!EndLoop
  $!IF |Loop| == 1
    $!EXPORTSTART
      EXPORTREGION = CURRENTFRAME
  $!ELSE
    $!EXPORTNEXTFRAME
  $!ENDIF
$!ENDLOOP
$!EXPORTFINISH
Animation Export
When you choose to animate to a file in a dialog with animation options, the Export dialog appears. Choose the desired export format from the menu at the top of the dialog, then set the options as desired. Two different types of export formats are available:
-
Movie formats (e.g. mpeg-4), which produce a single file for a given animation.
-
Sequenced image formats (e.g. png etc.), which produce a sequence of static image files for a given animation. See Sequenced Image Files.
Most of the available formats share a set of similar options, which are described here.
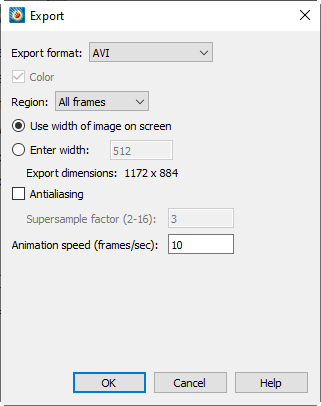
- Region
-
Select the region of the workspace to animate.
- Current Frame
-
Captures only the active frame.
- All Frames
-
Captures the smallest rectangular area containing all frames.
- Work Area
-
Captures the workspace.
- Use Width of Image on Screen
-
Select this option to generate an image file the same size as the current plot on the screen.
- Enter Width
-
Select this option to specify a width (in pixels) for the generated image. A larger width increases the quality of your image. However, the greater the width you specify, the longer it will take to export the image and the larger the exported file.
- Antialiasing
-
Select this option to smooth jagged edges in the image. The image is rendered at a higher resolution than that at which it will eventually be displayed, then reduced in size.
- Supersample Factor
-
Control the amount of antialiasing used in the image. The higher this number, the larger the temporary image used for antialiasing will be, and the more time may be required.
- Animation Speed (frames/sec)
-
Enter a value in the text field to set your animation’s speed in frames per second.
The following sections describe any settings unique to specific formats, as well as providing additional useful information about each format (references, viewers, etc.).
Performance Tips
If exporting is taking an unusually long time, or you get an error message saying that the animation cannot be exported, the most likely cause is that the width of the image you are trying to export is too large. Choosing a smaller width may greatly speed up the export process. Note that antialiasing multiplies the image’s width and height by the entered supersampling factor, so choosing a lower factor also speeds up export.
For an export size of Length x Width, with a supersampling factor of SSF, the size of an uncompressed true color frame is approximately Length x SSF x Width x SSF x 3. Memory requirements to export such a frame can be up to twice this.
AVI Files
AVI format is an older video format for Windows platforms, and is widely compatible with Windows applications. Below are some applications that can be used to view and/or edit AVI files:
- Windows Media Player
-
A standard movie viewer included with Windows distribution. More information is available at support.microsoft.com/en-us/windows/windows-media-technologies-ebf04fdc-dc47-9944-c160-ae22d8413116
- QuickTime
-
Included with Mac, Apple’s QuickTime can play AVI files and export them to other formats as necessary.
- VideoLan Client (VLC)
-
Free player that supports many video formats, including AVI, on Windows, Mac, Linux, and several other platforms. www.videolan.org/vlc/
- Adobe® Premier®
-
A powerful tool for professional digital video editing. More information is available at www.adobe.com/products/premiere.html.
Flash Files
Adobe® Flash® refers to the "Small Web Format" (SWF) for interactive Web content including animations and movies. Flash files have the filename extension .swf and are referred to as SWF files.
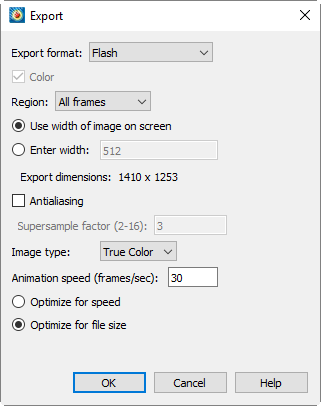
The following options are unique to Flash files. For options common to all supported export formats, see Animation Export.
- Image Type
-
Choose an image type. Your options are:
- True Color
-
Select this option to create twenty-four-bit images with lossless (ZLIB) compression.
- JPEG
-
Select this option to create twenty-four-bit images with lossy compression. This produces smaller files than True Color, and the images will be of lower quality.
- 256 Colors
-
Select this option to reduce each image to 256 colors and compress it with ZLIB.
- Optimize for Speed
-
For True Color or 256 Colors image types, select this option to create the output as quickly as possible. This reduces the compression level and results in larger files. It does not affect playback speed.
- Optimize for File Size
-
For True Color or 256 Colors image types, select this option to produce the smallest possible files. This setting does not affect playback speed.
MPEG-4 Files
MPEG-4 is the modern ISO standard for video playback. MPEG-4 files can be played by a wide variety of computer software, portable devices, and set-top boxes. We suggest:
- QuickTime
-
Included with Mac, Apple’s QuickTime can play MPEG-4 files and export them to other formats as necessary.
- Windows Media Player
-
A standard movie viewer included with Windows distribution. More information is available at support.microsoft.com/en-us/windows/windows-media-technologies-ebf04fdc-dc47-9944-c160-ae22d8413116.
- VideoLan Client (VLC)
-
Free player that supports many video formats, including MPEG-4, on Windows, Mac, Linux, and several other platforms. www.videolan.org/vlc/
MPEG-4 export does not have any options besides the ones that apply to all animation export formats; see Animation Export.
Windows Media (WMV) Files
Windows Media Video (WMV) files are widely supported by Windows applications, including Windows Media Player and Microsoft Office (PowerPoint, etc.). They may also be played on Macintosh computers using Microsoft’s free Windows Media Components for QuickTime.
WMV export does not have any options besides the ones that apply to all animation export formats; see Animation Export.
Raster Metafiles
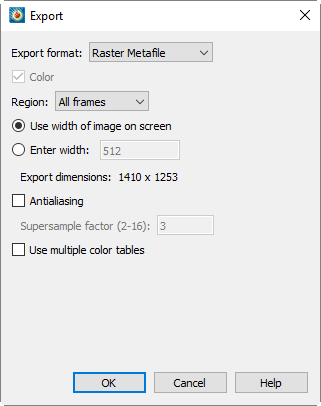
Raster Metafile is a NASA-defined standard format for storing bitmap images and may contain one or more images, allowing it to be used for animations. The format is defined in the following reference:
Taylor, N., Everton, E., Randall, D., Gates, R., and Skeens, K., NASA TM 102588, Raster Metafile and Raster Metafile Translator. Central Scientific Computing Complex Document G-14, NASA Langley Research Center, Hampton, VA. September, 1989. |
Raster Metafiles support only 256-color images (Tecplot 360 selects the best colors). Plots with many colors may have poor results when exported as Raster Metafiles when compared to exports as true-color formats. Using Raster Metafiles for animations with transparency or smooth color gradients may result in poor image quality.
When you select Raster Metafile in the dialog, you have the following additional options:
- Use Multiple Color Tables
-
Select this check box to create a Raster Metafile with a separate color table each step in the animation. If this check box is not selected, Tecplot 360 scans all steps in the animation and creates one color table for the entire animation. Multiple color tables can provide better per-step image quality for the animation, but may result in flicker during playback.
Sequenced Image Files
With sequenced image formats, Tecplot will produce separate image files (e.g. png, tiff, etc.) with a sequence number appended to the body of the filename. For example, if you specify to output to "mymovie.png", the following files will be generated:
mymovie_000001.png
mymovie_000002.png
... and so on.
Note that every time an animation is exported with sequenced image files the files will be numbered starting at 1 and incrementing by 1. Even if you are doing something like a J-Planes animation and are starting at a J-Plane other than 1.
The following image file formats are available when generating animations: BMP, JPEG, PNG, and TIFF. All settings for these formats when making animations is the same as are available when exporting a single image (via the File/Export dialog). See the corresponding section for each format:
BMP: BMP Export
JPEG: JPEG Export
PNG: PNG Export
TIFF: TIFF Export