Exporting Plots
The dialog, accessible from the menu, can be used to create files for export to other applications. Tecplot 360 can export files in variations of three types: vector graphics, image, and movie file formats.
Tecplot 360 exports the following formats:
- EPS Export
-
Vector or image graphics in a special type of PostScript file designed for inclusion in other applications.
- PostScript (PS) Export
-
Vector or image graphics suitable for direct printing, but usually unsuitable for import into other applications. It is recommended that you use the Encapsulated PostScript (EPS) format for importing into other applications.
- WMF Export
-
Vector graphics to import into various Windows applications.
Tecplot 360 exports the following formats:
- BMP Export
-
Image in Windows Bitmap format.
- JPEG Export
-
JPEG files are very small for their resolution and quite common on the internet, but they do involve some loss of image quality that may affect certain plot images.
- PNG Export
-
Also common on the internet, PNG images have a high image quality but larger file size than JPEG.
- TIFF Export
-
Image in Tagged Image File Format.
Tecplot 360 can also export animations to various movie file formats. For more information on exporting animations, see Animation. Tecplot 360 can also export animations to sequenced image files. See Sequenced Image Files for more information.
Certain image formats support anti-aliasing, a feature that smooths jagged edges on text, lines and edges. This feature is discussed at the end of this chapter. See Antialiasing Images.
Tecplot 360 can also export images directly to the clipboard instead of to a file. See Clipboard Exporting to Other Applications for more information.
Performance Tips
If exporting is taking an unusually long time, or you get an error message saying that the image cannot be exported, the most likely cause is that the image width you are trying to export is too large. Selecting a smaller image width should speed up the export process.
For an image export size of Length x Width, the file size for an uncompressed true color image is approximately Length x Width x 3. Memory requirements to export such an image can be up to twice this size.
For 256 color images, the maximum file size is approximately Length x Width, but is usually less since all 256 color image files are compressed. However, the memory requirements for exporting are the same as they are for a true color uncompressed image.
Anti-aliasing can dramatically increase the memory and time requirements of image export, since a large image is rendered first and then downsized to the final image dimensions. Furthermore, some graphics card drivers may not report an error if they cannot allocate enough memory for this operation, instead producing a black image or other rendering issues. See Antialiasing Images.
Layout Packages
As an alternative to exporting image and vector representations of plots, Tecplot 360 supports the Packaged Data layout format, or layout packages. A layout package (exported from Tecplot 360 as an .lpk file rather than as a .lay file) contains the data needed for the layout, and only that data. You can reload the resulting file into Tecplot 360 for viewing and rotation. The plot will appear visually identical to the original plot, although you cannot manipulate the variables and other plot elements as in the source plot.
By streamlining the elements included in the exported file, the Packaged Data export reduces the size of the resulting LPK to an average of 25% of the original file size (although the reduction varies greatly depending on what the original layout includes).
To export your current (3D Cartesian) plot with the Tecplot Viewer export format, choose from the menu. In the dialog that appears, select as the format, and click OK.
To reduce the file size, the lightweight file includes only the following.
-
Data for only the current surfaces and lines drawn for the current plot
-
Derived elements (such as slices and iso-surfaces) as zones
-
The variables necessary to draw each zone (For example, if an iso-surface displays a contour flood, only the spatial variables and the contour variable data will be output to the file for that iso-surface’s zone)
-
Text, geometries, custom labels, and all visible data elements displayed on your plot
The following restrictions apply.
-
Only the active frame of a 3D Cartesian plot may be exported
-
Only the current time step of a transient data set may be exported
-
The plot must include at least one zone, slice, streamtrace, or iso-surface
-
Several plot features will not be reflected in the exported plot:
-
Finite element volume zones with the Contour or Shade layer enabled and a "Surfaces to Plot" setting other than "None" or "Boundary Faces" will not display.
-
Volume zones with the Scatter layer enabled and a "Points to Plot" setting other than "Nodes on Surface" or "Cell Centers Near Surfaces" will not display.
-
Finite element volume zones with the Scatter layer enabled and a point index I-Skip other than one (1) may render scatter symbols in different locations.
-
IJK blanking of ordered zones will not display.
-
Streamtrace arrowheads may render at different locations and with different sizes.
Saving the Exported File
When saving an exported file, the Select Exported File dialog appears. Navigate to the directory where you want to save the file and name it as desired, then click Save. The standard filename extension for the type of file being exported is automatically added to the name entered when appropriate.
Vector Graphics Format
Vector export files have device-independent resolution and thus can be easily resized, but they have the same limitations as vector print output. Table 1 provides a summary of the advantages and disadvantages of using vector graphics file formats.
| Advantages | Disadvantages |
|---|---|
Resolution Independent (can be re-sized over and over to any size) |
Does not support translucency |
Always journal quality (suitable for publication) |
Lines can appear different than on screen |
Small file sizes for XY and 2-D output |
Very large 3D output files |
Not Web-friendly |
|
Can be manipulated in third-party programs, but those programs are usually more expensive |
|
Needs a PostScript printer for proper output |
EPS Export
Encapsulated PostScript file (EPS) are PostScript files with additional commands that another program can use to determine the size of your plot. After you import your EPS file into another program, you can position it and usually resize it before printing.
| If you try to send an EPS directly to a printer, it may not be positioned correctly on the paper. Import the EPS to a word processor or page layout software to position it on the page. Use the PostScript export format to create files to send directly to a printer. |
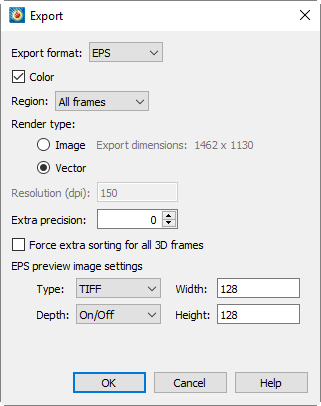
The dialog for EPS format has the following options:
- Color
-
Mark the checkbox to output in color. Otherwise output will be in grayscale.
- Region
-
Choose to export only the current frame, the smallest rectangle containing all frames, or the full work area.
- Render Type
-
If you choose Vector, the individual PostScript commands required to draw the image are saved. If you choose Image, a bitmap image is embedded in the file.
Vector mode generally results in a smaller file, and such graphics remain smooth when enlarged, but Image mode can accurately represent translucency or smooth color gradations, like other bitmap formats. In most cases, however, a TIFF, BMP, or PNG is a better choice than an Image EPS, as such files are more widely compatible.
When printing a vector EPS file to a non-PostScript printer, only a low-resolution preview image may be printed, depending on the operating system and print drivers. On Windows platforms, you must specify that the printer is a PostScript printer to print vector EPS files at their full quality. In most cases, Image mode EPSs will be printed correctly on any printer.
If you choose the render mode, the following option is available:
- Resolution
-
Enter the resolution of the image in dots per inch. Larger values create more accurate plots, but result in larger file sizes.
If you choose the render mode, the following options are available:
- Extra Precision
-
Specify the number of decimal places to specify the size and position parameters in the vector-based EPS output. Larger values create more accurate plots, but result in larger file sizes.
- Force Extra Sorting for All 3D Frames
-
Toggle on to use extra sorting in all 3D frames. Overrides the setting in the Advanced 3D Control dialog. If selected, Tecplot 360 uses a slower, more accurate approach that detects and resolves problems with how, for example, intersecting objects are rendered.
- EPS Preview Image Settings
-
Tecplot 360 provides the following options for the preview image:
- Type
-
The type of the preview image, or None.
- None
-
No preview image information is included. If your application will not use such information, this minimizes the file size. However, the graphic will appear blank in most applications; it will appear correctly only when printed.
- TIFF
-
Include a monochrome or grayscale TIFF preview image. This is the most common preview image format. You may specify an image depth for the preview image in the drop-down.
- EPSIV2
-
Include a monochrome (one bit per pixel) Encapsulated PostScript Version 2 preview image. This is also a common preview image type in EPS files.
- FrameMaker
-
Include a monochrome preview image compatible with older versions of Adobe® FrameMaker®. This preview image type is rarely necessary, as newer versions of FrameMaker support TIFF previews.
- Depth
-
Specifies the number of shades of gray for the preview by how many bits of information is used per pixel. The larger the number of bits per pixel, the larger the resulting file, but the larger the number of shades available. Your options are:
- On/Off
-
One bit per pixel using an on/off strategy. All background pixels are made white (on), and all foreground pixels, black (off). This setting creates smaller files and is good for images with lots of background, such as line plots and contour lines.
- 1 Bit/Pixel
-
One bit per pixel using gray scale values of pixels to determine black or white. Those pixels that are more than 50 percent gray are black; the rest are white. This setting creates small files that might be useful for a rough draft or a preview image.
- 4 Bit/Pixel
-
Four bits per pixel resulting in sixteen levels of gray scale. This setting generates fairly small image files with a fair number of gray levels. This setting works well for most preview image purposes.
- 8 Bit/Pixel
-
Eight bits per pixel resulting in 256 levels of gray. This setting is useful for full image representation, but the files generated by this setting can be large.
- Width,Height
-
The size of the preview image.
| When using a Render Type of Image, these preview image width, height, and depth values are separate from the characteristics of the EPS image itself. The EPS image size is determined by the Resolution setting and the depth is determined automatically. |
Performance Tips If exporting is taking an unusually long time, or you get an error message saying that the image cannot be exported, the most likely cause is that the image width you are trying to export is too large. Selecting a smaller image width will greatly speed up the export process.
For an image export size of Length x Width, the file size for an uncompressed true color image is approximately Length x Width x 3. Memory requirements to export such an image can be up to twice this size.
For 256 color images, the maximum file size is approximately Length x Width, but is usually less since all 256 color image files are compressed. However, the memory requirements for exporting are the same as they are for a true color uncompressed image.
PostScript (PS) Export
The dialog allows you to export plots in PostScript (PS). This format is usually used for printing directly to a printer or print spooler. It is recommended that you use the Encapsulated PostScript (EPS) format for importing into, for example, page layout or illustration applications. See EPS Export for details.
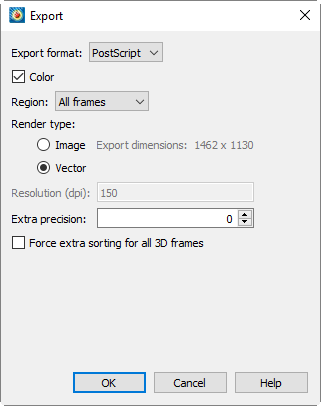
The Export dialog for the PostScript format has the following options:
- Color
-
Mark the checkbox to output in color. Otherwise output will be in grayscale.
- Region
-
Choose to export only the current frame, the smallest rectangle containing all frames, or the full work area.
- Render Type
-
If you choose Vector, the indivdual PostScript commands required to draw the image are saved. If you choose Image, a bitmap image is embedded in the file.
Vector mode generally results in a smaller file, and such graphics remain smooth when enlarged, but Image mode can accurately represent translucency or smooth color gradations, like other bitmap formats. If you choose the render mode, the following option is available:
- Resolution
-
Enter the resolution of the image in dots per inch. Larger values create more accurate plots, but result in larger file sizes.
If you choose the render mode, the following options are available:
- Extra Precision
-
Specify the number of decimal places to specify the size and position parameters in the vector-based EPS output. Larger values create more accurate plots, but result in larger file sizes.
- Force Extra Sorting for All 3D Frames
-
Toggle on to use extra sorting in all 3D frames. Overrides the setting in the Advanced 3D Control dialog. If selected, Tecplot 360 uses a slower, more accurate approach that detects and resolves problems with how, for example, intersecting objects are rendered.
WMF Export
WMF (Windows Metafile) is a Microsoft vector graphics format widely accepted by Windows applications. Since WMFs are vector graphics, they can be easily resized by the importing application without the introduction of visual artifacts, but they cannot accurately represent plots with translucency or smooth color gradations.
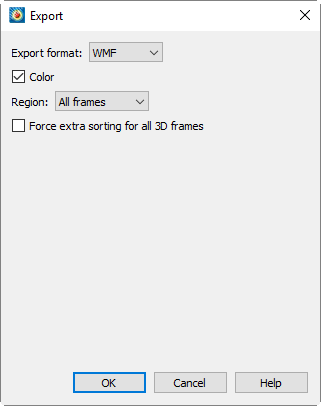
Selecting WMF from the Format drop-down displays WMF options:
- Color
-
Mark the checkbox to output in color. Otherwise output will be in grayscale.
- Region
-
Choose to export only the current frame, the smallest rectangle containing all frames, or the full work area.
- Force Extra Sorting for All 3D Frames
-
Toggle-on to use extra sorting in all 3D frames. Overrides the setting in the Advanced 3D Control dialog. If selected, Tecplot 360 uses a slower, more accurate approach that detects and resolves problems with how, for example, intersecting objects are rendered.
Image Format
Image output has the advantage of accurately representing translucency and smooth color gradations, but with the disadvantage of generally being larger than vector output, particularly when a high image resolution is specified, as may be necessary for printing. Image files are sometimes called raster or bit-mapped. Table 2 provides a summary of the advantages and disadvantages of image file formats.
| Advantages | Disadvantages |
|---|---|
Looks like the screen image, or better |
Resolution-dependent (starts to lose quality if enlarged too much) |
Adjustable export size |
For professional-quality printing, images will be very large |
Supports translucency |
|
Relatively small file size |
|
Easily managed by presentation packages |
|
Web friendly |
|
Easily manipulated in inexpensive 3rd party programs |
|
Prints on any printer |
Exporting Images with a Specific DPI
A characteristic of image files is a dots-per-inch setting (DPI), which interacts with the pixel dimensions of the image to determine how large it will be printed. To customize the DPI of your exported image, first set the width of the frame to the size of the image that you wish to export, using the dialog (accessible by selecting "Edit Active Frame" from the menu). Next, when actually exporting the image, multiply the frame width (in inches) by the desired DPI, and enter that number in the Enter Width field of the dialog.
For example, to export a 4 inch by 6 inch image at 300 DPI, set the frame dimensions to 4 inches by 6 inches, and then when exporting, enter a width of 1200 (4 times 300).
BMP Export
BMP (Bitmap) is an image format, and thus accurately represents plots with translucency and smooth color gradations. Although it originated on Windows, it is widely accepted on other platforms by many applications. However, it does not perform any compression, so file sizes are larger than more modern formats such as JPG and PNG.
BMP is always exported in color. The BMP export options are shown below.
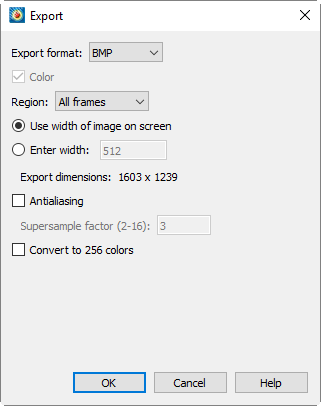
- Region
-
Choose to export only the current frame, the smallest rectangle containing all frames, or the full work area.
- Use Width of Image on Screen
-
Select this option to generate an image file the same size as the current plot on the screen.
- Enter Width
-
Select this option to specify a width (in pixels) for the generated image. A larger width increases the quality of your image. However, the greater the width you specify, the longer it will take to export the image and the larger the exported file.
- Antialiasing
-
Select this option to smooth jagged edges in the image. See Antialiasing Images for details.
- Supersample Factor
-
Control the amount of antialiasing used in the image. See Antialiasing Images for details.
- Convert to 256 Colors
-
Select this option to generate an image with only 256 colors (down from a possible 16 million colors). Tecplot 360 selects the colors. This option can help reduce file size, but the results may be suboptimal; using it with transparency, smooth color gradations, or antialiasing may result in poor image quality.
Performance Tips
If exporting is taking an unusually long time, or you get an error message saying that the image cannot be exported, the most likely cause is that the image width you are trying to export is too large. Selecting a smaller image width will greatly speed up the export process.
For an image export size of Length x Width, the file size for an uncompressed true color image is approximately Length x Width x 3. Memory requirements to export such an image can be up to twice this size.
For 256 color images, the maximum file size is approximately Length x Width, but is usually less since all 256 color image files are compressed. However, the memory requirements for exporting are the same as they are for a true color uncompressed image.
JPEG Export
JPEG (Joint Photographic Experts Group) is an image format, and thus accurately represent plots with translucency and smooth color gradations. However, JPEG is a highly-compressed, "lossy" format, meaning the exported file may not be identical to the plot. This can result in poor image quality for some types of images. The advantage of JPEG is very small file sizes and near-universal acceptance on the Internet.
JPEG supports different levels of compression, and Tecplot 360 allows you to control the image quality (and thus, inversely, the file size).
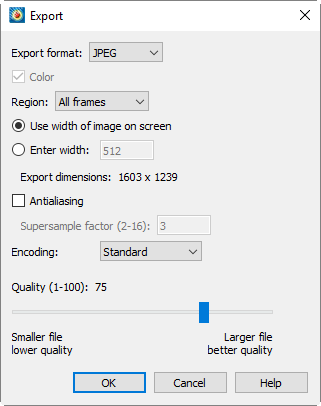
JPEG images are always exported in color. When you select JPEG in the dialog, you have the following options:
- Region
-
Choose to export only the current frame, the smallest rectangle containing all frames, or the full work area.
- Use Width of Image on Screen
-
Select this option to generate an image file the same size as the current plot on the screen.
- Enter Width
-
Select this option to specify a width (in pixels) for the generated image. A larger width increases the quality of your image. However, the greater the width you specify, the longer it will take to export the image and the larger the exported file.
- Antialiasing
-
Select this option to smooth jagged edges in the image. See Antialiasing Images for details.
- Supersample Factor
-
Control the amount of antialiasing used in the image. See Antialiasing Images for details.
- Encoding
-
Choose an encoding method for the JPEG file.
- Standard
-
Encodes a JPEG one line at a time, starting at the top line. In most Web browsers, this means nothing appears until the image has been completely loaded.
- Progressive
-
Encodes the JPG in two passes, first at lower quality and then at higher quality. In a Web browser, this means that a lower-quality version of the image appears quickly, then is replaced with a larger version of the image when the file has been completely loaded.
Given the same Quality level, encoded JPEG files generally look better than equivalent encoded JPEG files. However, they have a larger file size.
- Quality
-
Select the quality of JPEG image. Higher quality settings produce larger files and better looking exported images. Lower quality settings produce smaller files. A quality setting of around 75 is usually optimal; settings much below this may visibly degrade image appearance, while higher settings usually do not provide much visible improvement but create larger files.
Performance Tips
If exporting is taking an unusually long time, or you get an error message saying that the image cannot be exported, the most likely cause is that the image width you are trying to export is too large. Selecting a smaller image width will greatly speed up the export process.
For an image export size of Length x Width, the file size for an uncompressed true color image is approximately Length x Width x 3. Memory requirements to export such an image can be up to twice this size.
PNG Export
PNG (Portable Network Graphics) is an image format, and thus accurately represent plots with translucency and smooth color gradations. Unlike JPEG images, PNGs can exactly represent a plot without losing any nuance.
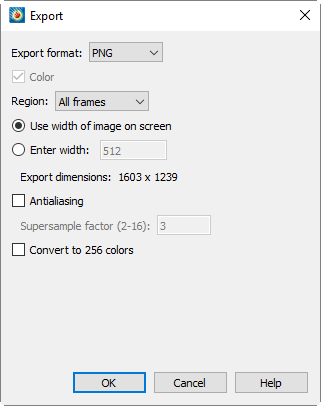
PNG images are always exported in color. When you select PNG in the dialog, you have the following options:
- Region
-
Choose to export only the current frame, the smallest rectangle containing all frames, or the full work area.
- Use Width of Image on Screen
-
Select this option to generate an image file the same size as the current plot on the screen.
- Enter Width
-
Select this option to specify a width (in pixels) for the generated image. A larger width increases the quality of your image. However, the greater the width you specify, the longer it will take to export the image and the larger the exported file.
- Antialiasing
-
Select this option to smooth jagged edges in the image. See Antialiasing Images for details.
- Supersample Factor
-
Control the amount of antialiasing used in the image. See Antialiasing Images for details.
- Convert to 256 Colors
-
Select this option to generate an image with only 256 colors (down from a possible 16 million colors). Tecplot 360 selects the colors. This option can help reduce file size, but the results may be suboptimal; using it with transparency, smooth color gradations, or antialiasing may result in poor image quality.
Performance Tips
If exporting is taking an unusually long time, or you get an error message saying that the image cannot be exported, the most likely cause is that the image width you are trying to export is too large. Selecting a smaller image width will greatly speed up the export process.
For an image export size of Length x Width, the file size for an uncompressed true color image is approximately Length x Width x 3. Memory requirements to export such an image can be up to twice this size.
For 256 color images, the maximum file size is approximately Length x Width, but is usually less since all 256 color image files are compressed. However, the memory requirements for exporting are the same as they are for a true color uncompressed image.
TIFF Export
TIFF (Tagged Image File Format) is an image format, and thus accurately represent plots with translucency and smooth color gradations. Tecplot 360 generates both color and gray-scale TIFF images.
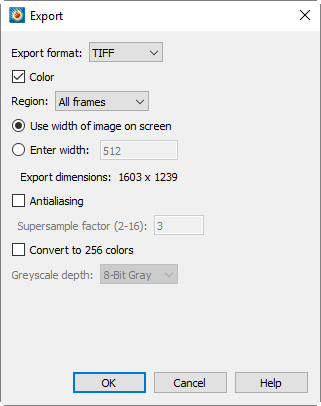
When you select TIFF in the dialog, you have the following options:
- Color
-
Mark the checkbox to output in color. Otherwise output will be in grayscale.
- Region
-
Choose to export only the current frame, the smallest rectangle containing all frames, or the full work area.
- Use Width of Image on Screen
-
Select this option to generate an image file the same size as the current plot on the screen.
- Enter Width
-
Select this option to specify a width (in pixels) for the generated image. A larger width increases the quality of your image. However, the greater the width you specify, the longer it will take to export the image and the larger the exported file.
- Antialiasing
-
Select this option to smooth jagged edges in the image. See Antialiasing Images for details.
- Supersample Factor
-
Control the amount of antialiasing used in the image. See Antialiasing Images for details.
- Convert to 256 Colors
-
Select this option to generate an image with only 256 colors (down from a possible 16 million colors). Tecplot 360 selects the colors. This option can help reduce file size, but the results may be suboptimal; using it with transparency, smooth color gradations, or antialiasing may result in poor image quality.
- Grayscale Depth
-
For grayscale images, this specifies the number of shades of gray by how many bits of gray-scale information is used per pixel. The larger the number of bits per pixel, the larger the resulting file. Your options are:
- On/Off
-
One bit per pixel using an on/off strategy. All background pixels are made white (on), and all foreground pixels, black (off). This setting creates small files and is good for images with lots of background, such as line plots and contour lines.
- 1 Bit/Pixel
-
One bit per pixel using gray scale values of pixels to determine black or white. Those pixels that are more than 50 percent gray are black; the rest are white. This setting creates small files that might be useful for a rough draft or a preview image.
- 4 Bit/Pixel
-
Four bits per pixel resulting in sixteen levels of gray scale. This setting generates fairly small image files with a fair number of gray levels. This setting works well for most preview image purposes.
- 8 Bit/Pixel
-
Eight bits per pixel resulting in 256 levels of gray. This setting is useful for full image representation, but the files generated by this setting can be large.
Antialiasing Images
Antialiasing smooths jagged edges on text, lines, and edges of image output formats by the process of
supersampling. A large intermediate image is rendered and then reduced to the final image size. Each pixel on the final image is created from multiple rendered pixels. The width and height of the intermediate image are the width and height of the final image times some scale factor. This scale factor is called the Supersample Factor. You can use values from 2 to 16. Factors greater than 3 are seldom necessary. Large scale factors take a lot more time and memory. Some graphics cards limit the dimensions of rendered images to a maximum of 2048x2048 or 4096x4096 pixels, and thus Tecplot 360 cannot antialias if the intermediate image would be larger than this limit. Some graphics drivers do not report an error in such situations, instead producing blank or garbled images.
Antialiasing uses many colors. If you are exporting with the option activated, antialiasing works for plots with a very limited selection of colors (like a red mesh on a black field). Otherwise, antialiasing to 256 colors wastes time and may decrease plot quality.
Using animation formats can amplify the antialiasing and 256-color problem, as the same 256 colors must generally be used for colors in all frames of the animation. For these formats, try a test animation of a few steps with antialiasing on before creating the entire animation.
Clipboard Exporting to Other Applications
In general, the , , and commands on the menu work only within Tecplot 360. However, it is possible to copy the plot in a frame to the clipboard as an image using the following procedure:
-
With the
 selector
tool active, click the frame border to select the frame. Black dots
appear at the frame’s corners and at the midpoints of its edges.
 -
From the menu, choose .
An image of the frame’s plot is now on your system clipboard and can be pasted into documents in other applications. Note that the image captures the plot exactly as it appears on the screen, including its size.
Text may be copied and pasted into other applications using a similar procedure. Select the text object, choose , then paste the text into the other application.