Macros
Tecplot 360 provides two methods of scripting or automating your workflow: macros and batch processing. This chapter focuses on the Tecplot 360 menu options for recording and playing back macros. The Scripting Guide describes the Tecplot 360 macro language in detail.
Macros are very useful for performing repetitive operations such as setting up frames, reading in data files and layout files, manipulating data, and creating plots. Macros can also be used to drive Tecplot 360 batch jobs. For information on batch processing, see Batch Processing.
Macro Creation
Tecplot 360’s records a macro as you perform a sequence of actions interactively. Macros can be recorded in either Tecplot (.mcr) or PyTecplot Python (.py) format. PyTecplot Python scripts run outside of Tecplot 360, and may be run from either the command line or any Python IDE. See the PyTecplot Guide for more information.
After recording your macro, you can edit your macro file with a plain text editor to remove redundant operations, compress repetitive actions into loops, replace references to files with variable names, and otherwise modify the macro to make it more generic and flexible.
To record a macro with the dialog, select "Record Macro" or "Record PyTecplot" from the menu. Specify a macro file name in the or dialog and click Save to initiate the recording. The dialog remains open during the recording session.
|
Auto Redraw is disabled during macro recording. If necessary, you can manually redraw your plot by clicking the Redraw button in the Plot sidebar. |
While recording macros, you can use any of the following buttons on the dialog to add specific macro commands to your macro:
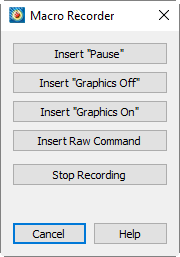
- Insert "Pause"
-
Adds a "pause" command to the macro. When you play a macro including a pause command, Tecplot 360 displays a message box when it reaches the pause command, and waits for you to click OK before continuing to process the macro.
- Insert "Graphics Off"
-
Adds a "graphics off" command to the macro. When you play a macro containing a "graphics off" command, Tecplot 360 stops displaying graphics in the workspace from the "graphics off" command until a "graphics on" command is encountered.
- Insert "Graphics On"
-
Adds a "graphics on" command to the macro.
- Insert Raw Command
-
Brings up a dialog in which you can enter any valid Tecplot macro command. For example, you can add
$!LOOP 10at the start of a section you want to repeat 10 times, then$!ENDLOOPat the end. See the Scripting Guide for information on the Tecplot 360 macro language. - Stop Recording
-
Select when you have completed the sequence of actions you want recorded.
The commands in a macro file typically rely on Tecplot 360 being in a
particular state. It is a good practice to use commands at the start of
a macro that force Tecplot 360 into a known state. For example, the
$!NEWLAYOUT command deletes all data sets and frames and
creates a single empty frame with a default size and position.
| Macros are more likely to be forward compatible (i.e. work with future releases of Tecplot 360) if the macro begins with a new layout or stylesheet. Refer to the Scripting Guide for more information. |
Macro Functions
When editing a macro file in a text editor, you can add macro function definitions and macro function calls. Macro functions have the following form:
$!MACROFUNCTION
NAME = functionname
.
.
.
$!ENDMACROFUNCTION
Between $!MACROFUNCTION and $!ENDMACROFUNCTION, you can include any legal macro command
except $!MACROFUNCTION.
For example, the following macro function turns on the Contour zone layer, turns off the Mesh zone layer, sets the contour plot type to for zones 1, 2 and 3, then chooses gray scale color mapping:
$!MACROFUNCTION
  NAME = "graycontour"
  RETAIN = Yes
  $!FIELDLAYERS SHOWCONTOUR = YES
  $!FIELDLAYERS SHOWMESH = NO
  $!FIELDMAP [1-3] CONTOUR{CONTOURTYPE = BOTHLINESANDFLOOD}
  $!GLOBALCONTOUR 1 COLORMAPNAME = "Grayscale"
  $!REDRAW
$!ENDMACROFUNCTION
The RETAIN parameter tells Tecplot 360 to retain the
macro function definition for use in subsequent macro calls; this allows
you to define a macro function once in some macro you load every time
you run Tecplot 360, and continue to use it throughout your Tecplot 360 session.
Use the $!RUNMACROFUNCTION macro command to call your
macro function. For example, to call the "graycontour" macro function
defined above, use the following macro command:
$!RUNMACROFUNCTION "graycontour"You can use the $!RUNMACROFUNCTION command within other
macro functions; calls may be nested up to ten deep.
To access parameters from within a macro function use "|n|", where n is the parameter number (do not include the double quotes). For example, the following function uses two parameters for the assignments to SHOWCONTOUR and SHOWMESH:
$!MACROFUNCTION
  NAME = "AssignContourAndMesh"
  $!FIELDLAYERS SHOWCONTOUR = |1|
  $!FIELDLAYERS SHOWMESH = |2|
$!ENDMACROFUNCTION
.
.
.
$!RUNMACROFUNCTION "AssignContourAndMesh" (YES,NO)
Linking to Geometries
Each geometry you create can be linked to a macro function. This macro function is called whenever the user holds down the control key and clicks the right mouse button on the geometry. Macro functions are specified with the field in the dialog. Only one macro function may be specified for each geometry.
The macro function must be defined in a macro file using the
$!MACROFUNCTION instruction as described in Macro Functions.
The macro file containing the variable must then be executed
so that the function is loaded into memory and available for use in the
current Tecplot 360 session.
A convenient way to handle this is to record a macro that opens the layout that contains the linked objects and then edit this macro using a text editor to also include the necessary macro functions. You can also simply include the macro functions in your tecplot.mcr file.
Macro Playback
Once you have created a macro file, you have four methods in Tecplot 360 for playing it back:
- From the command line
-
You can play a macro when Tecplot 360 is launched by including the name of the macro file on the command line, i.e.:
tecplot mymacro.mcrIf your macro file does not have the .mcr extension, run Tecplot 360 with the macro file by including the -p flag on the command line, such as:
tecplot -p mymacro.mmm - From the Tecplot 360 interface
-
You can play a macro from within Tecplot 360 by using the "Play Macro/Script" option on the menu.
- Using the Macro Debugger
-
Use the (accessed via ) to open, inspect, step through, and debug your macro file. See Macro Debugger for more information.
- Using the Quick Macro Panel
-
The (accessed via the menu) allows you to quickly play a macro function by clicking on the button in the panel that is linked to that macro function. See Quick Macro Panel for more information.
You can also launch Tecplot 360 and run a macro by dragging and dropping a macro file onto the Tecplot 360 icon. However, in this case, the macro file must have the .mcr extension. Otherwise, the file will be treated as an ASCII data file.
Quick Macro Panel
The , accessible by selecting "Quick Macros" from the menu, is a sidebar for playing your favorite or frequently-used macros. It initially appears docked to the right side of the main Tecplot 360 window, but like the other sidebars, it can be dragged out of the workspace to become a floating window, or docked with one or more other sidebars to suit your working habits. (See Sidebars for more information on working with sidebars.)
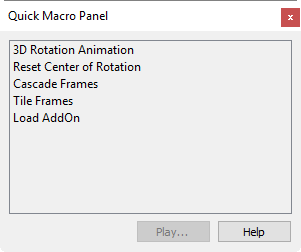
This panel comes with a number of useful macro functions already defined. To run any of these macros, select it in the list, then click the Play button, or simply double-click the macro name.
The Quick Macro Panel is linked to the special macro file tecplot.mcr,
which should contain only macro function definitions ($!MACROFUNCTION
instructions). The macro definitions having SHOWINMACROPANEL = TRUE
appear in the Quick Macro Panel. Other functions may be defined in
this file without this flag; these can be called by the macro(s)
displayed in the panel. You may also use the $!INCLUDEMACRO
instruction to include macro instructions from other files into the
quick macro file.
For information on how to load a quick macro file, see Custom Files loaded on Startup.
Macro Debugger
Use the , accessed via to step through and debug a macro file. This dialog allows you to add and delete breakpoints, view and set watch variables, and view the call stack.
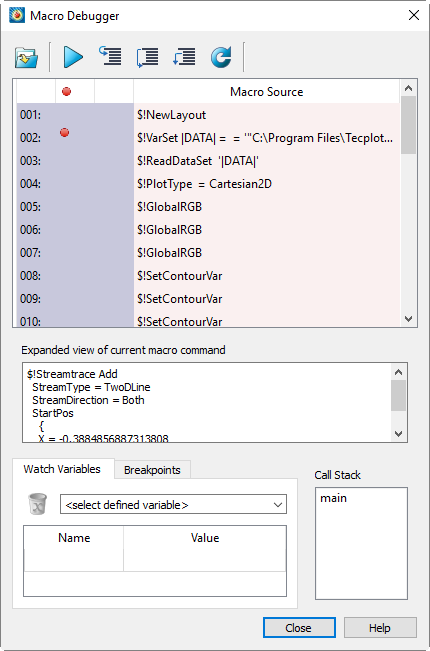
The displays the text of the currently loaded
macro file at the top of the dialog in the Macro Source area. The black
arrow  marks the line about to be
executed; it moves to the next command after the current command is executed.
Below this is a second area (ExpandedView) showing the complete command about
to be executed, as many macro commands are lengthy and may not be readable
in their entirety in the Macro Source area.
marks the line about to be
executed; it moves to the next command after the current command is executed.
Below this is a second area (ExpandedView) showing the complete command about
to be executed, as many macro commands are lengthy and may not be readable
in their entirety in the Macro Source area.
The Macro Debugger has the following buttons in its toolbar:
 Load a Macro file
-
Loads a macro file using the dialog, in which you can specify which macro file to load. Tecplot macro files typically have the extension
.mcr. Once you have loaded a macro file, it stays loaded in the Macro Debugger until you load a different one.  Continue
-
Plays the macro without stopping after each step, until the macro finishes or the Macro Debugger encounters a breakpoint.
- Step buttons
-
These three related buttons help you step through your macro line by line, pausing after each instruction has been processed. Checking the values of variables after each step is very helpful in finding and fixing problems. These buttons have slightly different functions, described below.
 Step Into
-
Executes the current macro command. When a $!RUNMACROFUNCTION command is encountered, the steps into the called function, so it too can be executed line by line.
 Step Over
-
Executes the current macro command. When a
$!RUNMACROFUNCTIONcommand is encountered, the entire function is processed as a single operation, instead of allowing you to step through it line by line.This is useful for functions that you have already verified to be working correctly and/or do not wish to step through, especially long ones.
 Step Out
-
Executes the rest of the current function at full speed, rather than line by line, until the end of the function (
$!ENDMACROFUNCTION) is encountered, then resumes single-stepping at the line after the$!RUNMACROFUNCTIONinstruction that called the function.This is useful when you have verified that a function is working correctly, and don’t need to continue stepping through it (especially in functions with loops) or have accidentally stepped into a function you don’t want to step through.
 Reset
Reset-
Stops the running macro, if any, and resets the macro to start running at the beginning again.
If your macro relies on Tecplot 360 being in a particular state when it starts processing (that is, it does not begin with loading or creating a layout), make sure Tecplot 360 is in this state before you click . Otherwise, the results of the macro may not be what you expect.
A convenient way to handle state with macro resets is to save a layout before beginning debugging, then reload this layout if you need to reset.
The Macro Debugger has the following three areas at the bottom of the dialog. Watch Variables and Breakpoints share the same space; use the provided tabs to switch between them.
- Watch Variables
-
Displays the values of selected macro variables as you step through the code, and allows you to add and remove variables to be watched. See Watching Variables.
- Breakpoints
-
Displays the breakpoints set in your macro and allows you to delete any or all of them easily. See Using Breakpoints.
- Call Stack
-
Displays all function calls currently executing. When one function calls another, which calls another, and so on, this area displays the name of all these functions in the order they were called. The name main represents the top-level script (instructions outside of any functions).
Watching Variables
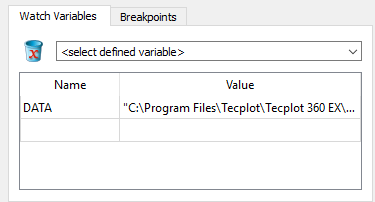
The Watch Variable panel at the bottom of the Macro Debugger allow you to set variables to be displayed while your macro runs. You can add a variable to be watched by choosing it from the pop-up menu here. To stop a variable from being watched, click it in the list of watched variables, then click the delete (trash) icon.
Using Breakpoints
A breakpoint is a point in your code where you wish to pause execution, usually just before some macro instructions you are having trouble with. Using the Continue button, your macro runs at full speed until it reaches a breakpoint. You can then inspect variables or the call stack and see the next several lines to be executed, then step through the macro a line at a time using the appropriate Step buttons in the toolbar to see how they behave.
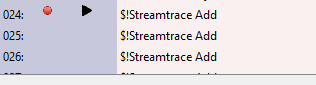
Breakpoints are shown as red discs to the left of each line of code in the Macro Source field. To set a breakpoint at a particular line of your macro, click to the left of that line. A red disc appears next to that line to indicate that execution will pause just before that line is executed. You can remove the breakpoint by clicking again.
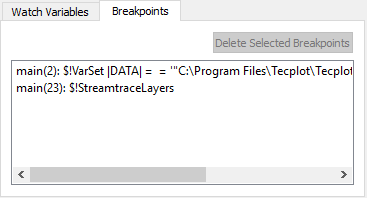
The Breakpoints area at the bottom of the Macro Debugger dialog display information about where each breakpoint is set: the function it’s in ("main" if it’s outside a function), its line number, and the macro command. You can delete breakpoints from this area by selecting them and clicking . (This is the fastest way to delete all breakpoints.)