Saving and Reusing Views and Plots
As you work with your project data in Tecplot RS, you may find it useful to be able to save an interesting plot or view so that you can quickly return to it later. You can do this in three different ways:
-
-
Stores the current 3D view (rotation, center, and perspective) as the main 3D view of your project. Later, you can easily return to this view. This view is stored in and saved with your Tecplot RS project file.
-
-
-
Define plot settings that you can apply to any data set, not just the current one. Settings included in templates include plot type, paper layout, multi-frame settings, variable selections, and layer toggles. Templates are saved in files on your computer and are not associated with any particular data set or project.
-
-
-
Stores plot settings that apply to a particular data set. This includes everything stored in a template, plus data-dependent options such entities, time steps, and view (pan, zoom, rotate). The only settings not saved in the Gallery are the settings in Plot Options (which apply to all plots in the project). Gallery plots are stored in and saved with your Tecplot RS project file.
-
Custom 3D View
When the active frame contains a 3D plot, you can choose from the menu to store that plot’s rotation, center, and perspective. (Only the 3D view is saved; other plot characteristics, such as the data set and style, are not saved.) Later, you can return to this view by choosing , or by clicking the Reset View button on the toolbar. The custom 3D view is stored in and saved with your project file.
| The keyboard shortcut for Save Custom 3D View is Ctrl+3. |
Only one custom 3D view can be saved per project. If you save a custom 3D view when one already exists in your project, the one being saved replaces the previously-saved one.
Templates
Templates store data-independent plot settings and can be applied to data sets other than the one used to create them. We suggest you create a folder specifically for storing your templates. This folder does not need to be the same location as your project file or data files. Having a single folder containing all your templates usually works well, since templates are designed as "generic" in nature, for use with multiple different projects.
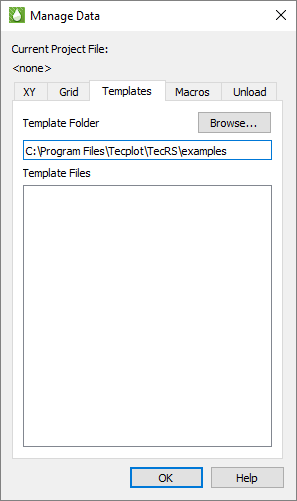
You can change the location of the Template Folder at any time by choosing from the menu. This launches the Manage Data dialog with the Templates page open.
To change the Template Folder, click the Browse button and choose a new folder, or type the location into the text field. Tecplot RS scans the specified folder for files with the template extension (.rstmpl) and lists file names of any templates it finds in the Template Files box.
Saving Template Files
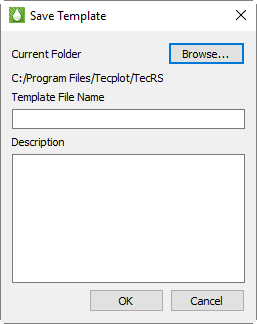
Once you create plot settings that you want to save as a template, choose from the menu. The dialog shows the folder currently chosen for template files associated with this project. Any template files you create will be saved in this folder. You can change the folder by clicking the Browse button.
Type a descriptive file name for your template file in the Template File Name text field. If you wish, you can type a description of the plot you are saving in the Description field.
| Keep lines short and press Enter for each new line. This will make the description easier to read when it appears in the dialog that lets you choose to apply a template. |
Click OK, and Tecplot RS will save the template file. Tecplot RS automatically adds the file name extension .rstmpl.
Applying Template Files
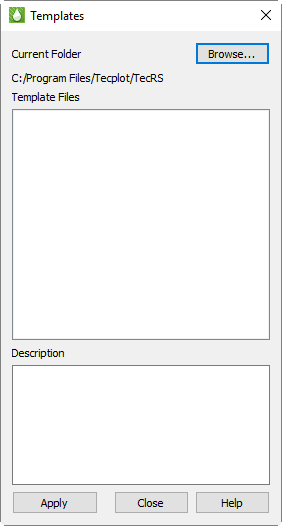
Once you have saved a template file, you can apply it by choosing "Apply" from the menu, and choosing the template to which you wish changes to be applied. Tecplot RS remembers the last 10 template files that have been applied. If you do not see the desired template file in the list, choose after in the menu to launch the Templates dialog.
The Templates dialog displays a list of all the template files that Tecplot RS found in the current template folder. You can change the template folder by clicking the Browse button. To apply one of the templates, choose it in the list and click the Apply button.
Since the template defines the plot type, applying a template may change the sidebar as well as the view. It can also change the paper size and orientation, since the template also stores this information.
Templates record the variables to be displayed in each frame. It is possible that the variables in use when the template was created may not exist in the current data set. Tecplot RS checks variable aliases and attempts to find a match. If it does not find one, it uses reasonable defaults.
The template file does not include other data set-dependent items. For example, a 3D Grid plot’s template will save the fact that you are viewing IJK slices with the ghost turned on, but the choice of which IJK slices to view is saved in the grid state file. Other data set-dependent items not included in the template file include the current time step and any Inside View options.
Template File Contents
Template files are XML files that include information needed to re-create a particular plot. This information includes:
-
The current plot type (XY Variables, XY Entities, 3D Grid, or another plot type).
-
The current Paper Layout design.
-
Multi-frame options.
-
Global plot settings, such as the state of many options in the sidebar.
-
Individual frame settings, such as the variables chosen for display in each frame.
Tecplot RS organizes each template in a separate file, in XML format. Using an XML editor or text editor, you can view and edit the template manually. However, it is much easier (and safer) to make changes using the Tecplot RS interface.
Managing Template Files
Use the Templates page of the Manage Data dialog (accessible by clicking the Manage Data button in the toolbar or from the menu), to change the folder from which to load template files. The Template Files region of the dialog displays all of the files housed within the folder listed in the Template Folder field.
Bookmark Gallery
The Bookmark Gallery allows you to create a collection of plots. Plots saved in the Bookmark Gallery are not images, but snapshots of the settings you used to create the plot. Virtually everything about the plot is saved except for the settings in the Plot Options, which are shared by all plots in the project. (The XY Freestyle plot type has its own settings for individual line styles, and so can be useful when you don’t want to change the line styles in all Gallery plots using Plot Options.) When you re-display a plot from the Bookmark Gallery, it restores the sidebar and all other settings dialogs to the state they were in when you added the plot to the Bookmark Gallery.
In general, any number of plots may be stored in the Bookmark Gallery, and there is no limitation on the number of plots of each type that can be stored. However, the Bookmark Gallery currently does not support the History Match or Flow Tables plot types, cell label options, inactive grid display options, pick blanking sections. Polyline geometries are not currently saved.
The Bookmark Gallery is part of your Tecplot RS project. Plots saved in the Bookmark Gallery are saved when you save a project, so if you do not save a project file, your Bookmark Gallery will be lost.
Bookmark Gallery plots work on the data sets loaded with the project. If those files change, for example with a new simulator run, the Bookmark Gallery plots will reflect the new data when the project is next opened.
Saving a Bookmark Plot
To save a plot in the Bookmark Gallery, choose from the menu and specify a name for the plot. Each plot must have a unique name; if you specify the name of a plot already in the Bookmark Gallery, you will be asked if you wish to replace the existing plot with that name.
| The name you specify here is not a file name, so it can contain characters that are not legal in filenames. Commas, quotes, asterisks, spaces, and other special characters may be used (up to 80 characters total); however, both slashes and backslashes will be replaced with vertical bars. |
You may also save a Bookmark Gallery plot using the Bookmark Gallery dialog (see following).
Managing the Bookmark Gallery
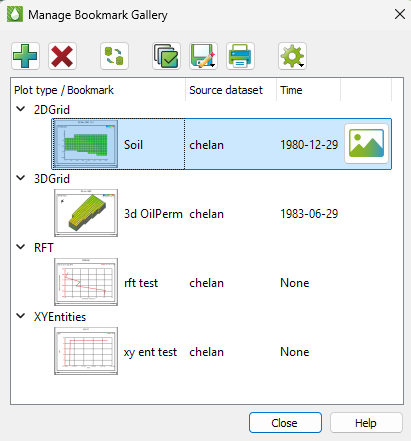
The Manage Bookmark Gallery dialog is opened by choosing Manage from the menu. The main section of this dialog contains a list of all saved Bookmark Gallery plots organized by plot type (this can be changed, see below), along with a preview image of the gallery plot. You can expand or collapse a plot type, showing or hiding the saved plots of that type, by clicking the small triangle next to the plot type.
| If you load a gallery that was saved with a previous version of Tecplot RS, it will not contain images. You can generate images for all bookmarks by clicking the "gear" icon and choosing |
You can select multiple plots for batch exporting by holding down the Ctrl or Shift key while clicking. Click a plot type to select all Bookmark Gallery plots of that type.
After selecting one or more plots, you may take the following actions using the toolbar buttons at the top of the dialog.
-
Display - To display a plot, click once on the row to select it, and then click the "Display" button
 located in the column to the right of the "Time" column. Only available if a single plot is selected.
You may also double-click a plot to display it. The
menu has a list of the most recently-used plots from the Gallery for
easy access.
located in the column to the right of the "Time" column. Only available if a single plot is selected.
You may also double-click a plot to display it. The
menu has a list of the most recently-used plots from the Gallery for
easy access. -
Export - To export one or more selected plots, click the "Save" toolbar button
 . This will display a menu where you can export the selected plot(s), or set export options. If you have selected
only one plot, you are asked to name the resulting image file. If you have
selected multiple plots, you are asked to choose a folder (or create a new
one). The exported plots will be placed in this folder and named according
to their name in the Bookmark Gallery, with the appropriate image filename
extension added. (Note that characters that are invalid in filenames will be
removed.). You can also rename a bookmark by clicking once on the name adjacent to the image, and then editing the name in place.
. This will display a menu where you can export the selected plot(s), or set export options. If you have selected
only one plot, you are asked to name the resulting image file. If you have
selected multiple plots, you are asked to choose a folder (or create a new
one). The exported plots will be placed in this folder and named according
to their name in the Bookmark Gallery, with the appropriate image filename
extension added. (Note that characters that are invalid in filenames will be
removed.). You can also rename a bookmark by clicking once on the name adjacent to the image, and then editing the name in place. -
Export Setup - Click the "Save" toolbar button and select "Export Setup" to choose the file format and options for the exported image (see Exporting a Single Image). If you do not set up your export, PNG file(s) with default settings are created.
-
Delete - To delete one or more Bookmark Gallery plots, select then and press the "Delete" key, or click the "Delete" toolbar button.

-
Swap Files Dialog - You can launch the Swap Files Dialog by clicking the swap files icon

-
Select All - To select all bookmark plots, click the "Select All" toobar button
 . You can also use the keyboard shortcut Ctrl+A, or select manually with the mouse.
 -
Print - Click the "Print" toolbar button
 to print the plot (see
Printing Your Plot).
to print the plot (see
Printing Your Plot). -
Group By - To group bookmarks, click the gear icon
 and select the "Group by" menu option. Plots may be grouped by Bookmark name, source dataset, or time step.
 -
Thumbnail Size - You can change the size of the thumbnail images by clicking the gear icon
and selecting "Thumbnail Size" menu option. -
Rebuilding Thumbnail Images - If you are importing Bookmark Gallery items from a previous version of RS (which did not store thumbnails), you can rebuild the thumbnails by clicking the gear icon and selecting the "Rebuild Thumbnails" menu options.
You can save a new plot to the Bookmark Gallery by clicking the "Add" toolbar button  (this is the same as choosing ). The Manage Bookmark Gallery dialog
may be left open while you work with Tecplot RS.
(this is the same as choosing ). The Manage Bookmark Gallery dialog
may be left open while you work with Tecplot RS.
Moving Bookmark Gallery Plots Between Projects
Since Bookmark Gallery plots are stored in the project file, moving them between projects requires some finesse. If the second project uses data files that are very similar in structure to the first project (in particular, the same variables), only with different file names, you may find useful to load different data files into the project containing the Bookmark Gallery plots you wish to use. The project may then be saved under a different name for later use with the swapped-in files. For more information, Swapping Data Files.
It may also be feasible to simply make a copy of the first project file and change the names of the data files it loads using a text editor. The copied project will have all the same project settings as the original, including its Bookmark Gallery.
In other situations, you can create a template from a Bookmark Gallery plot in one project, apply it to data loaded in a second project, and then save it as a Bookmark Gallery plot in that project. Because templates do not store all plot options, some additional work will be needed to fully recreate the plot in the second project, but applying the template will give you a significant head start.