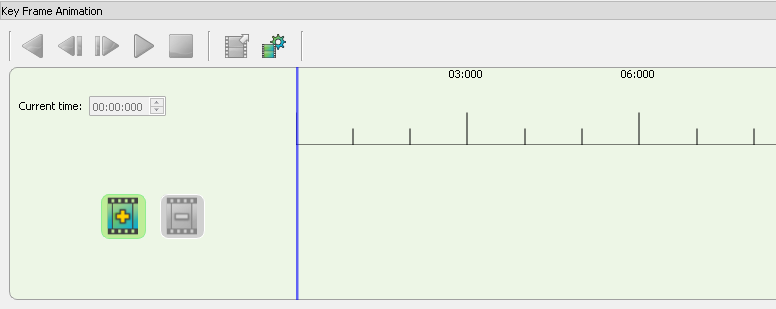
Key Frame Animation
With the key frame animation sidebar, you can easily animate a smooth progression through two or more specified views (key frames) and export them as an AVI or MP4 animation.
The Key Frame Animator sidebar can be viewed by selecting
| You must be in the "3D grid" plot type view in order to show the key frame animator. Also, at least one grid must be loaded. |
A Key Frame Animation is a series of one or more views along a timeline. A
"View" is a 3D position, rotation, and magnification. Key Frames are added
to the time line by clicking the  button, or by Right-Clicking on a position in the timeline and selecting
"Add key frame here" from the context menu.
button, or by Right-Clicking on a position in the timeline and selecting
"Add key frame here" from the context menu.
To run the animation, click the  button. RS will calculate all intermediate views between key
frames so that the animation will play smoothly though the progression of
key frames.
button. RS will calculate all intermediate views between key
frames so that the animation will play smoothly though the progression of
key frames.
| RS calculates and saves intermediate frames when they are added, rather than when the animation is played. This calculation may take more than few seconds, and you may see a progress bar at the bottom of the RS Window after adding, deleting, or moving a key frame. You may click Stop to cancel this calculation, but this is not recommended. If the intermediate frame calculation is cancelled, the animation will not include all intermediate frames. If cancelled, RS will attempt to re-compute the intermediate frames the next time a key frame is added, deleted, or a key frame time is changed. |
Key Frame Animation Quick Start
Follow the steps below to create a simple Key Frame Animation.
Start by loading a grid and switching RS to 3D grid view. From the menu, select . The key frame animation sidebar will be shown at the top of the RS view area. You may detach this sidebar and dock it at the bottom, or it may float outside of the RS view Window.
Using the toolbar buttons, change the position or magnification of the view.
Click the button to add
a key frame. By default, the first key frame is added at time 0 if there
are no existing key frames.
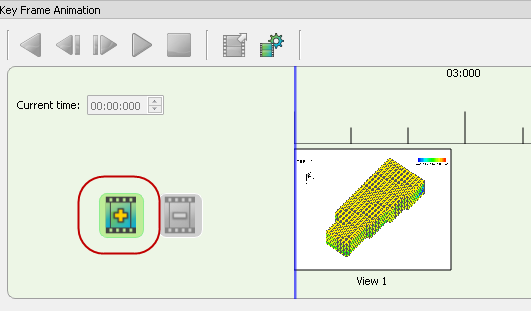
Each time a key frame is added, a snapshot of the current view is created and displayed on the key frame as a thumbnail image.
| Each key frame has a label which defaults to "View N". You can change this label to something more descriptive by clicking on the label. Labels are for you own use, and do not have to be unique. |
A key frame animation requires at least two key frames, so at this point
the button is not available.
Change the view of the plot, and then add another key frame.
You may notice a slight delay and a progress bar at the bottom of the screen. This is due to RS calculating all intermediate views between the two key frames. Once calculated, they will not be calculated again unless one of the key frames is moved.
Since there are now two key frames, the animation can be played. Click the
button. You will see a smooth
animation of all views between the two key frames.
| On the timeline, the key frame time position is indicated by the "UP" arrow on the left edge of the key frame |
You’ve now created your first key frame animation!
Saving Key Frame Animations
Key Frame animations are saved with other grid information in RS Project files (*.rsprj). If you have not edited a key frame animation for a grid, then an empty key frame animation is saved in the project file.
If the project file contains more than one grid, then a separate key frame
animation is saved in the project file for each grid. To edit the key frame
animation for a different grid, simply change the grid by clicking the
Manage Loaded Data button
 on the
RS Tool Bar.
on the
RS Tool Bar.
| The Key Frame animation sidebar will be hidden when the Manage Data dialog is launched. After selecting the new grid, go to to display the Key Frame Sidebar with the new selected grid. |
Intermediate key frames, and Key Frame preview images, are not saved in the project file. Preview images and intermediate frames will be recomputed the first time the Key Frame sidebar is displayed, but not until then. Therefore, the first time the Key Frame sidebar is displayed after loading a project file, you may see a progress bar as the preview images and intermediate frames are computed.
Exporting Key Frame Animations
Key Frame Animations may be exported as MP4 or AVI movie files.
To export a Key Frame Animation, click the Export button.
The controls of the Export Keyframe Animation dialog are:
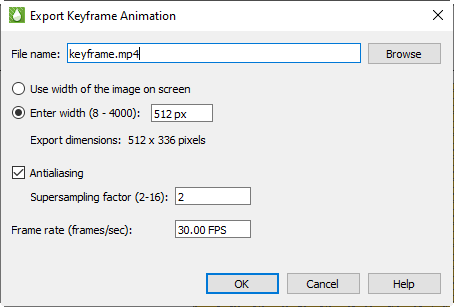
-
File Name - Enter the file name of the export. The file name must end in .mp4 (for MPEG4 output), or .avi (for AVI output). To select an output file, click the Browse Button.
-
Width - Enter width of the exported animation or you can choose "Use width of image on screen" to use the image size on screen
-
Antialiasing - Toggle-on Antialiasing to use antialiasing in your exported animation. Enter the Supersample Factor to control the amount of antialiasing used in the image. See Antialiasing Images for details.
-
Frame Rate - Enter the frame rate of the animation in frames per second (FPS).
| The higher the frame rate, the more intermediate frames must be calculated, and the longer it will take to create the animation. It is strongly recommend that Frames Per Second not exceed 30. |
Click OK to create the animation. You will see a progress bar at the bottom of the screen as the intermediate frames are calculated.
Key Frame Animation Settings
Certain animation setings which apply to all key frame animations are configurable, although with typical usage you should not need to change any of the settings from their defaults.
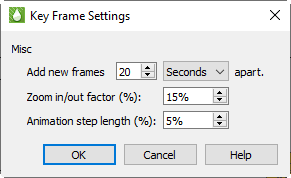
The settings for key frame animations is shown below:
-
Add new frames [N] [Seconds|Minutes] apart - Sets the time increment when the
button is clicked.
This value can be between 1 and 300 seconds. The default is 20 seconds.
| You can also add a frame at a specific time by Right-Clicking on the time line and selecting "Add new frame here". |
-
Zoom in/out factor (%) - Sets the amount of time to zoom in or out. The value is a percentage of the existing duration. Higher values will zoom faster, lower values will zoom slower.
| Animations cannot be longer than 60 minutes. |
-
Animation step factor (%) - Sets the amount the step forward and backward buttons
 increment on the time line.
Set in a percent of the total time on the time line.
increment on the time line.
Set in a percent of the total time on the time line.
Key Frame Sidebar Controls
The Key Frame sidebar contains the following controls:
-
Current time - This is the current position of the timeline marker. As you drag the timeline marker with the mouse, this time will change. You can also enter a time directly, and the timeline marker will move to that time.
-
"+" button - Adds a
key frame to the end of the animation. By default, key frames are added 20
seconds after the last frame. If there are no key frames, then the key
frame will be added at zero. You can also add a key frame by
Right-Clicking with the mouse at a location in the timeline, and
select "Add key frame here".
-
 "-" button -
Deletes the selected key frame. If you want to delete all key frames,
Right-Click on the timeline and select "Delete all key frames".
"-" button -
Deletes the selected key frame. If you want to delete all key frames,
Right-Click on the timeline and select "Delete all key frames". -
 "<" button - Play the animation
backwards. If the current timeline position is 0, then the timeline will jump
to the end and play backwards to time zero.
"<" button - Play the animation
backwards. If the current timeline position is 0, then the timeline will jump
to the end and play backwards to time zero. -
 "<|" button - Step backward
by a fixed percent of the view range.
"<|" button - Step backward
by a fixed percent of the view range.
| The "View Range" is the time shown in "Show To" minus the time shown in "Show From". For example, if "ShowFrom" is 1 minute (01:00:000) and "ShowTo" is 3 minutes (03:00:000), then the view range is 3-1 = 2 minutes. |
-
 "|>" button - Step forward by
a fixed percent of the view range.
"|>" button - Step forward by
a fixed percent of the view range. -
">" button - Play the animation
forward. This button is only available if there are at least two key frames,
or if there is a single key frame and the time for that key frame is > 0.
| When an animation is playing, no other interaction with RS is allowed. For example, the current RS sidebar, toolbars, and menu will not be available. The animation will play starting at the current timeline position, and continuing to the last key frame. |
-
 "[]" button - Stop the animation.
This button is only available if the animation is currently playing.
"[]" button - Stop the animation.
This button is only available if the animation is currently playing. -
 [Export] button - Export the animation
to an .mp4 or .avi file.
[Export] button - Export the animation
to an .mp4 or .avi file. -
 [Settings] button - Change
global settings for all key frame animations. For example, you can change the
default frame separation of 20 seconds when frames are added.
[Settings] button - Change
global settings for all key frame animations. For example, you can change the
default frame separation of 20 seconds when frames are added. -
[Show From] - This is the starting time of the timeline ruler. That is, To Time - From Time is the length of time displayed in the timeline ruler. This will change when zooming, for example, or you can type a new value directly into the edit field.
-
[Show To] - This is the ending time of the timeline ruler.
|
"Show From" must be less than "Show To". If you change the time such that "Show From" is >= "Show To", both ShowFrom and ShowTo will change to have red background ("Error mode"), and no all key frame functionality is disabled until the show from/to times are changed to be valid. There is also a minimum duration which is 30 seconds by default. If "Show To" - "Show From" is less than the minimum duration key frame will switch to error mode until show from/ show to are valid. If the key frame sidebar is closed while in error mode, the next time the key frame sidebar is shown, Show from/to times will be set to default (valid) values. |
-
 [Zoom In]/[Zoom Out] - Reduces
or expands the visible view time in the ruler by a fixed percent. The amount
of zoom is configurable in the settings dialog. Zoom out is limited to 59 minutes
(the maximum length of an animation). Zoom in is limited to one minute.
[Zoom In]/[Zoom Out] - Reduces
or expands the visible view time in the ruler by a fixed percent. The amount
of zoom is configurable in the settings dialog. Zoom out is limited to 59 minutes
(the maximum length of an animation). Zoom in is limited to one minute.
| You can also use the middle mouse wheel to zoom. Middle wheel up to zoom it, down to zoom out. |
Key Frame Sidebar Operations
Key Frame Time Line Marker
The Time Line marker is the vertical blue bar whose position indicates the current view. This marker can be dragged with the mouse to a new position, and the view will update to that position. When playing an animation the timeline marker will move as the animation is played. As you drag the timeline marker RS will update the view as the marker moves so that you can see the intermediate frames in the animation. The maximum position of the timeline marker is the time of the last frame.
The timeline marker also indicates the position which the animation will play from.
Selecting a Frame
To select a key frame, click on it once. The selected frame will be highlighted with a blue border. Note that only one frame may be selected at a time.
Using the mouse to move key frames along the time line
After you have added a view key frames, they can be moved by selecting them and dragging them to a different position in the timeline.
To select a key frame, single click anywhere on the preview image.
| Only one key frame may be selected at a time. Clicking anywhere outside of the selected key frame, or selecting a different key frame, will unselect the currently selected key frame. |
To move a selected key frame, simply drag to to a new position in the timeline.
When a key frame is moved RS will calculate any intermediate frames created by the new key frame position. This may take several seconds, and you may see a progress bar at the bottom of the screen.
| If you are dragging a key frame and want to cancel, move the mouse outside of the timeline while holding the left mouse button. The key frame will snap back to its original position. |
Placing the first Key Frame at a time greater than Zero
The first key frame is typically placed at time zero (00:00:000). However, you may move the first key frame so that it is placed at a time great than zero. In that case, the image from time 0 to the first key frame will be a static image of the first key frame. For example, if you place the first key frame at 30 seconds (00:30:000), then the animation from time 0 to time 30 seconds will be a static image of the key frame at time 30 seconds.
Key Frame Right Click Context Menu
Right-Clicking anywhere on the storyboard displays the key frame context menu.
Its operations are listed below:
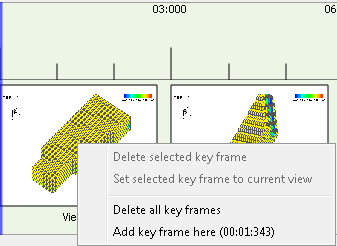
-
Delete selected key frame - Deletes the currently selected key frame. Available when a key frame is selected.
-
Set selected key frame to current view - Sets the selected key frame to the current view. Available when a key frame is selected.
-
Delete all key frames - Deletes all key frames. Available when at least two key frames have been added.
-
Add key frame here - Adds a key frame at the mouse position of the timeline. This menu option will show the time that at which the key frame will be added.