Loading Grid Data
Tecplot RS has many sophisticated functions for plotting both 2D and 3D representations of a reservoir model. As your first step, load a file containing data that you wish to plot.
Grid data sets generally consist of output from simulation programs. They include the actual grid geometry plus data that describe the subsurface properties, such as porosity, and/or values measured over time, such as oil saturation. You can load up to four different grid files into Tecplot RS at once.
Loading Grid Data
Choose "Load Grid Data" from the Project menu to begin the loading process. Use the File Type menu in the Load Grid Data dialog to specify the type of grid data you wish to load. Tecplot RS supports the following grid file types:
|
| CMG-format files can be processed on only Windows machines. However, once the initial processing is complete, the data may be loaded on Linux workstations. |
Tecplot RS can also load grid data contained in Virtual Database (VDB) folders. To begin loading data in this format, choose "Load VDB Data" from the menu.
After choosing the file or VDB case to be loaded, Tecplot RS displays a dialog to allow you to control the loading process. For more details on loading the supported formats, see the following sections:
Reservoir data files can be quite large, often requiring several gigabytes of disk space. Because the program must read data into the computer memory (RAM) before displaying it, large data files can quickly consume system resources. Data set sizes that cause this process to exceed the available RAM in the computer can adversely affect performance.
For this reason, Tecplot RS allows you to optimize the way Tecplot RS loads the files. For example, the first time you load a grid solution, Tecplot RS will automatically preprocess the grid and create a .rsgrid file that contains a compact form of the grid. The .rsgrid file uses less memory and speeds up the loading process for future loading of the solution. Additional options affect the appearance of the grid or its internal representation. See Loading APC Data for complete details.
| If you regularly load files containing millions of cells, consider using the RSPreprocess utility to generate your rsgrid_file prior to launching Tecplot RS to significantly speed up loading the files and to reduce memory use. |
Loading Inactive Cells
Tecplot RS 2009 R2 and later versions include the ability to display inactive cells (cells through which no fluid flows, and/or with no meaningful solution data for variables) along with active cells, in a contrasting display style, and/or with variable values. Tecplot RS automatically determines inactive cell data when loading the grid.
To display the inactive ceslls, toggle-on "Inactive" in the sidebar. See Inactive Cells for more information about the options available.
Saturation Variables
The reservoir simulator output defines saturation variables for each cell that sum to 1.0. Often the user will save space in the output file by excluding one of the saturation variables. Tecplot RS interprets the typical simulation cases, and it will automatically calculate and add the missing saturation variable to the internal data set.
Loading Eclipse/SLB Data
Tecplot RS reads Eclipse/SLB data (including Chears) from three or more file types, including:
-
grid Grid file, containing the grid geometry.
-
egrid Alternative format for the grid geometry.
-
init Init file, containing time-independent properties, such as porosity or permeability.
-
unrst Unified restart file, containing time stepped (recurrent) values such as pressure and oil saturation for all time steps.
-
Xnnnn Individual restart files, which contain each time step in a separate file.
You may notice that the list of grid files includes files with extensions of .grid, .egrid, and .fgrid. Tecplot RS does not actually support .fgrid files, but they appear in the list because of the way the names are filtered. If you choose an .fgrid file, Tecplot RS will use either a .grid or .egrid file, if available.
In most cases, you need to specify only the grid file. Tecplot RS will automatically find the additional files, provided that the root names match that of the grid file. If both unified and non-unified restart files are available, Tecplot RS will use the unified file.
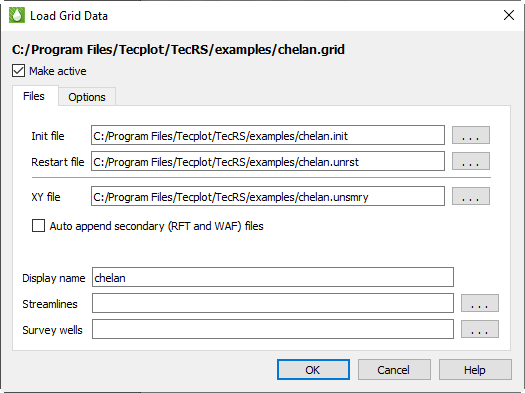
To begin loading Eclipse or Chears data, choose "Load Grid Data" in the menu. In the Open File dialog, choose "Eclipse(SLB)" from the file type menu and select a .grid file to open. The Load Grid Data dialog for Eclipse/SLB data has two pages (Files and Options) like the other grid data dialogs.
Use the Files page of the Load Grid Data dialog to specify the associated file(s) you wish to load, including init, restart, and XY data files. Tecplot RS automatically detects most associated files if they use the same base name as the selected grid file. If any files are not detected because they have different base names, use the browse buttons next to each field to choose the correct file.
The Files page has the following additional options besides specifying the Eclipse data files associated with the grid:
-
Make Active Toggle-on Make Active to make this grid the active grid once loaded. It is toggled on by default for the first grid loaded, and off for subsequent grids.
-
Auto-append secondary (RFT and WAF) files Toggle-on "Auto-append secondary (RFT and WAF) files" in the Load Grid Data dialog to automatically append RFT and/or WAF files to the data set. If you toggle-on this option, for each Eclipse .unsmry file that Tecplot RS loads, it loads an RFT file (with either an .rft or .frft extension) and/or a WAF file (.waf or .rswaf extension) having the same root file name, if found, and appends it to the corresponding Eclipse .unsmry file.
-
Display name Enter a name by which the data set will be known within in Tecplot RS. This defaults to the name of the selected grid file, but may be changed.
-
Streamlines Optionally, click the browse button next to the Streamlines field to specify streamline data in FrontSim .slnspec format.
-
Survey Wells Optionally, click the browse button next to the Survey Wells field to specify survey well data to load.
After you have specified the file(s) you wish to load, you can either click OK or switch to the Options page of the Load Grid Data dialog to specify any additional loading preferences. See Loading APC Data for details.
Loading VIP Map Data
In VIP files, the grid and solution data are both stored in files with a .map extension. Tecplot RS supports only Fortran-format binary VIP files. In the case of VIP formats, one .map file contains the grid geometry and static properties. Another .map file, chosen separately, contains the time-dependent variables.
Tecplot RS makes "Date" or "Time" available to the user for use in their plots. However, VIP files contain Date information only. Tecplot RS sets the Time value for each time step as the number of days from the first day in the file.
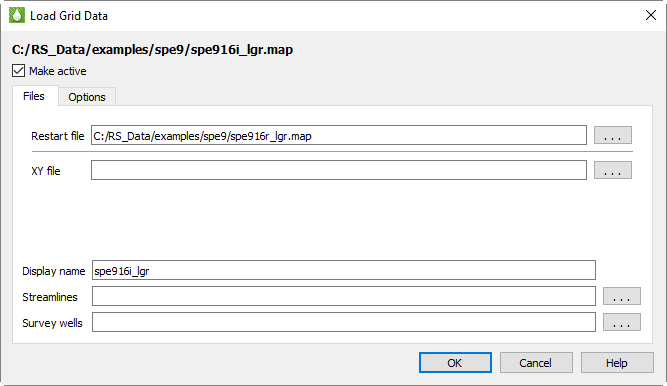
To load VIP files, choose "Load Grid Data" from the menu and choose VIP Map from the file format menu in the Open File dialog. Then select the main VIP .map file, sometimes referred to as the "init" file, containing the grid and static properties. After clicking Open, the Load Grid Data dialog appears, with two pages (Files and Options).
Put the "init" data in the Grid field, and the "recurrent" file in the Solution Data field on the Files page of the Load Grid Data dialog. You can specify the variable used to identify inactive cells on the Options page of the Load Grid Data dialog.
Files
Use the Files page of the Load Grid Data dialog to specify the file(s) you wish to load. You may choose a restart file (which contains the time-based variables) and/or an XY data file.
The Files page has the following additional options besides specifying the additional VIP data files associated with the grid:
-
Make Active Toggle-on Make Active to make this grid the active grid once loaded. It is toggled on by default for the first grid loaded, and off for subsequent grids.
-
Display name Enter a name by which the data set will be known within in Tecplot RS. This defaults to the name of the selected map file, but may be changed.
-
Streamlines Optionally, click the browse button next to the Streamlines field to specify streamline data in FrontSim .slnspec format.
-
Survey Wells Optionally, click the browse button next to the Survey Wells field to specify survey well data to load.
After you have specified the file(s) you wish to load, you can either click OK or switch to the Options page of the Load Grid Data dialog to specify any additional loading preferences.
Options
Use the Options page of the Load Grid Data dialog to specify your preferences for the use of the RSGRID file, Optimization and Inactive Cells.

-
Make Active Toggle-on Make Active to make this grid the active grid once loaded. It is toggled on by default for the first grid loaded, and off for subsequent grids.
-
RSGrid file options
The RSGrid file contains the grid geometry in an internal, proprietary format. This format compresses the data and allows more memory efficient data loading. Use the radio buttons to specify whether to:
-
Use the previous settings in the file.
-
Overwrite the RSGrid file with the settings in the new dialog.
-
Force creation of a new RSGrid file (even if the settings have not changed). This will create an rsgridi file as well, to control the inactive cells in your grid plot.
-
You can delete the rsgrid file at any time, but Tecplot RS will recreate it the next time you load the file. You can also create RSGrid files externally with the RSPreprocess utility. Refer to RSGRID File Format and RSPreprocess for additional information.
-
Optimization
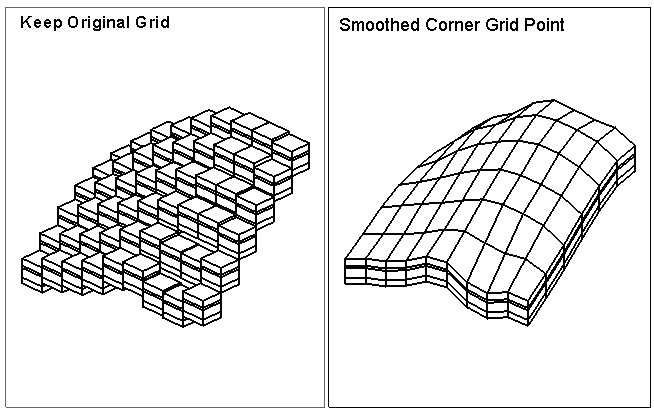
Tecplot RS can perform grid optimization to smooth the grid and remove unnecessary nodes inherent to corner point grids. Choose from three options:
-
With "Keep original grid" chosen, Tecplot RS does not perform any smoothing. However, to improve performance, it will still attempt to share duplicate nodes. The Node sharing tolerances define how close values must be for Tecplot RS to consider them a match.
-
| The "Keep original grid" option is intended to preserve the grid provided in the original file. However, since grids often include distortion, Tecplot RS uses tolerances to force node-sharing at logically identical cell nodes. If these nodes fall within the specified tolerances, Tecplot RS eliminates the redundant nodes to reduce memory and speed up rendering. This operation that eliminates nodes is a form of smoothing. Larger tolerances allow greater smoothing. Thus, choosing "Keep original grid" can provide a smooth version of the original grid. It becomes more apparent as you increase the tolerances. |
-
With "Create corner point grid - Shift" chosen, Tecplot RS joins the face of one cell to the adjacent face in the next higher-numbered plane.
-
With "Create corner point grid - Average" chosen, Tecplot RS joins faces, but calculates new Z-values for the corners by averaging the nodes on the joined faces. If you set your simulator to output a smooth corner point grid, these options will have little or no effect on the appearance.
If NNCs (Non-Neighbor Connections) exist in the grid, Tecplot RS will NOT smooth the grid across the NNC plane. Hence, Tecplot RS will preserve faults with specified NNCs.
| Smoothing a corner-point grid does NOT change the variable values (pressure, saturations, and so forth). Smoothing affects only the shape of the grid. |
In the absence of NNC definitions, smoothing a corner point grid with faults may result in highly distorted cells. In these cases, use the "Keep original grid" selection.
-
Tolerances
Although Tecplot RS does not perform smoothing when "Keep original grid" is chosen in the Optimization region of the Options page, to improve performance, it will still attempt to share duplicate nodes. The Tolerances define how close values must be for Tecplot RS to consider them a match. The tolerances only activate when "Keep original grid" is chosen.
Horizontal (XY) and vertical (Z) tolerances are measured separately. In general, a minimum tolerance of around 2% of the average cell size is recommended - this will preserve the original geometry but will help reduce memory requirements and improve display performance. Increasing the tolerance to 10% of the average grid size will further increase performance without significantly changing the geometry.
Applying the smoothing or node sharing calculations can be time consuming, especially for large grids. For this reason, the results of these optimizations are saved in a new grid file with an extension of RSGRID. Once the RSGRID file has been calculated, the program reads from it instead of the original grid file, which greatly reduces file load time.
Tecplot RS also includes a stand-alone executable named RSPreprocess. You can set this program to run at the end of a simulator run to make the more efficient RSGRID file available immediately.
Tecplot RS applies these optimization functions when loading a file. You cannot use these settings to change files once they are loaded.
-
Inactive Data
Use the Inactive Cells region of the dialog to specify the criteria to identify inactive cells, and/or load additional inactive cells.
-
Identify Cells as Inactive
Use the Var Name field to specify the variable to use, the menu to specify the comparison criteria, and the Value field to specify the comparison value. If Tecplot RS does not find the specified variable in the init file, it will mark no cells as inactive. It does not consider variables in the recurrent .map file.
-
| Tecplot RS will override any conditions specified here with any existing rsgrid file UNLESS you choose either "Update RSGRID file with these settings" or "Create a new RSGRID file" at the top of the dialog. |
Loading a VDB Case
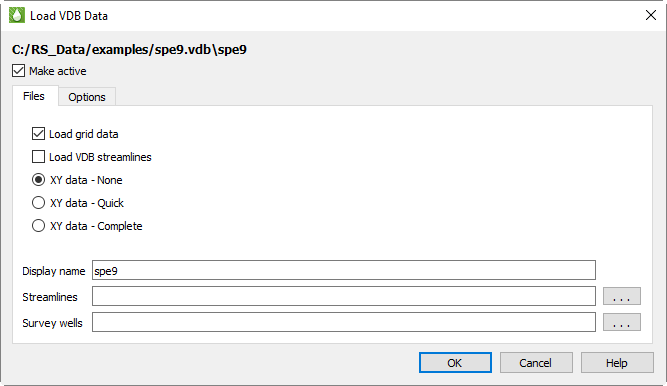
Tecplot RS includes capability to load virtual databases (VDB), by specifying one or more folders that contain the database of files (or "cases"). This kind of grid data is stored in a database file structure within a folder that ends with a .VDB filename extension. To begin loading a VDB case, choose "Load VDB Data" from the menu. Select the case folder inside the top-level VDB folder in the Select VDB Case Folder dialog that appears. If there is only one case in the VDB, you may also choose the top-level VDB folder. The Load VDB Data dialog has two pages (Files and Options) with the options described following.
Use the File page of the Load VDB Data dialog to specify the data you wish to load from the VDB case folder you have selected. Tecplot RS automatically locates grid and XY data in the VDB folder. By default, both grid data and complete XY data are loaded.
If the VDB folder contains streamline data, this can be loaded at the same time by toggling on the Load VDB streamlines checkbox. You cannot load streamlines from the VDB folder and from a separate file at the same time.
The Files page has the following additional options:
-
Make Active Toggle-on Make Active to make this grid the active grid once loaded. It is toggled on by default for the first grid loaded, and off for subsequent grids.
-
Load VDB Streamlines Toggle-on to load streamlines from the VDB database. Do not use the Streamlines field lower in the dialog in this case.
-
XY Data Indicate which of the XY Data stored in the VDB database you wish to load.
-
None - Do not load any XY data, only grid data.
-
Quick - Reads XY data only for fields, wells, and regions and skips loading completions and network connections.
-
Complete - Loads all XY data.
-
-
Display name Enter a name by which the data set will be known within in Tecplot RS. This defaults to the name of the selected case, but may be changed.
-
Streamlines Optionally, click the browse button next to the Streamlines field to specify streamline data in FrontSim .slnspec format. Should not be used if the Load VDB Streamlines option is toggled on.
-
Survey Wells Optionally, click the browse button next to the Survey Wells field to specify survey well data to load.
After you have specified the database you wish to load, you can either click OK or switch to the Options page of the Load VDB Data dialog to specify additional loading preferences. See Grid Data Loading Options for details.
Loading Sensor Data
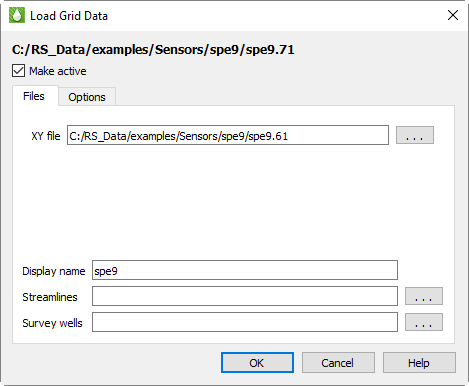
Tecplot RS supports the visualization of grid solution data created by the SENSOR® reservoir simulator. To load Sensor grid data into Tecplot RS, choose "Load Grid Data" from the menu, then choose "Sensor/TETRAD" from the file type menu in the Open File dialog. The filename extension for a SENSOR grid file is .71. Choose a file and click Open to display the options that enable Sensor data loading.
The Load Grid Data dialog for Sensor data has two pages (Files and Options), like the dialogs for loading other types of grid data. Loading Sensor data requires only the first page of the dialog, but the second page provides additional settings.
On the Files page of the Load Grid Data dialog for Sensor data, you can specify an associated XY data file to be loaded at the same time as the grid data. This file has a filename extension of .61 and is automatically selected by Tecplot RS if it exists with the same basename as the grid .71 file.
The Files page has the following additional options:
-
Make Active Toggle-on Make Active to make this grid the active grid once loaded. It is toggled on by default for the first grid loaded, and off for subsequent grids.
-
Display name Enter a name by which the data set will be known within in Tecplot RS. This defaults to the name of the selected case, but may be changed.
-
Streamlines Optionally, click the browse button next to the Streamlines field to specify streamline data in FrontSim .slnspec format.
-
Survey Wells Optionally, click the browse button next to the Survey Wells field to specify survey well data to load.
After choosing the Sensor data to load, click OK to load the data, or switch to the Options page in the Load Grid Data dialog to customize loading settings. See Grid Data Loading Options for details.
Loading CMG Data
Tecplot RS can load files created by the CMG (Computer Modeling Group) reservoir simulator, which have the extension .irf, .mrf, .sr3.
| CMG-format files are supported only on Windows. |
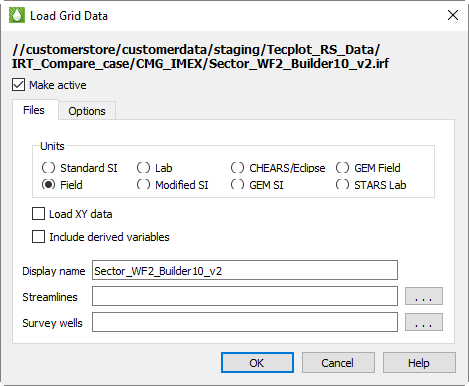
To load CMG grid data into Tecplot RS, choose "Load Grid Data" from the menu. Choose CMG from the file type menu in the Open dialog, then choose an .irf, .mrf, .sr3 file and click Open. The Load Grid Data appears, letting you choose what data should be loaded and what units should be used.
The Load Grid Data dialog for CMG data has two pages (Files and Options) similar to the dialog for loading other types of grid data.
On the Files page of the Load Grid Data dialog for CMG data, you can specify the units for the data being loaded and choose to load XY data. Some CMG files do not include rate and ratio variables; if you would like Tecplot RS to calculate these for you while opening the file, toggle on Include derived variables.
| Include derived variables is not available for CMG .sr3 files. |
| You can choose the default CMG units from Tecplot RS’s Options menu using the CMG System Units menu item. This choice is saved in the project file and your most recent choice will be remembered for future use. All files in a project must use the same units. |
The Files page has the following additional options:
-
Make Active Toggle-on Make Active to make this grid the active grid once loaded. It is toggled on by default for the first grid loaded, and off for subsequent grids.
-
Display name Enter a name by which the data set will be known within in Tecplot RS. This defaults to the name of the selected case, but may be changed.
-
Streamlines Optionally, click the browse button next to the Streamlines field to specify streamline data in FrontSim .slnspec format.
-
Survey Wells Optionally, click the browse button next to the Survey Wells field to specify survey well data to load.
After choosing the CMG data to load, click OK to load the data, or switch to the Options page in the Load Grid Data dialog to customize loading settings. See Grid Data Loading Options for details.
Loading UTCHEM Data
Tecplot RS can load files created by the UTCHEM (University of Texas Chemical Flood Simulator). You must choose the file named INPUT.
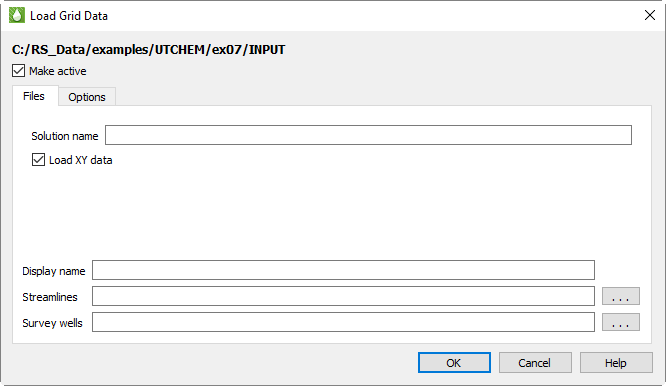
To load UTCHEM grid data into Tecplot RS, choose "Load Grid Data" from the menu. Choose UTCHEM from the file type menu in the Open dialog, then choose an INPUT file and click Open. The Load Grid Data appears, letting you choose what data should be loaded and what units should be used.
The Load Grid Data dialog for UTCHEM data has two pages (Files and Options) similar to the dialog for loading other types of grid data.
On the Files page of the Load Grid Data dialog for UTCHEM data, you can edit the solution name, which is initially set to the run name found but may be changed, and choose to load XY data contained in the dataset.
The Files page has the following additional options:
-
Make Active Toggle-on Make Active to make this grid the active grid once loaded. It is toggled on by default for the first grid loaded, and off for subsequent grids.
-
Display name Enter a name by which the data set will be known within in Tecplot RS. This defaults to the name of the selected case, but may be changed.
-
Streamlines Optionally, click the Browse button next to the Streamlines field to specify streamline data in FrontSim .slnspec format.
-
Survey Wells Optionally, click the Browse button next to the Survey Wells field to specify survey UTCHEM data to load.
After choosing the UTCHEM data to load, click OK to load the data, or switch to the Options page in the Load Grid Data dialog to customize loading settings. See Grid Data Loading Options for details.
Loading GRDECL Data
Tecplot RS can load GRDECL data to display grid geometry and static properties. Since data are often distributed in multiple files, and these files may be in separate folders, the dialog gives you the ability to pick and choose the files to be loaded. This is often useful when investigating alternatives prior to running a full simulation.
| Tecplot RS does not currently support GRDECL files containing dual porosity models. Additionally, if the GRDECL file contains local grid refinements (LGRs), the inactive cell display is not available. We intend to refine Tecplot RS’s support for GRDECL files in future releases. |
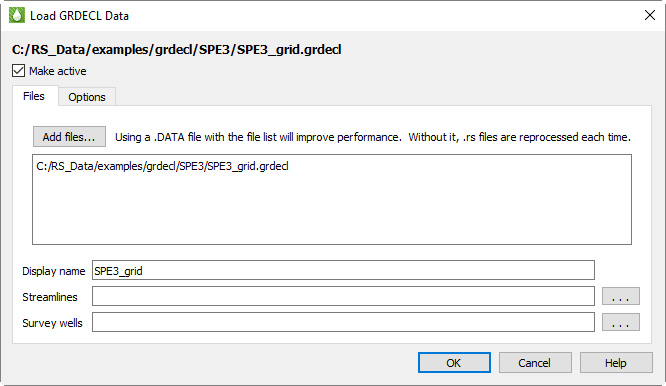
To begin loading GRDECL data, choose "Load Grid Data" in the menu or the Grid option in the menu bar. In the dialog file type drop-down list, choose "GRDECL grid (*.data; *.grdecl)"
You start by choosing a single file with either a .grdecl or .data filename extension.
-
If a .data file is chosen, it is scanned for INCLUDE directives and the dialog will display all the included files that have a .grdecl extension. Since the INCLUDE directive may point to a file with a full path, the additional files may reside in other folders.
-
If a .grdecl file is chosen to start, the program will find all the other .grdecl files in the same folder.
The file list is just a starting point. You may remove files from the list by highlighting and deleting them in the Load GRDECL Data dialog. You can also click the Add Files button and browse to and select additional files, including files from other folders.
GRDECL is an ASCII format, which means it is easy to view and change them, but it is less efficient to load and display the data. For this reason, Tecplot RS scans the files and creates additional binary files. The generated .tecinit and .rsinit files hold the solution data, and an .rsgrid file contains the grid geometry.
Tecplot RS attempts to create these files only the first time the GRDECL data is loaded or if it changes. However, it can be difficult to tell what has changed when picking and choosing individual GRDECL files. For this reason, we recommend using a .data file with INCLUDE directives when practical. This makes it possible for Tecplot RS to detect files that have been added, removed, or updated, and avoids unnecessary re-processing when the data is loaded into Tecplot RS.
The options for smoothing the grid geometry can be controlled via the Options tab on the dialog. See Grid Data Loading Options for details.
Loading RESQML Data
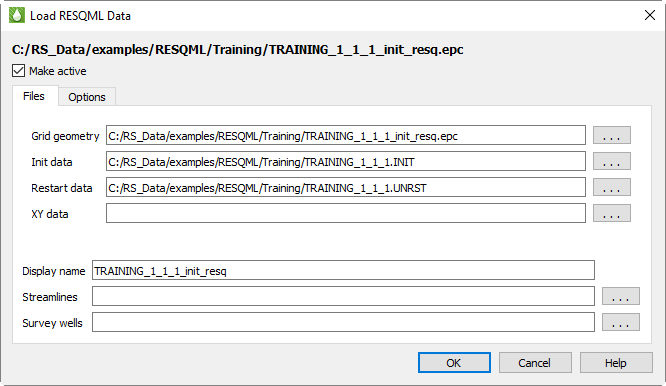
Tecplot RS can load IJK grid geometries in the RESQML format (*.epc files and the associated .h5 files). At this time, only the grid geometries are loaded from the RESQML files. However, the associated grid solution data, including well geometries, can be read from Eclipse formatted .init and .unrst files.
When loading the RESQML data, you may choose either an .afi or .epc file. If the .afi file is chosen, it will be searched for an INCLUDE directive that specifies the .epc file containing the grid geometries. This will look something like this.
INCLUDE "MyFile.epc" {type="epc" epc_type="geom_and_props"}If found, the MyFile.epc will be placed in the field for the grid geometry. If the .afi file is not selected, or if it does not contain the required INCLUDE directive, you can instead simply choose the .epc file containing the grid geometry directly.
At this time, the grid solution data must come from Eclipse-formatted .init and/or .unrst files. If these files are found in the folder that contained the .afi or .epc file defining the grid geometry, then they will be placed in the dialog. If not found, or if you need to select different solution files, you may use the … button to select files manually.
Future releases of RS will provide the option to load solution data from .epc files.
Loading APC Data
Tecplot RS reads APC data from 9 file types:
|
| Tecplot RS APC loader currently does not support the following types of grids: * Radial coordinates * Dual Porosity model |
Grid Refinements (That is, grid files may not contain more than one grid)
To load APC data, first select a DSRV1 (*.cn1) file, or a DSRV2 (*.gc1) file.
If a root.cn1 file is selected, Tecplot RS will look for the following companion files in the same directory:
-
DSRV1 Corner Point Grid file: If root.cpg file is found, a corner point grid will be loaded from this file. If root.cpg file is not found, then a Cartesian grid will be loaded from root.cn1.
-
DSRV1 Time and Well Information: root.cn2 must exist in the same folder.
-
DSRV1 Time Dependent Data: root.cn3 must exist in the same folder.
If a root.gc1 file is selected, Tecplot RS will look for the following companion files in the same directory:
-
DSRV2 Corner Point Grid file: If root.cgcp file is found, a corner point grid will be loaded from this file. If root.cgcp file is not found, then a Cartesian grid will be loaded from root.gc1.
-
DSRV2 Time and Well Information: root.gc2 must exist in the same folder
-
DSRV2 Time Dependent Data: root.gc3 must exist in the same folder
-
DSRV2 Node displacement data: If root.gc4 exists, then node displacement data is loaded from this file.
It is not required that root.gc4 exists.
GC4 Note:
When loading GC4 data, three static variables are created:
-
"GC4 X Displacement", "GC4 Y Displacement", "GC4 Z Displacement"
-
Although the number of nodes in the GC4 file is (NX+1)(NY+1)(NZ+1), the (N+1)th planes are not read, so each displacement variable has NX*NY*NZ values (i.e., the number of blocks in the grid).
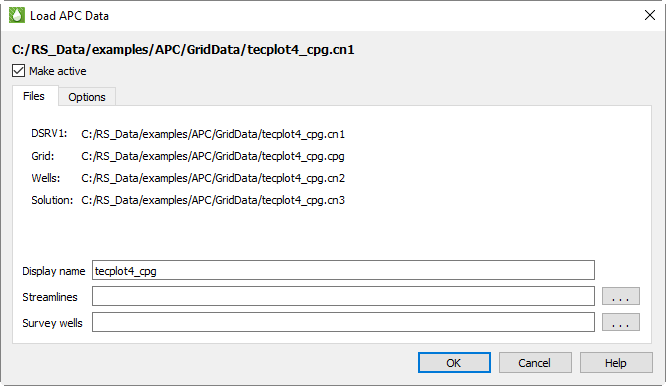
After selecting a *.cn1 or *.gc1 file, Tecplot RS shows the following dialog which displays all companion files found. This information is display only, since companion files must exist in the same folder as the root file and must have the extensions listed above.
The Files page has the following additional options:
-
Make Active Toggle-on Make Active to make this grid the active grid once loaded. It is toggled on by default for the first grid loaded, and off for subsequent grids.
-
Display name Enter a name by which the data set will be known within in Tecplot RS. This defaults to the name of the selected case, but may be changed.
-
Streamlines Optionally, click the browse button next to the Streamlines field to specify streamline data in FrontSim .slnspec format.
-
Survey Wells Optionally, click the browse button next to the Survey Wells field to specify survey UTCHEM data to load.
After you have specified the file(s) you wish to load, you can either click OK or switch to the Options page of the Load Grid Data dialog to specify any additional loading preferences. See Grid Data Loading Options for details.
Grid Data Loading Options
The Options page of the Load Grid Data dialog is substantially the same for all formats except VIP.
You can change the following options in this page of the dialog:
-
Make Active Toggle-on to make this grid the active grid once loaded. It is toggled on by default for the first grid loaded in a session, and off for subsequent grids.
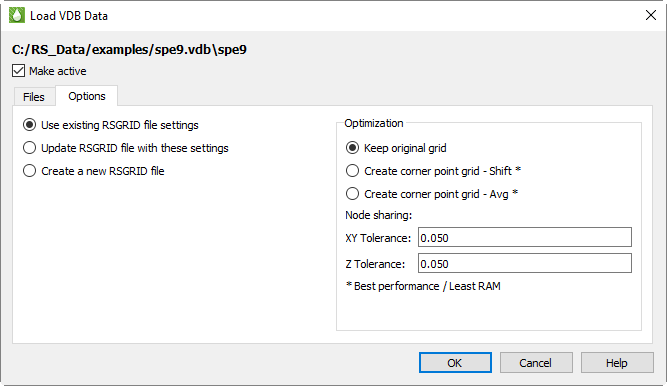
RSGrid file settings
When a data file is loaded into Tecplot RS for the first time, Tecplot RS builds an RSGrid file derived from the data file. This RSGrid file contains the grid geometry in an internal, proprietary format that compresses the data and allows data loading in a more memory efficient manner. With the radio buttons on this page, you can choose to:
-
Use the previous settings in the file (will apply if this file has been created by previous loading of the data file).
-
Overwrite the RSGrid file with the settings chosen when loaded this time (settings in the Load Grid Data dialog will overwrite old settings).
-
Force creation of a new RSGrid file (even if settings have not changed).
If you delete the RSGrid file corresponding to a data file, Tecplot RS will recreate it the next time that data file is loaded.
Optimization
For grids that are not corner point grids, RS can smooth the grid and remove unnecessary nodes. (Grids that are already corner point grids are not smoothed further.) To exercise this feature, choose from three options:
-
With "Keep original grid" chosen, Tecplot RS only attempts to share duplicate nodes. The node-sharing tolerances define how close values must be for Tecplot RS to consider them a match.
| The "Keep original grid" option is intended to preserve the grid provided in the original file. However, since grids often include distortion, Tecplot RS uses tolerances to force node-sharing at logically identical cell nodes. If these nodes fall within specified tolerances, Tecplot RS eliminates the redundant nodes to reduce memory and speed up rendering. This operation that eliminates nodes is a form of smoothing. Larger tolerances allow greater smoothing. Thus, choosing "Keep original grid" can provide a smooth version of the original grid. It becomes more apparent as you increase the tolerances. |
-
With "Create corner point grid - Shift" chosen, Tecplot RS joins the face of one cell to the adjacent face in the next higher-numbered plane.
-
With "Create corner point grid - Average" chosen, Tecplot RS joins faces, but calculates new Z-values for the corners by averaging the nodes on the joined faces. If you set your simulator to output a smooth corner point grid, these options will have little or no effect on the appearance.
If NNCs (Non-Neighbor Connections) exist in the grid, Tecplot RS will not smooth the grid across the NNC plane. In this way, Tecplot RS will preserve faults with specified NNCs.
| Smoothing a corner-point grid does NOT change the variable values (pressure, saturations, and so forth). Smoothing affects only the shape of the grid. |
In the absence of NNC definitions, smoothing a corner point grid with faults may result in highly distorted cells. In these cases, use the "Keep original grid" selection.
Tolerances
Although Tecplot RS does not perform smoothing when "Keep original grid" is chosen in the Optimization region of the Options page, to improve performance, it will still attempt to share duplicate nodes. The Tolerances define how close values must be for Tecplot RS to consider them a match. The tolerances only activate when "Keep original grid" is chosen.
Horizontal(XY) and vertical(Z) tolerances are measured separately. In general, a minimum tolerance of around 2% of the average cell size is recommended - this will preserve the original geometry but will help reduce memory requirements and improve display performance. Increasing the tolerance to 10% of the average grid size will further increase performance without significantly changing the geometry.
Applying the smoothing or node-sharing calculations can be time consuming, especially for large grids. For this reason, the results of these optimizations are saved in a new grid file with an extension of RSGRID. Once the RSGRID file has been calculated, the program reads from it instead of from the original grid file, which can greatly reduce file load time.
Tecplot RS applies all chosen optimizations when loading a file. You cannot use these settings to change files once they are loaded.
Managing Grid Data
Tecplot RS will let you load up to 50 different grid files at once, subject to available memory, and you can quickly switch between them or plot them side-by-side for comparison purposes.
To load multiple files, use the same method as to load one file choose from the menu and choose the file containing the data you want to display. Each subsequent time you load data, Tecplot RS will ask you how you would like to handle the additional data with the Manage Data dialog.
Manage Data
To manage your data sets, use the Manage Data dialog. Click the Manage Data button in the toolbar or choose "Manage Data" from the menu to launch this dialog. Switch to the Grid tab of the dialog specify the active grid data.
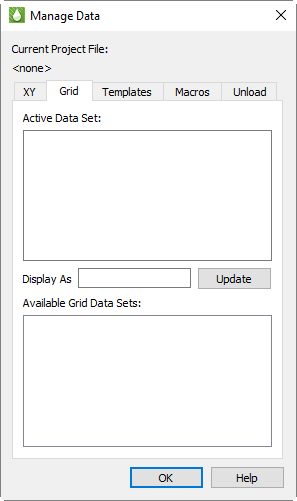
The Grid tab of the Manage Data dialog has the following options:

-
Display As Use the Display As text field to designate a display name for the Active data set. Tecplot RS will use the display name if you have incorporated the file name as part of your Paper Layout. Tecplot RS uses the file name if the Display As field remains empty. You must click Update to save your changes to the Display As field.
-
Available Data Sets When you load multiple grids, you must also designate which one is the active data set. You can have only one grid active at a time. The active data set will display when you choose a grid plot type.
The Manage Data dialog allows you to control whether the active data set changes when Tecplot RS opens a new file, but you can easily change the active grid after loading the files as well. When you load multiple grids, they will display in the Available Data Sets box. Tecplot RS will highlight the active grid, and a summary showing information about the active grid (number of planes, LGRs, and wells) will display in the Active Data Set box.
To change to a different active data set, highlight that file name in the Available Data Set box. When you click OK and choose the desired plot type, the plot display and dialog options will reflect the data from the newly active grid.
Unloading Grid Data
Since grid files can often consume large amounts of system RAM, when you no longer need a grid, it is a good idea to unload it. This releases the system memory that you can use to load another file.
Use the Unload tab of the Manage Data dialog to unload data sets. You do not need to unload files prior to exiting Tecplot RS; the data sets unload automatically when you exit.
Reloading the Active Grid (Eclipse format only)
If the active grid has changed, it can be reloaded by click the
 (Reload Grid) toolbar button.
Reloading the grid will preserve the current environment while reloading
the grid and loading any additional timesteps. After clicking the reload
grid button, a popup message will display over the tooltip indicating the
number of new timesteps read (if any).
(Reload Grid) toolbar button.
Reloading the grid will preserve the current environment while reloading
the grid and loading any additional timesteps. After clicking the reload
grid button, a popup message will display over the tooltip indicating the
number of new timesteps read (if any).
| Reload Grid is currently only supported for Eclipse format grid files |
Changing Grid Solution Data
You may load new grid solution data into your project by choosing . This function is convenient in two situations:
-
Changing grid data when the data is stored in a separate file from the grid geometry. Due to this requirement, this feature applies only to some file types. Eclipse (SLB) allows both init and restart data to be changed; VIP allows the restart data to be changed. CMG, Sensor/TETRAD, and VDB data sets do not have this option.
-
Appending streamlines or survey wells to the active grid data set if you didn’t load these when you originally loaded the grid, or want to replace streamlines or add more survey wells. This is available for all file formats.
The Change Grid Solution Data dialog is essentially the same as the Load Grid Data dialog you see when initially loading grid data into Tecplot RS, albeit with some features hidden. The following is the Eclipse (SLB) version of the dialog.
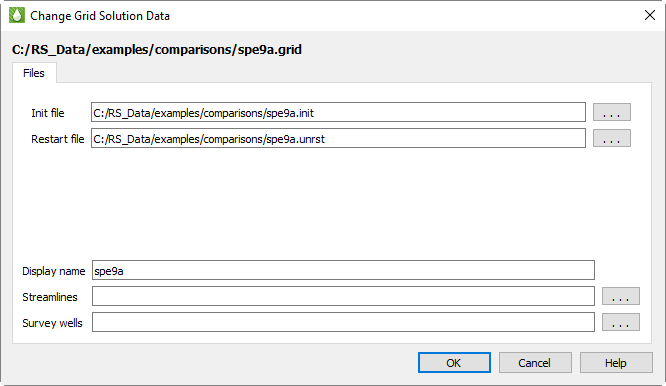
The Options tab is not displayed, since you aren’t changing the grid geometry, and the Make Active checkbox is also hidden because you are, by definition, changing the active grid data set rather than loading a new one. Also, the options for loading XY data are not included. XY data is not associated with the grid data, so you can always load them separately. See Loading XY Data.
The solution filenames are pre-filled with the paths to the current grid data solution file(s). Click the … browse buttons to choose different files for one or either (or enter the new path directly). Clearing the fields does not unload the data file; see Unloading Grid Data for instructions on doing this.
Choosing a new streamline file replaces any streamline data already loaded, since only one streamline file may be associated with a grid. However, multiple survey well files may be attached to a single grid by loading them one at a time. Since survey well files are plain text files, you may also concatenate them into a single file and load them all at once.
You may also edit the display name for the current grid data set in this dialog.
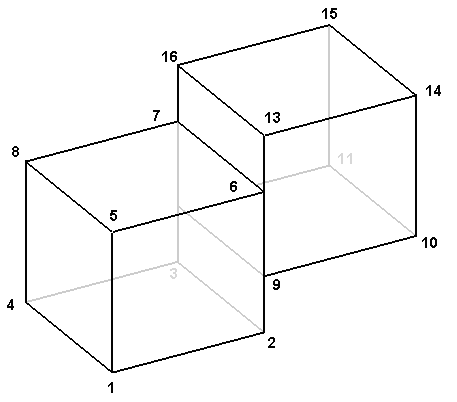
Swapping Data Files
You can exchange any loaded data file for another by using the Swap Files dialog, accessible from . Unlike Changing Grid Solution Data, Swap Files temporarily substitutes one file for another, such that all references to the original file refer instead to the new file. This is particularly useful for plots in the Bookmark Gallery and for XY Freestyle Plots plots, which are tied to a specific data set. It is also useful for choosing different files for some kinds of comparison plots without losing track of the original data sets used for the comparison
The Swap Files dialog shows a list of the files currently active in your project and, to the right of this, a list of corresponding replacement files. Initially, the swap files are listed as "no swap," indicating that the original file is active. A single scroll bar controls both lists in sync, and highlighting a file in one list also highlights it in the other.
Files you swap in should be basically similar to the original files. That is, in general, they should have the same entity and variable names, grid IJK limits, and spatial dimensions. The swapped-in file will replace the original file in the current session, including in the Bookmark Gallery and XY Freestyle Plots plots, which refer to specific data sets by name. Differences in variable names can be handled by Aliases. Differences in entity names are not resolved, however, and may result in an empty plot. Also, 3D grid views are calibrated to a specific area, and if a replacement grid is on a different coordinate system, the data may no longer be in that same area and the plot may again appear empty.
To swap in a different file for a designated file, use one of the following techniques. You may swap as many or as few files as you like; you do not need to swap all files.
-
Browse to individual files - Highlight the data set that you want to replace and click Browse swap file. A file browser for the appropriate data type (grid or XY) appears, in the directory of the selected file, with the filename extension filter set the same as the original file. Either may be changed if you wish to load a file from a different directory or of a different type. The selected file appears in the Swap file list after loading.
If loading a VDB case, click Browse VDB case instead. Choose the case folder inside the top-level VDB folder.
-
Files in a different folder - To handle varying simulator runs where the new results are in a different folder from the current ones, use the Folder… button to browse to the new file location, then click Search Names. Files in the selected folder will be swapped in for currently-loaded files if their names match exactly.
-
Files with altered names - When a new simulator run uses slightly different filenames than the current names, but the new files are in the same folder as the current ones, you can use the Find Pattern and Replace Pattern fields, and the Search Patterns button, to perform a search-and-replace operation on the filenames. Each filename in the Current file list is examined and, if it contains the Find Pattern, that text is replaced with the Replace Pattern. If a file of that name exists in the same folder as the current file, that file is swapped in.
Note that no wildcards (or ?) are permitted. Since all matches of the Find Pattern are replaced, be sure to enter enough characters to prevent ambiguity; for example, if you want to change XYZ_March1_2012 to XYZ_March2_2012, searching for 1 and replacing it with 2 will change the year to 2022 as well as the date to 2, causing no files to match; instead, search for 1 and replace with 2. Since only files that actually exist will be swapped in, an ambiguous replacement will generally cause the desired files not to be found. In general, make the find and replace strings as specific as possible.
To undo the highlighted swap-in substitution, click Remove swap file. The entry in the Swap File list changes back to "no swap". You can also simply swap the original file back in by browsing to it.
When swapping in new files, Tecplot RS automatically sets the options for you; you do not have the ability to set the options (such as grid smoothing) you set when you originally loaded the file. In general, the same options are used to load the swapped-in file as were used when loading the original file, with the following exceptions:
-
If a grid file being swapped in already has a corresponding .rsgrid solution file, it will be used; otherwise, a new one is created using the same smoothing options as the file being replaced.
-
If solution data are in files separate from the grid, only the defaults will be loaded (that is, those that match the grid name the same ones that are selected automatically in the standard grid loading dialog).
-
Auxiliary files such as streamlines, faults, or survey wells are loaded if they have the same base name as the swap file and the file being replaced also loaded these data.
If the automatic behaviors are not what you want, after doing the swap you can change the loader settings using the standard loader dialogs.
The selected files are not actually swapped in until you click OK. This may take some time depending on the size of the swapped-in files.
| Saving the project after a swap records the swapped-in files. If you want to retain the original project, either choose not to save changes, or save the project under a different name. |
Additional Notes on Grid Optimization
The active grid is always loaded into the computer memory. However, you can choose options that will both smooth the grids and require less RAM. This optimization will also result in greatly improved performance when displaying the grid or changing the view rotation.
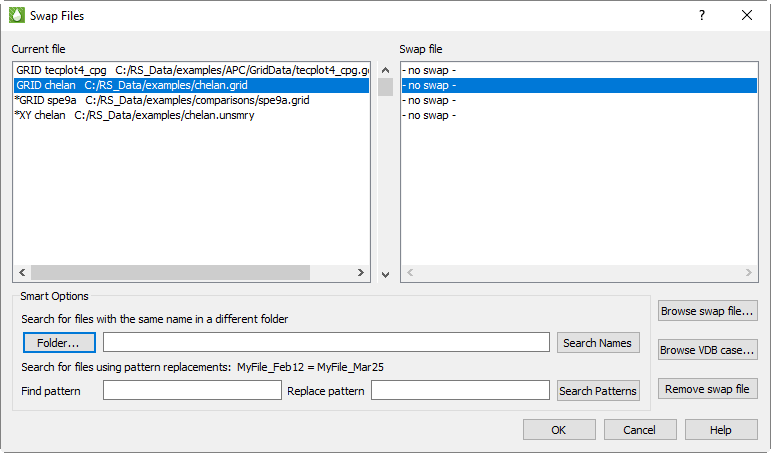
The grid cells are shaped like bricks. For corner point grids, eight individual points or nodes (with X-Y-Z coordinates) are required for each brick:
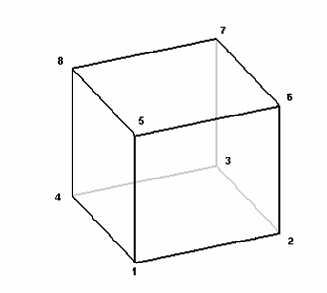
If two cells are adjacent and the nodes match, Tecplot RS will always "share" the nodes so that fewer points are needed. In this example, two bricks require 12 nodes instead of 16:
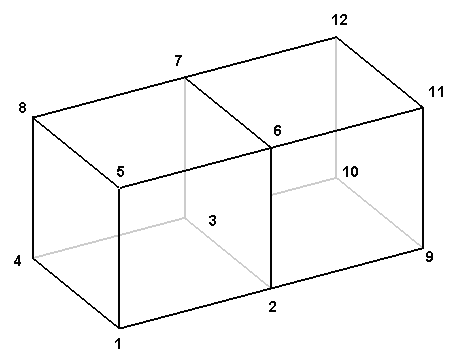
If the nodes do not coincide, Tecplot RS requires all 16 points:
Tecplot RS gives you the ability to smooth out the surface and force node sharing. This will greatly reduce the number of points required to store and display the model.
Since the smooth grid has fewer exposed cell faces, Tecplot RS requires much less computational effort to render the displayed image.
Load on Demand
Tecplot RS uses a sophisticated load-on-demand algorithm that minimizes memory usage by loading only the grid variables needed to create the current grid plot. It also only loads the data for the required time steps (typically just one time step). Tecplot RS maintains a buffer to read extra variables based on a loader time limit and available memory. When the active plot no longer requires a variable, Tecplot RS stores that variable temporarily in the virtual memory. This helps minimize repeat data transfers when you access files across a network.
Index File (.rsrst)
When you use a file-based loader to load grid data, Tecplot RS reads recurrent variables on demand. When you choose a new time step for display, Tecplot RS will retrieve the data from the file.
To retrieve the data efficiently, Tecplot RS uses a "map" to the start of each time step in the file, which it creates when reading the entire file the first time you open the file.
The data ranges of each variable also serve as important pieces of information. To automatically set up the legend for contour values, it is necessary to know the minimum and maximum values for each variable over all time steps.
The very first time you use a restart file (which contains the time-dependent data), Tecplot RS reads the entire file to find all the time steps and compute all the ranges. It then saves these data in a small file called an Index File. The file has the same root name as the grid file, but with an extension of .rsrst.
If Tecplot RS detects that this file does not exist, or if the Restart file has a newer date than the index file, Tecplot RS will create an index file automatically. The initial load will take longer because Tecplot RS scans the entire file.
Once an up-to-date index file exists, you can load a grid with load-on-demand much faster.
You can also create both the index and the .rsgrid files with the RSPreprocess.exe utility (included in your installation). You can launch this utility automatically at the end of a simulator run. See RSPreprocess for more information.