Macros: Task Automation
To make common plot tasks and repetitive actions simple, Tecplot RS includes the ability to record sets of commands and play them back with the click of a button. Tecplot RS records the command sets in the Tecplot scripting language, in units of macros. You can record and play macros from within Tecplot RS, or you can use text editing software to edit an existing macro or write your own and then load it into Tecplot RS.
Macros can save you time by performing repetitive operations or time-consuming operations for you. For example, if you have daily data simulations and want to create a plot each day to view the simulation, you can record a macro that opens a project file with customized plot settings, loads data, manipulates the plot, and exports an image of the simulation. Then each day you only need to place the simulation data where the macro is assigned to look for it (with the same name), run the macro, and view the exported image!
This section discusses recording, editing, and playing macros from within Tecplot RS. Refer to Macro Commands Summary for a list of all the commands used for functions specific to the RS Manager.
Creating a Macro
To record a macro in Tecplot RS, start the , accessible in the menu, and then perform the sequence of actions you wish to record. After recording your macro, if you wish, you can edit your macro file with an ASCII text editor to remove redundant operations, compress repetitive actions into loops, or otherwise modify the macro.
To operate the Macro Recorder, do the following:
-
Choose from the menu.
-
Specify a file name and location to save your macro in the Write Macro File dialog and click Save in that dialog (macros automatically use the file extension .mcr).
-
An Information dialog appears to let you know that Auto-redraw will not work during macro recording. Click OK.
-
Tecplot RS is now recording the macro. Execute the actions you wish to record. (The Macro Recorder dialog remains open during the recording session).
-
When you have completed the actions you wish to record, click the Stop Recording button in the Macro Recorder dialog.
| To redraw your plot while recording and see the result of your plot selections, click the Redraw button in the sidebar. |
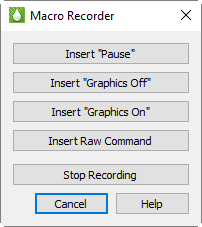
While recording macros, you can use the buttons in the Macro Recorder to add specific commands to your macro. These buttons insert the following:
-
Insert "Pause" Clicking this button adds a "pause" command to the macro. When you play a macro including a pause command, Tecplot RS displays a message box when it reaches the pause command, and waits for you to click OK before continuing to process the macro.
If you include several different plots or plot views in your macro, you may find it useful to insert a pause in the sequence. Click the Insert Pause button, and add a comment or label in the provided dialog. Then, when you replay the macro, the sequence will pause at this point, allowing you to view the results.
-
Insert "Graphics Off" Adds a "graphics off" command to the macro. When you play a macro containing a "graphics off" command, Tecplot RS stops displaying graphics in the workspace from the "graphics off" command until a "graphics on" command is encountered.
-
Insert "Graphics On" Adds a "graphics on" command to the macro.
-
Insert Raw Command Opens a dialog in which you can enter any valid Tecplot macro command. For example, you can add "$!LOOP 10" at the start of a section you want to repeat 10 times, then "$!ENDLOOP" at the end. See the Tecplot 360 Scripting Guide for information on the Tecplot macro language.
-
Stop Recording Click this button to stop recording when you have completed the sequence of actions you wish to include in your macro.
| To make your macro as compatible as possible with other versions of Tecplot RS, begin recording with a blank project and default formatting. |
When creating a macro, be sure to think about the state of your project when you begin recording. For example, you may wish to begin with a blank project and default formatting to create a macro that will run without first loading data. On the other hand, if you wish to create a macro that operates on whatever data you have loaded at the time, you may wish to load example data before beginning to record your macro.
|
To use a macro to precisely duplicate the plot you had when you recorded it, Tecplot RS must be in the exact same state when you run the macro as it was when you began recording it. To accomplish this, start with an blank project for both recording and replaying a macro to start with all default settings except plot type (you can specify the plot type in your macro). To begin with all default formatting and the default plot type, restart Tecplot RS before recording and replaying your macro. |
| You may encounter errors in macro playback if you include "pick" operations when recording a macro. A "pick" operation includes any instance of selecting an object by clicking it (such as text or a geometry). |
Playing a Macro
There are a number of ways to play a created macro. The most straightforward is to choose from the menu. In the Play Macro dialog that appears, browse to the macro file () that you wish to play, and click the Open button.
The last ten macros you played are listed in the menu, giving you a second way to play frequently-used macros.
| On Windows operating systems, you can also launch Tecplot RS and run a macro by dragging the macro file (with the extension .mcr) onto the Tecplot RS icon. |
Command Line
You can also launch Tecplot RS from the command line and tell it to play a macro by including the name of the macro file on the command line, like this:
tecplotrs mymacro.mcr
To play a macro this way, first navigate to the folder containing the macro or include the path to the macro in the command.
You can also run the macro in batch mode using the -b flag. The complete command for accomplishing this on a Windows operating system follows this form:
tecplotrs -b <macro filename>
For example:
tecplotrs -b MyMacro.mcr
This command syntax will also work on Linux platforms.
Easy Macros
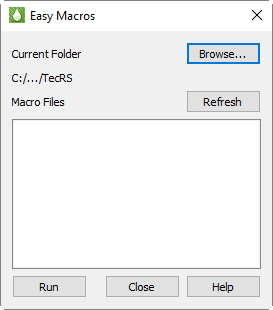
The Easy Macros window, which you can open from the menu, lets you quickly play a macro file from a folder you have chosen. The Easy Macros window will stay open while you use Tecplot RS, giving you an easy way to integrate your macros into your workflow.
-
Click Browse to choose the folder.
-
If you add more macros to the folder while Tecplot RS is running, click Refresh to see them in the list.
-
Click Run to play the selected macro, or simply double-click the macro in the list.
Manage Data
The Macros tab of the Manage Data dialog lets you choose the default directory where the Easy Macros window will look for macros. The directory can be set for each project.
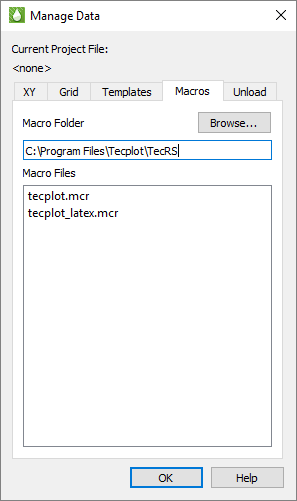
In this dialog, click Browse to set the Easy Macros directory, or type a path directly. The Macro Files list shows all the macro files found in the selected directory.
Writing and Editing a Macro
While using the Macro Recorder is the easiest way to create macros, you can also use a text editor to either write your macro manually or edit a created macro. This can be useful for automating the same action several times in one macro (for example, to load several data files with numerically incremental names, like simulation1.unsmry, simulation2.unsmry, and simulation3.unsmry).
When writing or editing a macro file, you can add macro commands by enclosing them in a unit called a macro function: define the command(s) in the macro function, and then call the macro function. Use this form to define a macro function:
$!MACROFUNCTION
NAME = functionname
.
.
.
$!ENDMACROFUNCTION
Between $!MACROFUNCTION and $!ENDMACROFUNCTION, you can include any legal macro command (except $!MACROFUNCTION; you cannot define another macro command inside a definition).
For example, the following macro function turns on the Contour zone layer, turns off the Mesh zone layer, sets the contour plot type to "Both Lines and Flood" for zones 1, 2 and 3, then chooses gray scale color mapping:
$!MACROFUNCTION
NAME = "graycontour"
RETAIN = Yes
$!FIELDLAYERS SHOWCONTOUR = YES
$!FIELDLAYERS SHOWMESH = NO
$!FIELDMAP [1-3] CONTOUR {CONTOURTYPE = BOTHLINESANDFLOOD}
$!COLORMAP 1 CONTOURCOLORMAP = GRAYSCALE
$!REDRAW
$!ENDMACROFUNCTION
The RETAIN parameter tells Tecplot RS to retain the macro function definition for use in subsequent macro calls in one Tecplot RS session. This allows you to define and call a macro function once, and then call that function in any other macro after playing this macro in your Tecplot RS session.
Use the $!RUNMACROFUNCTION macro command to call your macro function. For example, to call the "graycontour" macro function defined above, use the following macro command:
$!RUNMACROFUNCTION "graycontour"
You can use the $!RUNMACROFUNCTION command within other macro functions; calls may be nested up to ten deep.
To access parameters from within a macro function use "|n|", where n is the parameter number (do not include the double quotes). For example, the following function uses two parameters for the assignments to SHOWCONTOUR and SHOWMESH:
$!MACROFUNCTION
NAME = "AssignContourAndMesh"
$!FIELDLAYERS SHOWCONTOUR = |1|
$!FIELDLAYERS SHOWMESH = |2|
$!ENDMACROFUNCTION
.
.
.
$!RUNMACROFUNCTION "AssignContourAndMesh" (YES,NO)
Working with Macros: Going Farther
If you use macros for only recording and playing, you do not need to understand or even look at the command structure. However, to tap into the full power of macros, you can learn to manipulate the files, cut and paste, modify, and even create files with macros.
Exploring Basic Macro Structure
Remember the very first XY plot you created in Basic XY Plots? The macro commands for creating that plot look like this:
#!MC 1100
$!VarSet |MFBD| = 'C:\Program Files\$TEC_RS_2025'
$!ADDONCOMMAND
  ADDONID = 'Tecplot RS'
  COMMAND = 'LOADDATAFILE FTYPE=ECLUNSMRY FNAME="C:/Program
Files/Tecplot/TecRS 2025 R1/Examples/Tecplot RS/chelan.unsmry" APPENDRULE=NONE'

$!ADDONCOMMAND
  ADDONID = 'Tecplot RS'
  COMMAND = 'SETACTIVEXYdata set FNAME="C:/Program Files/Tecplot/TecRS 2025 R1/Examples/Tecplot RS/chelan.unsmry"'

$!ADDONCOMMAND
  ADDONID = 'Tecplot RS'
  COMMAND = 'PLOTXY TYPE=XYVARIABLES'
$!REDRAWALL
$!RemoveVar |MFBD|
Even without understanding the macro structure, you can probably recognize that these commands load a file and then specify the XY Variables plot type, which are the steps you took to create that first plot.
The best way to learn macro command structure is record while you are working and then look at the results. Also, refer to the command guides. Your command file will usually contain a combination of "native" Tecplot commands and those specific to Tecplot RS. For the former, refer to the Tecplot 360 Scripting Guide. For the syntax for commands unique to Tecplot RS, see Macro Commands Summary of this manual. Tecplot RS macros always begin with:
$!ADDONCOMMAND ADDONID = 'Tecplot RS'
Understanding Basic Macro Structure
All Tecplot RS macro commands are embedded in the Tecplot scripting language’s ADDONCOMMAND macro:
$!ADDONCOMMAND
ADDONID = <string>
COMMAND = <string>
.
.
.
The first string (<string>) identifies the Tecplot add-on that will receive the command. Set this to "Tecplot RS". The second string contains all of the information that Tecplot RS needs to process the command.
In the tables that follow this section, parameter values will be identified by the type enclosed in angle brackets < >. Do not include the brackets when you type a command.
The type of commands include:
-
<integer> Integer value, which does not include decimal points. The allowable range will depend on the specific command.
-
<double> Real number, with or without decimal points. The allowable range will depend on the specific command.
-
<boolean> TRUE or FALSE (can be shortened to T or F)
-
<string> Character strings, enclosed in double quotes.
-
<option> Options specific to the particular command. Allowable values will appear in the Notes column.
| The COMMAND strings must be contained on a single line in your macro command file, even if they appear on multiple lines in the tables. |
Macro Debugger
Use the Macro Debugger, accessed via , to step through and debug a macro file. This dialog allows you to add and delete breakpoints, view and set watch variables, and view the call stack.
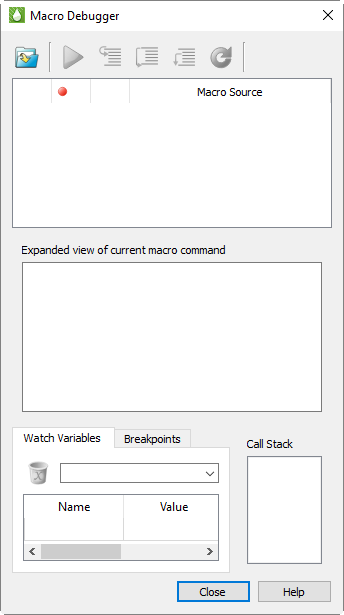
The Macro Debugger displays the text of the currently loaded macro file at
the top of the dialog in the Macro Source area. The black arrow
 marks the line about to be
executed; it moves to the next command after the current command is
executed. Below this is a second area (Expanded View) showing the complete
command about to be executed, as many macro commands are lengthy and may
not be readable in their entirety in the Macro Source area.
marks the line about to be
executed; it moves to the next command after the current command is
executed. Below this is a second area (Expanded View) showing the complete
command about to be executed, as many macro commands are lengthy and may
not be readable in their entirety in the Macro Source area.
| Because Tecplot RS began life as a Tecplot 360 add-on, many of its macro commands appear as $!AddonCommand in the macro debugger. You will need to view them in the Expanded View to see what they actually do. |
The Macro Debugger has the following buttons in its toolbar:
-
 Load a Macro file - Loads a
macro file using the Open Macro dialog, in which you can specify which
macro file to load. Tecplot macro files typically have the extension
.mcr. Once you have loaded a macro file, it stays loaded in the
Macro Debugger until you load a different one.
Load a Macro file - Loads a
macro file using the Open Macro dialog, in which you can specify which
macro file to load. Tecplot macro files typically have the extension
.mcr. Once you have loaded a macro file, it stays loaded in the
Macro Debugger until you load a different one. -
 Continue - Plays the macro
without stopping after each step, until the macro finishes or the Macro
Debugger encounters a breakpoint.
Continue - Plays the macro
without stopping after each step, until the macro finishes or the Macro
Debugger encounters a breakpoint. -
Step buttons - These three related buttons help you step through your macro line by line, pausing after each instruction has been processed. Checking the values of variables after each step is very helpful in finding and fixing problems. These buttons have slightly different functions, described below.
-
 Step Into - Executes the
current macro command. When a $!RunMacroFunction command is
encountered, the Macro Viewer steps into the called function, so it too can
be executed line by line.
Step Into - Executes the
current macro command. When a $!RunMacroFunction command is
encountered, the Macro Viewer steps into the called function, so it too can
be executed line by line. -
 Step Over - Executes the
current macro command. When a $!RunMacroFunction command is
encountered, the entire function is processed as a single operation,
instead of allowing you to step through it line by line.
Step Over - Executes the
current macro command. When a $!RunMacroFunction command is
encountered, the entire function is processed as a single operation,
instead of allowing you to step through it line by line.This is useful for functions that you have already verified to be working correctly and/or do not wish to step through, especially long ones.
-
 Step Out - Executes the rest
of the current function at full speed, rather than line by line, until the
end of the function ($!EndMacroFunction) is encountered, then
resumes single-stepping at the line after the $!RunMacroFunction
instruction that called the function.
Step Out - Executes the rest
of the current function at full speed, rather than line by line, until the
end of the function ($!EndMacroFunction) is encountered, then
resumes single-stepping at the line after the $!RunMacroFunction
instruction that called the function.This is useful when you have verified that a function is working correctly, and don’t need to continue stepping through it (especially in functions with loops) or have accidentally stepped into a function you don’t want to step through.
-
-
 Reset - Stops the running
macro, if any, and resets the macro to start running at the beginning again.
Reset - Stops the running
macro, if any, and resets the macro to start running at the beginning again.If your macro relies on Tecplot RS being in a particular state when it starts processing, make sure Tecplot RS is in this state before you click Reset. Otherwise, the results of the macro may not be what you expect.
| A convenient way to handle state with macro resets is to save your plot in the Bookmark Gallery before beginning debugging, then restore that plot if you need to reset. |
The Macro Debugger has the following three areas at the bottom of the dialog. Watch Variables and Breakpoints share the same space; use the provided tabs to switch between them.
-
Watch Variables - Displays the values of selected macro variables as you step through the code, and allows you to add and remove variables to be watched. See Watching Variables.
-
Breakpoints - Displays the breakpoints set in your macro and allows you to delete any or all of them easily. See Using Breakpoints.
-
Call Stack - Displays all function calls currently executing. When one function calls another, which calls another, and so on, this area displays the name of all these functions in the order they were called. The name main represents the top-level script (instructions outside of any functions).
Watching Variables
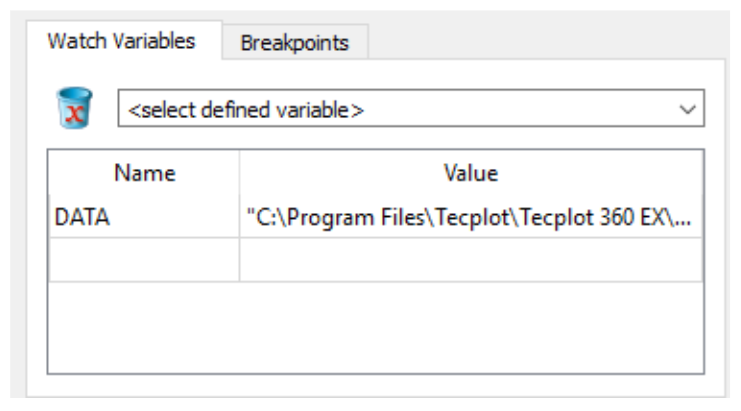
The Watch Variable panel at the bottom of the Macro Debugger allow you to set variables to be displayed while your macro runs. You can add a variable to be watched by choosing it from the pop-up menu here. To stop a variable from being watched, click it in the list of watched variables, then click the delete (trash) icon.
Using Breakpoints
A breakpoint is a point in your code where you wish to pause execution, usually just before some macro instructions you are having trouble with. Using the Continue button, your macro runs at full speed until it reaches a breakpoint. You can then inspect variables or the call stack and see the next several lines to be executed, then step through the macro a line at a time using the appropriate Step buttons in the toolbar to see how they behave.
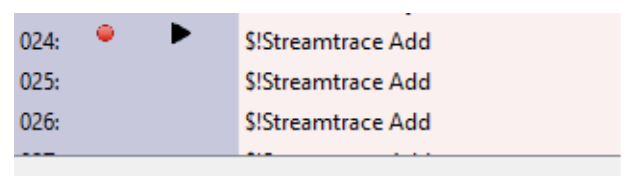
Breakpoints are shown as red discs to the left of each line of code in the Macro Source field. To set a breakpoint at a particular line of your macro, click to the left of that line. A red disc appears next to that line to indicate that execution will pause just before that line is executed. You can remove the breakpoint by clicking again.
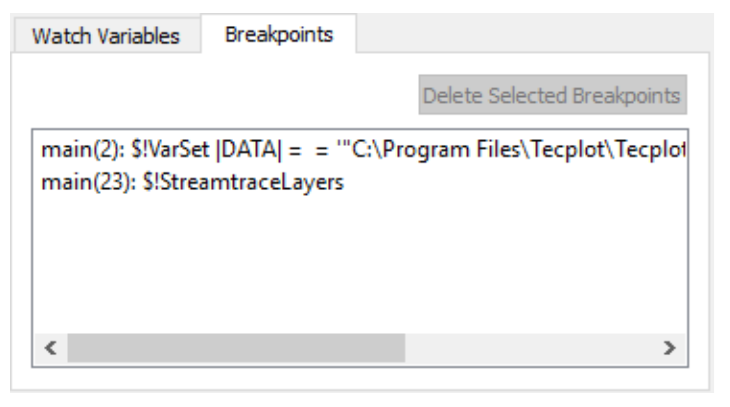
The Breakpoints area at the bottom of the Macro Debugger dialog display information about where each breakpoint is set: the function it’s in ("main" if it’s outside a function), its line number, and the macro command. You can delete breakpoints from this area by selecting them and clicking Delete Selected Breakpoints. (This is the fastest way to delete all breakpoints.)