Printing and Exporting
Once you have created your plot, use this section to learn how to share it!
Tecplot RS includes many methods of sharing your created plots with others. You can choose from several different ways to save, print, or export your plot, so that you can select the method most appropriate for your intended audience. The following table summarizes each option and its uses.
| Method | Purpose |
|---|---|
Prints a display of your plot. |
|
Different formats give flexibility between size and accuracy. Easily transmitted electronically. Users must have software capable of reading the selected format. Tecplot RS’s EPS (Encapsulated PostScript) export format concatenates several PostScript files, resulting in a set of images that can resemble an animation sequence. |
|
|
Ideal for displaying multiple plots, especially those that represent time-stepped animations. Great for adding to Web pages or transmitting electronically. Requires that the user has a viewer capable of reading the specific format. |
|
Can be shared with others who have access to Tecplot 360 or Tecplot Focus but not Tecplot RS. Gives limited ability to modify the plot (for example, in grid plots you can change the rotation or variable, but not the time step). Similar to a single-view option. |
Creates an animation using macro commands. |
To utilize these output options, use one of two workflows, depending on whether you wish to produce a single page or an automated series of pages.
|
To use the simplest method of electronic export, choose from the menu. You can then paste your plot into other applications. |
Printing Your Plot
Technically, printing your plot involves sending the plot image to an output device, print spooler, or file. Typically a printer represents the output device, but you could also print to a plotter, film recorder, file or typesetting machine (for example, you could print your plot to a PDF). Use this option generally if you do not wish to use the output in another program.
To print a plot, choose from the menu. Tecplot RS supports the standard printer drivers for Windows operating systems.
| Type Ctrl-P to access the Print dialog quickly. |
The Print dialog includes the following options:
-
Print Setup Click the Print Setup button to open your platform’s Print dialog and set up a printer, including choosing a different printer or adjusting such settings as the colors used and the paper orientation.
-
Send Output to File (Linux) Generates a disk file of the output rather than sending it to a printer. (This feature is in the Print Setup dialog in the Windows version of Tecplot RS.)
-
Copies (Linux) Indicates how many copies of the printout to make. (This feature is in the Print Setup dialog in the Windows version of Tecplot RS.)
-
Render Options Use the Render Options in the Print dialog to control the appearance of your printed plots. In the Windows version of Tecplot RS, these appear in the main Print dialog. In the Linux version of Tecplot RS, a Render Options button appears instead, leading to a separate Print Options dialog where these options may be set.
-
Color Check the Color control for color output; uncheck this box for monochrome output.
-
Render Type Choose "Vector" to create print output using the drawing commands of the printer. The printer renders the plot, yielding higher resolution, but the printer cannot render some plot options, such as translucency, contour flooding with Gouraud shading, or contour flooding using continuous color distribution.
-
Choose "Image" to create print output using an image from Tecplot RS. Tecplot RS does the rendering at the specified resolution, usually less than the printer’s resolution. However, in this case, Tecplot RS can render all plot options.
|
To preserve quality of color in your plot (translucency, contour flooding with Gouraud shading, or continuous contour flooding), choose the Image render type. To preserve the quality of text in your plot, choose the Vector render type. |
-
Force Extra Sorting for all 3D Frames This option becomes available when you have chosen the Vector option. Checking this box will cause Tecplot RS to use extra sorting in all 3D frames. When printing 3D plots in a vector graphics format, Tecplot RS must sort the objects so that it can draw those farthest from the screen first and those closest to the screen last. By default, Tecplot RS uses a quick sorting algorithm. This method works quickly, but sometimes operates less accurately and fails to detect problems, such as intersecting objects. If you choose Extra Sorting, Tecplot RS uses a slower, more accurate approach that detects problems.
-
Resolution (dpi) When you have the Image option selected, you can access this control. Type the resolution in dpi in the text field to set the print resolution. Larger resolutions may result in an out-of-memory condition, or produce very large files. Smaller resolutions may yield less attractive output images.
Print Setup (Linux)
The Print Setup dialog in the Linux version of Tecplot RS includes options for setting the print spooler and indicating the precision of the graphics rendering.
-
Spooler Cmd - The command that should be executed to send the output to the printer. Typically you use either the lp or lpr commands to send files to the print spooler. There may be command-line options that need to be set on your system, as well, such as a flag to specify a particular printer.
In the Spooler Cmd text field, enter the appropriate spool command for your system, using the @ symbol to represent a file name.
For example, suppose you routinely use the following spool command to print a file named myfile.ps: "lpr -m -r myfile.ps." The appropriate spooler command to enter in the Spooler Cmd field is then "lpr -m -r @."
| When printing to a spooler, Tecplot RS creates temporary files with names of the form tp??????, where the ?s are randomly generated characters. Tecplot RS does not delete these temporary files automatically; commands to do so should be included in your spool command. In our example, the -r flag says to remove the file when done. |
-
Extra Precision - For PostScript output, you can control the numerical precision used in your print files. Print files contain numbers that define sizes and positions of pieces of the plot on the output paper. These numbers are defined as integers between zero and about 8,000. Usually, this provides sufficient resolution for most output devices. Occasionally, you may need more resolution. For example, printing to a high-resolution output device like a Linotronic typesetter may require more precision; making print output with very small cells or elements may also require more precision.
To increase the precision of the output, increase the value in the Extra Precision field of the Print Setup dialog. The precision is defined as the number of digits to the right of the decimal. Normally, extra precision is zero. The higher the Extra Precision setting, the larger your print files, but the more accurate the plot. The maximum setting for the precision is eight.
Print Options (Linux)
In the Linux version of Tecplot RS, the Print Options, which control the appearance of your printed plots, are in a separate dialog that can be opened by clicking Render Options in the main Print dialog.
-
Color Check the Color control for color output; uncheck this box for monochrome output.
-
Render Type Choose "Vector" to create print output using the drawing commands of the printer. The printer renders the plot, yielding higher resolution, but the printer cannot render some plot options, such as translucency, contour flooding with Gouraud shading, or contour flooding using continuous color distribution.
-
Choose "Image" to create print output using an image from Tecplot RS. Tecplot RS does the rendering at the specified resolution, usually less than the printer’s resolution. However, in this case, Tecplot RS can render all plot options.
|
To preserve quality of color in your plot (translucency, contour flooding with Gouraud shading, or continuous contour flooding), choose the "Image" render type. To preserve the quality of text in your plot, choose the "Vector" render type. |
-
Force Extra Sorting for all 3D Frames This option becomes available when you have chosen the Vector option. Checking this box will cause Tecplot RS to use extra sorting in all 3D frames. When printing 3D plots in a vector graphics format, Tecplot RS must sort the objects so that it can draw those farthest from the screen first and those closest to the screen last. By default, Tecplot RS uses a quick sorting algorithm. This method works quickly, but sometimes operates less accurately and fails to detect problems, such as intersecting objects. If you choose Extra Sorting, Tecplot RS uses a slower, more accurate approach that detects problems.
-
Resolution (dpi) When you have the Image option selected, you can access this control. Type the resolution in dpi in the text field to set the print resolution. Larger resolutions may result in an out-of-memory condition, or produce very large files. Smaller resolutions may yield less attractive output images.
Exporting a Single Image
To output a single image of your plot, especially for use in other electronic
programs, choose from the menu to create
a single-frame graphics file (EPS, JPEG, PNG, TIFF, WMF). Alternatively,
you can click on any of the  buttons if
available on the sidebar for the current plot type.
buttons if
available on the sidebar for the current plot type.
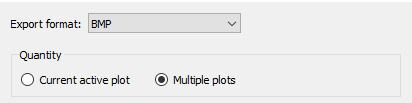
On the Export Dialog, select the "Current Entity" radio button to export a single Image.

If an animation is also available for the current plot type, you may select a video format (AVI or MPEG4). If a video format is selected then dialog will change to show animation options.
Each file type provides different advantages and has its own configuration options.
-
BMP Export Image in Windows Bitmap format.
-
EPS Export Vector or image graphics in a special type of PostScript file designed for inclusion in other applications.
-
JPEG Export JPEG files are very small for their resolution and quite common on the internet, but they do involve some loss of image quality that may affect certain plot images.
-
PNG Export Also common on the internet, PNG images have a high image quality but larger file size than JPEG.
-
PostScript (PS) Export Vector or image graphics suitable for direct printing, but usually unsuitable for import into other applications. It is recommended that you use the Encapsulated PostScript (EPS) format for importing into other applications.
-
TIFF Export Image in Tagged Image File Format.
-
WMF Export Vector graphics to import into various Windows applications.
Each of these formats allows you to set the options for creating the exported file each time you export.
You may also export images from the Bookmark Gallery dialog by clicking the "Export Setup" button in the dialog. However, only static images may be exported from the Bookmark Gallery dialog.
Performance Tips
If exporting is taking an unusually long time, or you get an error message saying that the image cannot be exported, the most likely cause is that the image width you are trying to export is too large. Selecting a smaller image width may speed up the export process.
For an image export size of Length x Width, the file size for an uncompressed true color image is approximately Length x Width x 3. Memory requirements to export such an image can be up to twice this size.
For 256 color images, the maximum file size is approximately Length x Width, but is usually less since all 256 color image files are compressed. However, the memory requirements for exporting are the same as they are for a true color uncompressed image.
Anti-aliasing can dramatically increase the memory requirements during image generation. This is because a larger image is rendered first and then super-sampled to render to the final image. A smaller super-sample allows for faster rendering time. See Antialiasing Images.
BMP Export
BMP (Bitmap) is an image format, and thus accurately represents plots with translucency and smooth color gradations. Although it originated on Windows, it is widely accepted on other platforms by many applications. However, it does not perform any compression, so file sizes are larger than more modern formats such as JPG and PNG.
When you select BMP in the Export dialog, you have the following options:

-
Region Choose to export only the active frame, or the smallest rectangle containing all frames, or everything shown in the workspace.
-
Use Width of Image on Screen Choose this option to generate an image file the same size as the current plot on the screen. You can only use this option if you use on-screen image rendering in the Display Performance dialog. See Performance Dialog for details.
-
Enter Width Choose this control to specify a width (in pixels) for the generated image. A larger width increases the quality of your image. The greater the width you specify, the longer it will take to export the image and the larger the exported file. You cannot choose this option if you have chosen to use on-screen image rendering.
-
Antialiasing Select this option to smooth jagged edges in the image. See Antialiasing Images for details.
-
Supersample Factor Control the amount of antialiasing used in the image. See Antialiasing Images for details.
-
Convert to 256 Colors Select this option to generate an image with only 256 colors (down from a possible 16 million colors). Tecplot RS selects the best color match. The image will have a greatly reduced file size, but poor image quality may result if your plot includes many colors, transparency, smooth color gradations, or antialiasing.
EPS Export
An Encapsulated PostScript file (EPS) is a PostScript file with additional commands that another program can use to determine the size of your plot. After you import your EPS file into another program, you can position it and usually resize it before printing.
| If you try to send an EPS directly to a printer, the printer may not position it correctly on the paper. Use Tecplot RS’s Print dialog to send files directly to a printer. |
For some applications, if you import an EPS file and print to a non-PostScript printer, it prints only the preview image. On Windows platforms, you must specify that the printer is a PS printer, or you will get a printout of the preview image.
The Export dialog for EPS format has the following options:
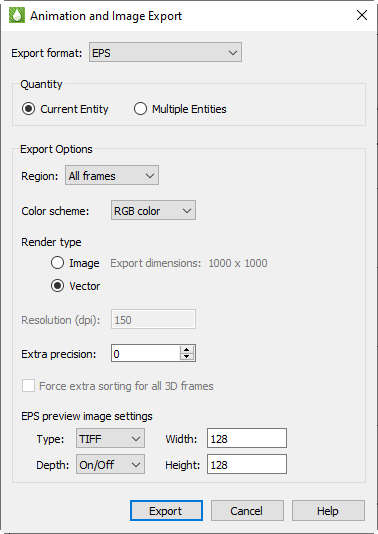
-
Color Use the check box to choose between color and gray-scale EPS output.
-
Render Type Choose the Render Type as vector PS commands or a PS image in the file. Vector commands generally result in a smaller file, but a PS image is required to accurately represent translucency or smooth color gradations.
If you choose Vector Render Type, you can also specify:
-
Extra Precision Specify the number of decimal places to include in the size and position parameters in the resulting vector-based EPS output. Larger values create more accurate plots but larger file sizes.
-
Force Extra Sorting for All 3D Frames Use this check box to order extra sorting in all 3D frames. When printing 3D plots in a vector graphics format, Tecplot RS must sort the objects so that it can draw those farthest from the screen first and those closest to the screen last. By default, Tecplot RS uses a quick sorting algorithm. This method works quickly, but sometimes operates less accurately and fails to detect problems, such as intersecting objects. If you choose Extra Sorting, Tecplot RS uses a slower, more accurate approach that detects problems.
If you choose "Image Render Type", you can also specify:
-
Resolution Type the resolution of the image in dots per inch. Larger values create more accurate plots but larger file sizes.
-
Region Choose to export only the active frame, or the smallest rectangle containing all frames, or everything shown in the workspace.
-
EPS Preview Type Tecplot RS provides the following options for the preview image:
-
None No preview image information is include. This is good for importing into applications that do not use preview image information.
-
TIFF Include a monochrome or gray-scale TIFF preview image. (Color preview images are not available.) This is the most common preview image format. You can specify an image depth for the preview image in the menu. TIFF image depth options are described in TIFF Export. (This preview image depth is separate from the depth of the actual image for EPS files generated with Render Type Image. Tecplot RS determines the actual image depth.)
-
EPSIV2 Include a monochrome (one bit per pixel) Encapsulated PostScript Version 2 preview image. This is also a common preview image type in EPS files.
| When using Render Type Image, these preview image width and height values are separate from the size of the actual EPS image. The actual EPS image size is determined by the Resolution setting. |
JPEG Export
Export Options
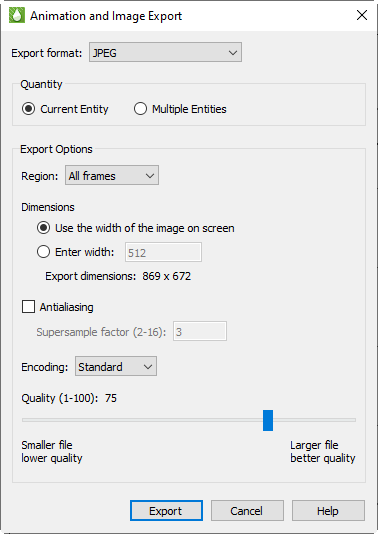
JPEG (Joint Photographic Experts Group) is an image format, and thus accurately represent plots with translucency and smooth color gradations. However, JPEG is a highly compressible, "lossy" format, and can result in poor image quality for some types of images. The advantage of JPEG is very small file sizes and near universal acceptance on the internet. JPEG supports different qualities of compression, and Tecplot RS allows you to control the image quality (and thus, inversely, the file size).
When you choose the JPEG format in the Export dialog, you have the following options:
-
Region Choose to export only the active frame, or the smallest rectangle containing all frames, or everything shown in the workspace.
-
Use Width of Image on Screen Choose this option to generate an image file the same size as the current plot on the screen. This option is required if you use on-screen image rendering in the Display Performance dialog. See Performance Dialog for details.
-
Enter Width Choose this option to specify a width (in pixels) for the generated image. A larger width increases the quality of your image. However, the greater the width you specify, the longer it will take to export the image and the larger the exported file. This option is not available if you have chosen to use onscreen image rendering.
Image Settings
-
Antialiasing Select this option to remove "jagged edges" from the image. See Antialiasing Images for details.
-
Supersample Factor Control the amount of antialiasing used in the image. See Antialiasing Images for details.
-
Encoding Choose an encoding method for the JPEG file:
-
Standard Creates a JPEG which downloads one line at a time, starting at the top line.
-
Progressive Creates a JPEG image that can be displayed with a "fade in" effect in a browser. This is sometimes useful when viewing the JPEG in a browser with a slow connection, since it allows an approximation of the JPEG to be drawn immediately, and the browser does not have to wait for the entire image to download.
Given the same Quality level, Standard encoded JPEG files look better than equivalent Progressive encoded JPEG files. However, they have a larger file size.
-
Quality Select the quality of JPEG image. Higher quality settings produce larger files and better looking export images. Lower quality settings produce smaller files. For best results, use a quality setting of 75 or higher.
PNG Export
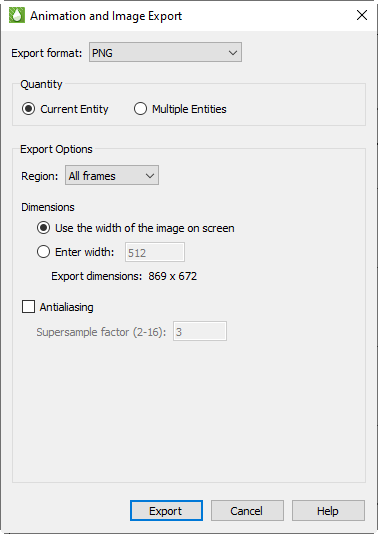
PNG (Portable Network Graphics) is an image format, and thus accurately represent plots with translucency and smooth color gradations.
When you select PNG in the Export dialog, you have the following options:
-
Region Choose to export only the active frame, or the smallest rectangle containing all frames, or everything shown in the workspace.
-
Use Width of Image on Screen Choose this option to generate an image file the same size as the current plot on the screen. You can only use this option if you use on-screen image rendering in the Display Performance dialog. See Performance Dialog for details.
-
Enter Width Choose this control to specify a width (in pixels) for the generated image. A larger width increases the quality of your image. The greater the width you specify, the longer it will take to export the image and the larger the exported file. You cannot choose this option if you have chosen to use on-screen image rendering.
-
Antialiasing Select this option to smooth jagged edges in the image. See Antialiasing Images for details.
-
Supersample Factor Control the amount of antialiasing used in the image. See Antialiasing Images for details.
-
Convert to 256 Colors Select this option to generate an image with only 256 colors (down from a possible 16 million colors). Tecplot RS selects the best color match. The image will have a greatly reduced file size, but poor image quality may result if your plot includes many colors, transparency, smooth color gradations, or antialiasing.
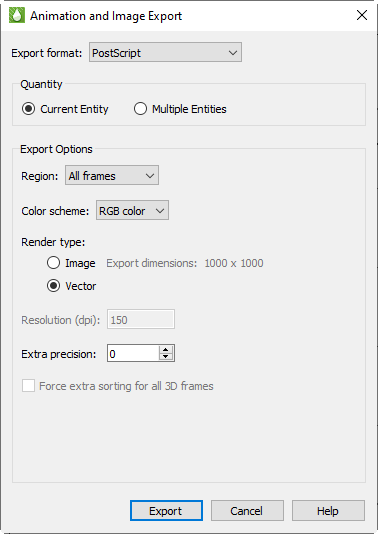
PostScript (PS) Export
The Export dialog allows you to export plots in PostScript (PS). This format is usually used for printing directly to a printer or print spooler. It is recommended that you use the Encapsulated PostScript (EPS) format for importing into, for example, page layout or illustration applications. See EPS Export for details.
The Export dialog for the PostScript format has the following options:
-
Color Use the check box to choose between color and gray-scale EPS output.
-
Region Choose to export only the active frame, or the smallest rectangle containing all frames, or everything shown in the workspace.
-
Render Type Choose the Render Type as vector PS commands or a PS image in the file. Vector commands generally result in a smaller file, but a PS image is required to accurately represent translucency or smooth color gradations.
If you choose "Vector Render Type", you can also specify:
-
Extra Precision Specify the number of decimal places to include in the size and position parameters in the resulting vector-based EPS output. Larger values create more accurate plots but larger file sizes.
-
Force Extra Sorting for All 3D Frames Use this check box to order extra sorting in all 3D frames. When printing 3D plots in a vector graphics format, Tecplot RS must sort the objects so that it can draw those farthest from the screen first and those closest to the screen last. By default, Tecplot RS uses a quick sorting algorithm. This method works quickly, but sometimes operates less accurately and fails to detect problems, such as intersecting objects. If you choose Extra Sorting, Tecplot RS uses a slower, more accurate approach that detects problems.
If you choose "Image Render Type", you can also specify:
-
Resolution Type the resolution of the image in dots per inch. Larger values create more accurate plots but larger file sizes.
TIFF Export
Export Options
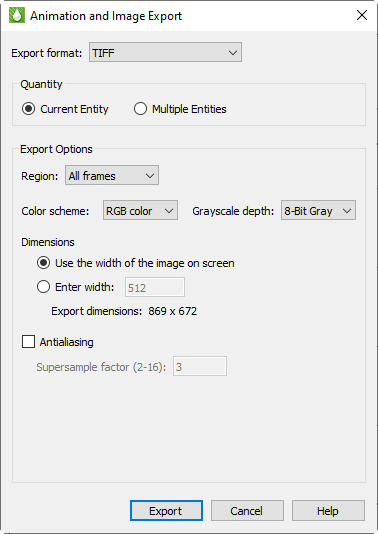
TIFF (Tagged Image File Format) is an image format, and thus accurately represent plots with translucency and smooth color gradations. Tecplot RS generates both color and gray-scale TIFF images.
When you select TIFF in the Export dialog, you have the following options:
-
Color Choose between color and grayscale TIFF output.
-
Region Choose to export the active frame, all frames, or everything shown in the workspace.
-
Use Width of Image on Screen Choose this option to create an image file the size of the current plot on the screen. You have to use this option if you choose on-screen image rendering in the Display Performance dialog. See Performance Dialog for details.
-
Enter Width Choose this option to specify a width (in pixels) for the generated image. A larger width increases the quality of your image, but exporting will take longer and result in a larger file. You cannot choose this option if you have chosen to use on-screen image rendering.
Image Settings
-
Antialiasing Choose this option to smooth jagged edges in the image. See Antialiasing Images for details.
-
Supersample Factor Control the amount of antialiasing used in the image. See Antialiasing Images for details.
-
Convert to 256 Colors Select this option to generate an image with only 256 colors (rather than a possible 16 million colors). Tecplot RS chooses best color matches. This control will greatly reduce file size, but may decrease image quality if your plot includes many colors, translucency, smooth color gradations, or antialiasing.
-
Depth For grayscale images, this specifies the number of shades of gray by how many bits of gray-scale information is used per pixel. The larger the number of bits per pixel, the larger the resulting file. Choose one of these options:
-
On/Off One bit per pixel using an on/off strategy. All background pixels are made white (on), and all foreground pixels, black (off). This setting creates small files and is good for images with lots of background, such as line plots and contour lines.
-
1 Bit/Pixel One bit per pixel using gray scale values of pixels to determine black or white. Those pixels that are more than 50 percent gray are black; the rest are white. This setting creates very small files that might be useful for a rough draft or a preview image.
-
4 Bit/Pixel Four bits per pixel result in sixteen levels of gray scale. This setting results in small image files with a fair number of gray levels; it works well for preview images.
-
8 Bit/Pixel Eight bits per pixel result in 256 levels of gray. This setting represents images most fully, but can result in large file sizes.
WMF Export
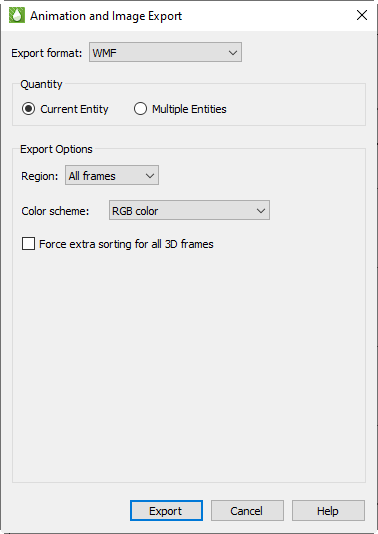
WMF (Windows Metafile) is a vector graphics format and thus can be easily resized by the importing application. WMF files can be imported into many applications. As a vector format, WMF cannot accurately represent plots with translucency or smooth color gradations. Choosing WMF from the "Export Format" menu displays WMF options (as shown below).
You can choose from the following options:
-
Region Choose to export only the active frame, or the smallest rectangle containing all frames.
-
Color Toggle-on for color WMF output. Toggle-off for gray-scale.
-
Force Extra Sorting for All 3D Frames Use this check box to instruct Tecplot RS to use extra sorting in all 3D frames. When printing 3D plots in a vector graphics format, Tecplot RS must sort the objects so that it can draw those farthest from the screen first and those closest to the screen last. By default, Tecplot RS uses a quick sorting algorithm. This method works quickly, but sometimes operates less accurately and fails to detect problems, such as intersecting objects. If you choose Extra Sorting, Tecplot RS uses a slower, more accurate approach that detects problems.
The Export dialog controls all image exports, but you can access additional animation export options from the Times region of the sidebar. See Exporting an Animation or Group of Images for details.
Exporting an Animation or Group of Images
You can export an animation of your
plot by using the Export button in the Times region of the sidebar for
various plot types.
When you are viewing the plot type XY Variables, XY Entities, Custom XY Plots, 2D Grid Plots, or 3D Grid Plots, the sidebar includes a Times region with media buttons resembling media controls. In grid plots, these buttons control moving through multiple time steps, while in XY plots, they control cycling through successive variables or entities. These controls include:
-
 buttons to step through one
page at a time,
buttons to step through one
page at a time, -
 button to review an entire
series of plots in sequence,
button to review an entire
series of plots in sequence, -
 button to review the series
of plots in reverse sequence,
button to review the series
of plots in reverse sequence, -
 button to stop an animation
progression, and
button to stop an animation
progression, and -
button that opens a dialog to export
an animation.
To export an animation from Tecplot RS, you could display each step of your animation and print or export the images. But the Export dialog provides a more efficient approach. With this feature, Tecplot RS exports each step of the animation to the chosen output format.
Exporting a Video Format
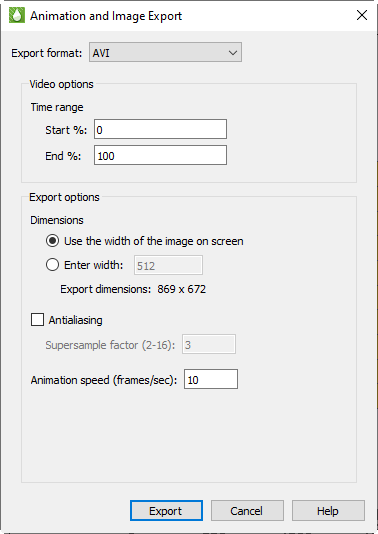
To export a video, select one of the video formats from the "Export Format" drop-down. The export dialog will then change to show video options. After selecting the video options, click the Export button. You will be asked for a filename and then the animation will be exported.
Time Range
The Time Range settings (the Start % and End % boxes) apply only to grid plots. They allow you to limit the range of time steps that Tecplot RS will animate. Starting and ending points are expressed as percentages of the total time span. For example, to output only the second half of the available time steps, set the Start % to 50 and the End % to 100.
You can also limit the time step increments on a grid by clicking the … button in the Times region of the sidebar and choosing time steps to skip in the Time Options dialog. For XY plots, use the Filter button in the sidebar to control which entities and variables to include in the playback.
Width
You can control the size of the output image by specifying the width in pixels. The height will adjust to maintain the aspect ratio currently displayed on the screen.
Anti-aliasing
When the export controls instruct Tecplot RS to resize an image to fit into the specified width, the export can suffer a loss of definition and edge sharpness, especially if it includes text. You can use anti-aliasing to reduce the impact of resizing. It does slow down the export process, but generally results in much better images. Use the Antialiasing check box to choose whether to include anti-alias computations.
Tecplot software uses a method called supersampling to perform anti-alias corrections. You can input the supersampling as a Factor in the text field. Accuracy increases as values increase, but so does the time and memory required to complete the operation. Generally, a value of 3 is sufficient. See Antialiasing Images for more information on anti-aliasing and supersample factors.
Exporting a Sequence of Images
As an alternative to exporting a video format, you may export the animation as a sequence of images.
For XY plot types, select the "Multiple Entities" radio button. When this is selected, the dialog will show a list of properties or entities to export as individual image files. You may select one or more of these properties or entities. You must select at least one, by default all are selected.
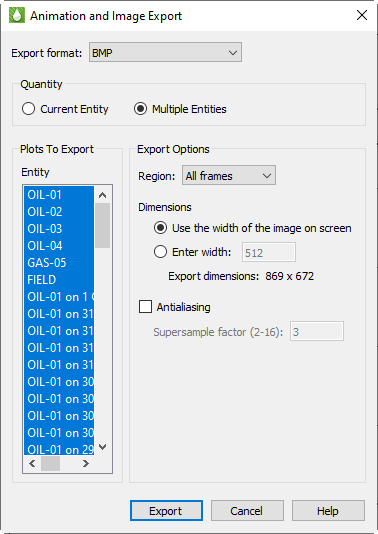
If the plot type is 2D or 3D, then select "Multiple Plots" to export an image for each time step.
After selecting the other export options, click the Export button. A file name will be requested. The filename is then used as the base filename for each image.
XY Formats
For XY formats, each file in the sequence is named as follows:
[filename]_[sequence]_[entity].[format]
where "filename" is the name selected, "sequence" is a 5 digit plot number starting at 00001, and "entity" is the name of the entity being plotted.
For example, if you plot 2 entitles "OIL-01", "OIL-02", as PNG, with the file name "untitled.png", then the following files are created:
untitled_00001_OIL-1.png
untitled_00001_OIL-2.png
Saving a Tecplot Product File
To share a view of your plot with another Tecplot user (such as a Tecplot 360 or Tecplot Focus user), you can save your plot as a Tecplot layout package file (.lpk) or write your data to either a binary (.plt) or ASCII (.dat) file.
Tecplot Layout Package File Export
To create a Tecplot layout package file, choose "Tecplot Data" and then "Save Tecplot Layout" from the menu. Other Tecplot products, such as Tecplot 360 and Tecplot Focus, can read the file type that this method creates (.lpk).
Layout package files include data and style information of your plot, with an optional preview image of the Tecplot product workspace. When you use this file type, you lose much functionality of manipulating your plot, retaining basic image viewing, zooming and style representation.
| Tecplot 360 does not support the display of stamp plots. If stamp plots are displayed in the exported plot, the .lpk file will show empty squares when loaded into Tecplot 360. |
Data File Writing
Using the "Write Data File Options" dialog, you can write out the data set in the active frame as either an ASCII or binary data file. Choose "Tecplot Data" and then "Write Tecplot Data File" from the menu to open this dialog, customize settings and choose file type in the dialog, and click OK to name and choose location for your data file.
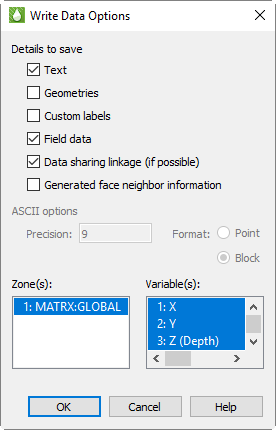
The "Write Data File Options" dialog includes the following controls to help you choose the aspects of your data that you wish to include in the binary file, as well as whether to write the file as ASCII (.dat) or binary (.plt).
-
Details to Save In the first region of the dialog, choose the details to include in the data file by turning on and off the appropriate check boxes. By default, Tecplot RS includes all details present in the active frame. You can customize whether to include:
-
Text Turn on this control to include all text in the active frame.
-
Geometries Turn on "Geometries" to include any and all geometries in the active frame.
-
Custom Labels Use this control to choose whether to include custom labels.
-
Field Data Turn on this control to include zone data in the file.
-
Data Sharing Linkage (If Possible) With this control turned on, Tecplot RS will include the variable and connectivity shared between zones in the data set, reducing the data set’s size and loading time.
-
| To write the file quicker, at the expense of file size and loading time, turn off "Data Sharing Linkage". |
-
Face Neighbor Information Generated by Tecplot RS Turn on this control to save face neighbor information generated by Tecplot RS for finite element zones. This increases data set size and loading time, but speeds performance after loading.
-
Save Data File Using Use this control to choose whether to save the file as ASCII (.dat) or binary (.plt). When ASCII is selected, you can set the precision of the float and double variables with the Precision text field. Tecplot RS writes these variable types in exponent format and the precision determines the number of digits included to the right of the decimal point.
-
Zone/Geometry Format When ASCII file type is selected, you can use this region to choose to write the file in Point or Block format. (Tecplot RS requires BLOCK format if the data set includes any cell-centered variables.) See the Tecplot 360 Data Format Guide (available on the Tecplot Web site) for more information on these formats.
-
Zone(s) and Variable(s) Use the Zone(s) and Variable(s) regions of the dialog to choose the zones and variables to include in the file.
-
Antialiasing Images
Antialiasing smooths jagged edges on text, lines, and edges of image output formats by the process of supersampling. Tecplot RS renders a large intermediate image and then reduces it to the final image size. It creates each pixel on the final image from multiple rendered pixels. The width and height of the intermediate image are the width and height of the final image times the scale factor, the Supersample Factor. You can use values from 2 to 16, although usually a factor of 3 renders sufficiently. Large scale factors take much more time and memory. Some graphics cards limit the dimensions of rendered images to a maximum of 2048x2048 or 4096x4096 pixels, and thus Tecplot RS cannot antialias if it results in an intermediate image larger than this limit.
Antialiasing uses many colors, although since certain image formats have limits of 256 colors, they cannot always represent antialiased images correctly. The image formats limited to 256 color include AVI, Raster Metafile, and any image format with the Convert to 256 Colors option selected. With these formats, the antialiasing works for plots with a very limited selection of colors (like a red mesh on a black field). Otherwise, antialiasing with 256 colors wastes time and may decrease plot quality.
Using animation formats can amplify the antialiasing and 256-color problem. Both AVI and Raster Metafile support only 256 colors, and need to use them to display multiple frames. For these formats, try a test animation of a few steps with antialiasing on before creating the entire animation.
| You can use antialiasing only with image export rendering performed off-screen (the default setting). In some cases, you may find that you need to turn off the off-screen rendering (usually due problems with a graphics card). |
Movie File Creation with Macros
You can also export an animation using the Tecplot macro language, by using macro commands to export images to a movie file. You can also use loops to repeatedly rotate 3D objects, cycle from one zone to another, and so on, to create your movie. See Macros: Task Automation for detailed information regarding the Tecplot macro language.
A typical macro file for making movies has the following form:
#!MC 1120

... optional commands to set up the first image

$!ExportSetup ExportFormat = AVI
$!ExportSetup ExportFName = "mymovie.avi"
$!ExportSetup ExportRegion = CurrentFrame
$!ExportStart
$!Loop 50
  ... commands to set up next image
  $!RedrawAll
  $!ExportNextFrame
$!EndLoop
$!ExportFinish
Advanced Animation Techniques
Overview
This section includes a couple advanced techniques to experiment with when creating animation files.
Text Changes
If you wish to include information in your animation file which tells viewers about the time step, current zones, or a mapping, you can add dynamic text to your text box(es). See Dynamic Text.
Multiple Frames Animation
Animation of plots in multiple frames requires the use of a macro. Macros can use the $!FrameControl commands to switch between each frame. The following template demonstrates how to do this with a project in which each frame contains a similar plot:
#!MC 1120

# Set the number of images (movie frames) in the animation.
$!VarSet |NumCycles| = 10
$!ExportSetup ExportFormat = RasterMetaFile
$!ExportSetup ExportFName  = "2frames.rm"
BitDumpRegion = AllFrames

# Insert commands to set up first frame, if necessary.

# Outer loop
$!Loop |NumCycles|

  #Inner loop cycles through each frame in the current plot.
  $!Loop |NumFrames|

  # Insert commands to change the plot in the active frame.

  # Push the top (active) frame to the back.
  $!FrameControl MoveToBottomByNumber

  # Activate new top frame
  $!FrameControl ActivateTop
$!EndLoop

# This series of $!IF statements ensures that a new AVI file will be
# created when the macro is started.
$!If |Loop| == 1
   $!ExportStart
     ExportRegion = CurrentFrame
$!EndIf

$!If |Loop| != 1
    $!ExportNextFrame
$!EndIf
$!EndLoop
$!ExportFinish
Movie File Viewing
The following tools allow you to view movie files you have created with Tecplot RS.
AVI Files
AVI format is the standard video format for Windows platforms. Below are some applications that can be used to view and/or edit AVI files:
-
Windows Media Player
A standard movie viewer included with Windows distribution. -
Adobe Premiere
A powerful tool for professional digital video editing.