Projects
Tecplot Chorus manages the cases that make up your parametric CFD studies as projects A project stores your cases' metadata (the input and result variables for each case) as well as all the information you create in Tecplot Chorus. The project also contains links to auxiliary files associated with each case, such as images and data.
Often, a project will comprise the cases for a single study, but this is not a requirement of Tecplot Chorus; it is possible, and useful, to use projects to organize multiple related studies, or only a subset of the cases in a study.
Each project you create in Tecplot Chorus is stored in a project file (extension .chprj). This file may be sent to or shared with other Tecplot Chorus users to give them access to the project.
Tecplot Chorus does not copy your data files into the project; these files, and related files such as images and layouts, can be stored on your workstation’s hard disk (if only you need access to them) or, more commonly, in a network location accessible to everyone working on a study.
| Make sure that everyone who will work on a project accesses the associated files using the same path. On Windows, we recommend using a UNC path (starting with \\) rather than a mapped drive letter; this way you don’t need to configure anything on the individual workstations. There are often differences in how Linux and Windows computers address network resources, so Tecplot Chorus works best when all members of a team use the same operating system. |
It is never necessary to explicitly save a project. Everything you do in Tecplot Chorus is saved as you work. Your original data files are never modified.
Welcome Screen
The Welcome Screen is the screen that initially appears when you launch Tecplot Chorus. You can also display the Welcome Screen at any time by choosing .

The Welcome Screen lists sessions and projects you have recently worked with, along with useful resources for learning about working with Tecplot Chorus. Simply click one of these to open it in Tecplot Chorus and display a Table View of its data in the workspace.
You may also click the button to create a new project. See Creating Projects for more information.
Opening Projects
You can open a project in Tecplot Chorus in one of two ways.
-
Recently-used projects appear in the Welcome Screen and can be opened from there. (See Welcome Screen.)
-
You may also open a project by choosing (or by clicking Open Project in the Welcome Screen) and selecting the project in the Open Session File dialog. Tecplot Chorus projects have the filename extension .chprj.
Creating Projects
You can start creating Tecplot Chorus projects in three ways:
-
By clicking the Create New button in the Welcome Screen (see Welcome Screen)
-
By choosing
-
By choosing (a shortcut for creating a project from a comma-separated value file using the Delimited Text Reader; see note at Importing with the Delimited Text Reader).
In either case, you will be asked to name and save the file using the Save Your Project File dialog. Then Tecplot Chorus launches the Create Project wizard, a sequence of screens that guides you through the steps in creating the project.
Tecplot Chorus can import cases into the project using two different methods: by reading a delimited text file (such as a CSV file) and by "crawling" a folder structure in which the files associated with each case have been stored. The initial steps for creating a new project are the same regardless of which method you use. Then you choose an importer, which determines the remainder of the steps.
If you need to go back to a previous step in the wizard, click
the button in the top left corner of the window
(Windows) or the button directly to the left of the button
(Linux). button in the top left corner of the window
(Windows) or the button directly to the left of the button
(Linux).
|
Step 1: Select Data Importer
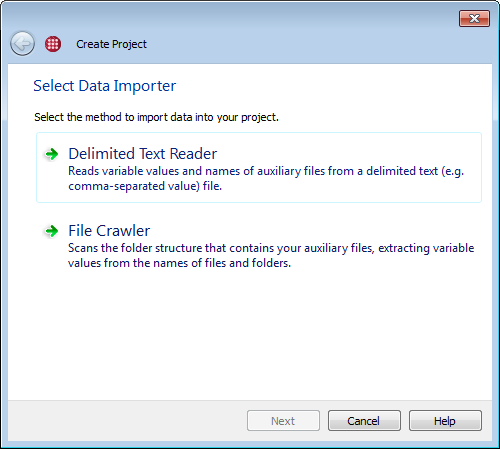
Choose how you wish to import your data on this page of the wizard.
- Delimited Text Reader
-
Reads variable values and names of auxiliary files from a delimited text file—that is, one in which each line represents a case, and the variable values for each case are separated by commas, white space, or another delimiter. A CSV (comma-separated value) file is one type of delimited text file.
- File Crawler
-
Scans the folder structure that contains your auxiliary files, extracting variable values from the names of files and folders and detecting each case’s auxiliary files by name.
The importer you will want to use depends largely on what solver you are using to process your cases and which fits better with your methods and workflows.
After you choose your importer, the wizard continues to the next step automatically. The remaining steps of the wizard are determined by the importer chosen. Continue with either Importing with the Delimited Text Reader or Importing with the File Crawler as appropriate.
Importing with the Delimited Text Reader
The Delimited Text Reader reads variable values and names of auxiliary files from a CSV (comma-separated value) file or other delimited text file. The first row of the file must specify the name of each variable.
The second row of the file may be used to specify a variable nature for each column. Each column of this second header must contain one of the following values:
- Independent
-
The column is an independent (input or parameter) variable.
- Dependent
-
The column is a dependent (output or result) variable.
- Other
-
The column is data such as a note or comment about each case.
- Auxfile
-
The column is a link to an auxiliary file (external data or image file).
Values are not case-sensitive. If the second row of the file contains any values other than the above, that row is taken to be the first row of data rather than the optional second header row.
| If multiple columns in a delimited text file have the same variable name, these are disambiguated upon import by appending a number in parentheses to the name of the variable. |
Subsequent rows should specify the variable values for each case, matching the order in the first row. Columns containing solely numeric data are taken to be numeric variables. (The text "NaN," meaning "Not a Number," is also accepted in otherwise numeric columns to indicate an invalid or missing value.) In a later step, you will choose (or change, if this has already been specified in the second header) which variables are dependent and independent, and which columns contain links to auxiliary files.
Excess whitespace is stripped when reading a delimited text file. For files not using tabs as a delimiter, this includes tabs as well as spaces.
The file Example3.csv located in the sampledata/example3 directory of the Tecplot Chorus installation illustrates the required format.
Perform the following steps when importing a delimited text file into a project.
|
If the file being imported uses commas as delimiters, i.e., it is a Comma-Separated Value (CSV) file, you can use to open it in a single step. Tecplot Chorus automatically determines the type of each column and links auxiliary files to the project where appropriate. The nature of any numeric variable is set to Independent, but this may be changed after import; see Changing Variable Nature. The root path of the project is set to the directory containing the CSV file; your auxiliary files should generally be in the same directory, or in subdirectories under it, though they need not be. We recommend using auxiliary file paths relative to the root path wherever possible, as this will make it easier to move the project if necessary; however, absolute paths—those beginning with a drive letter or double-backslash (Windows) or a slash (Linux)—are also accepted. A new .chprj file is created in the root directory next to the CSV file with the same base name. (If a .chprj file with this name already exists, you will be asked to name and save the file.) You probably will open this file in the future, rather than the original CSV file. You may invoke this feature when launching Tecplot Chorus from the command line using
the |
Step 2: Select File
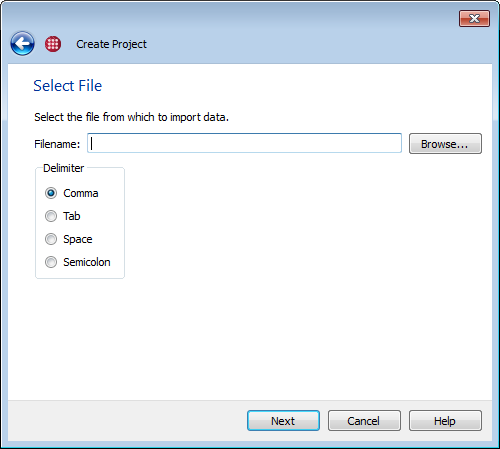
In this step of the wizard, select the file to be imported. Click the button, then choose the file using the Open dialog, and click . Then choose the delimiter that appears between columns (a comma for CSV files) and click to proceed to the next step of the wizard.
Step 3: Specify Root Folder
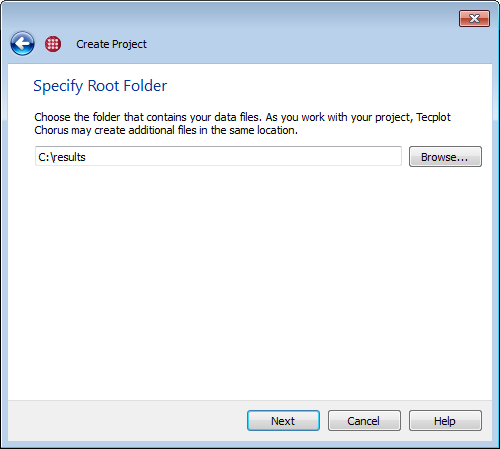
Tecplot Chorus needs to know where the data files from your project are. Click , use the Open dialog to navigate to the top-level folder of the structure that contains your data files, and click . Then click to proceed to the next step in the wizard.
Step 4: Specify Files to Link
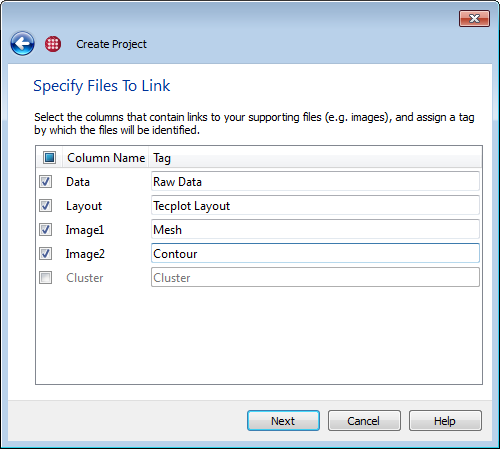
In this step, you can indicate which columns of the file (if any) contain the paths of supporting files, such as images and data files. Files linked must be assigned a tag so that you can easily choose which auxiliary file you want to view later (see Tagging Image and Data Files).
| Tecplot Chorus can display PNG and JPEG image files, and can open Tecplot layouts and layout packages in Tecplot 360. With a little extra effort, Tecplot 360 can also open other data file formats. See Loading Other Data Formats for more information. |
Mark the checkbox next to any column name that you want to treat as a file to be linked. Any column not used for linked files will be imported as a string (text) variable into Tecplot Chorus. There may be only one image file matched for a given tag. For data files other than Tecplot layouts (.lay files) and layout packages (.lpk files), you may give multiple files the same tag; they will be opened in the order the corresponding columns appear in the delimited text file.
The paths specified for your auxiliary files may be either relative to the project’s root folder, in which they should not begin with a drive letter, a slash or a backslash, or they may be absolute paths, beginning with a drive letter or double-backslash (Windows) or a slash (Linux). Generally, relative paths are preferred, since they make it easier to move the project if necessary.
Some non-Tecplot data formats, such as Fluent and PLOT3D, use two physical files per data set, one for the coordinates and one for the rest of the variables. In this case, you must give both files the same tag when adding them to the project so that Tecplot Chorus will know they should be opened together when you view the case’s data.
The tag defaults to the column name, but it may be edited if desired (for example, when working with your project, you may want to be able to open a case’s "Contour Layout" rather than its "contourlpk").
| Partial pathnames (including plain filenames) in the file are taken to be relative to the root folder specified in the previous step. |
Click to move to the next step of the wizard.
Step 5: Confirm Data
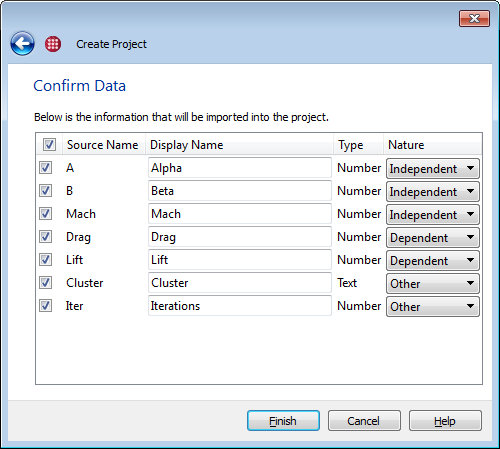
Tecplot Chorus now gives you a chance to confirm the data that will be imported. You may also edit the Display Name or Nature of any variable being imported.
- Display Name
-
The name by which a variable is known in Tecplot Chorus for axis labeling and other uses. This feature can also be used to clarify names or make them more consistent; for example, if Mach number is "M" in your data files, you could reassign it to "Mach" in your project to make its meaning more apparent.
Tecplot Chorus does not allow leading or trailing whitespace in variable names or display names, and strips extra tabs and spaces from the beginning and end of all names
You may not use the names Case ID and Case Status for your variables. These names are reserved for internal Tecplot Chorus variables. If you have variables with these names in your data, you can use this feature to "rename" them inside Tecplot Chorus (perhaps prepending "External" or "Original"). - Nature
-
Each numeric variable can be Independent (input), Dependent (output), or Other. "Other" implies that the variable is not an input or output variable used or calculated by the solver. String (text) variables are always Other.
When you have edited your variables' Display Names and Natures as desired, click to close the wizard and perform the import. Nothing is added to the project until you click .
The new project is automatically opened into a clean workspace. See Exploring Your Results for your next steps.
Importing with the File Crawler
The File Crawler scans a chosen folder structure, extracting variable values from the names of files and folders and detecting each case’s auxiliary files by their names. Perform the following steps when extracting metadata into a project using the File Crawler.
Step 2: Specify Root Folder

On this page, click and navigate to the folder that contains all your cases, then click . The File Crawler will examine all folders inside the root folder you select, and the folders inside them, and so on, to any depth. Click to proceed to the next step of the wizard.
Step 3: Identify Data
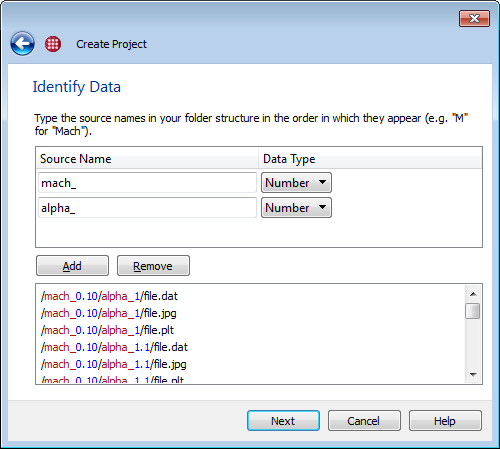
The File Crawler extracts variable names and values from the names of the files and folders inside the root folder. The entire path of each folder, relative to the root folder selected on the previous page, is scanned for the keywords you define here. The value immediately following each keyword is taken as the value of the named variable for all the cases in the folder.
For example, you may have a set of folders named M1.0, M1.1, M1.2, M1.3, etc., that contain simulation results at various Mach numbers. Inside the Mach folders are additional folders representing the various values of another variable, and inside these, folders representing values of a third variable. The File Crawler recognizes that the digits in the outermost folders' names represent Mach number, and each case is assigned a Mach number derived from the name of the folder or folders it is inside.
All files with identical combinations of parameter values are considered part of a single case, with the case being assigned a unique internal identifier. Folder hierarchy is not considered when detecting cases.
For each value you wish to extract, you must specify the Source Name, which is text that uniquely identifies the value in the file path, and indicate whether the value is a number or a string of characters. You must add these in the order they appear in your folder hierarchy, shallowest first (that is, leftmost in the textual representation of the folder path).
A directory separator ("/") may be included in Source Name patterns. For example, if the folder hierarchy contains only variable values with no other identifying text, such as /1.0/1.1/1.2, the "/" character itself can be specified as three different Source Name patterns; the resulting variables can then be given names in the Confirm Data step.
To add a variable:
-
Click .
-
Enter text that immediately precedes the value you wish to extract into the new, blank Source Name field. If there are underscores, periods, spaces, or other characters in the file path between the name and the value, enter these as well; every character up to the value you wish to extract must be matched.
Observe the scrolling list of file paths at the bottom of the dialog for instant confirmation of your entry. As you type the Source Name, the text you enter appears in red in all the paths. When Tecplot Chorus recognizes a value immediately following a Source Name, that value appears in blue in all the paths. Scroll through this list to make sure Tecplot Chorus is picking up all the values you want.
-
Choose Number or String (text) data type for the new variable.
You may add and edit entries in this dialog, or delete an entry entirely by selecting it and clicking . When you have specified all the variables you wish to extract, click .
Step 4: Specify Files to Link
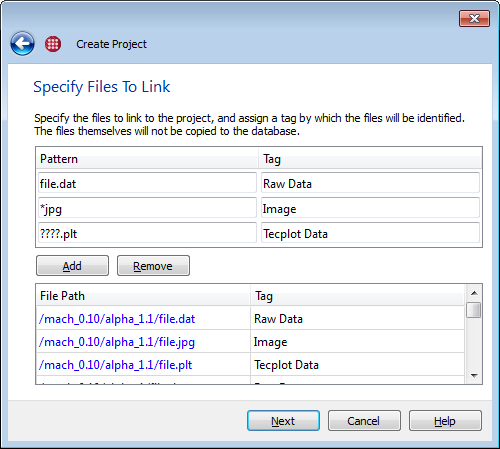
In this step, you can indicate which files are images and data files. Each such file will be linked to a case and assigned a tag so that you can easily choose which auxiliary file you want to view in Tecplot Chorus (see Tagging Image and Data Files).
| Tecplot Chorus can display PNG and JPEG image files, and can open Tecplot layouts and layout packages in Tecplot 360. With a little extra effort, Tecplot 360 can also open other data file formats. See Loading Other Data Formats for more information. |
To link files:
-
Click .
-
In the new Pattern field, enter text that uniquely identifies the supporting files you wish to link to your cases. The asterisk may be used as a wildcard to match any number of characters; for example,
*.datmatches any file with a .dat extension. A question mark matches any single character. As you type, the scrolling list of filenames at the bottom of the dialog highlights matching files in blue, so you can instantly see when you have specified the files you want.Generally, you should use the specific names of each file you wish to import to the extent possible. When using wildcards, it is very easy to accidentally match files you do not intend to match and give them the wrong tag. (Files linked in error can, however, be removed from the project via the option on the menu.)
If you do use a wildcard, use as much of the typical file’s name as possible, using a wildcard only for parts that change, and review the scrolling list at the bottom of the window carefully to make sure you only have only matched the files you intended.
As in the earlier Identifying Data step, you may include a directory separator ("/") in your pattern to match only files in particular directories. The pattern is matched against the entire path to each candidate file. For example, if your project is organized so that each case has subdirectories called contour and wireframe, each of which contains an image called image.png, the patterns
contour/image.pngandwireframe/image.pngmay be used to link these images.You may match at most one image file for a given tag. For any data file other than Tecplot layouts (.lay files) and layout packages (.lpk files), you may give multiple files the same tag; they will be opened in the order you enter the patterns in this step of the wizard. If multiple files are matched by a single pattern for a single case, the files will be opened together and in alphabetical order when viewing the case data in Tecplot 360.
Some non-Tecplot data formats, such as Fluent and PLOT3D, use two physical files per data set, one for the coordinates and one for the rest of the variables. In this case, you must give both files the same tag when adding them to the project so that Tecplot Chorus will know they should be opened together when you view the case’s data.
-
In the Tag field, enter an identifier by which you will later access matching files in Tecplot Chorus when viewing individual cases. (See Tagging Image and Data Files.)
As with the previous step, you may add, edit, or remove entries in this dialog (by clicking the entry to be removed, then clicking ). Click to proceed to the final step.
Step 5: Confirm Data Import
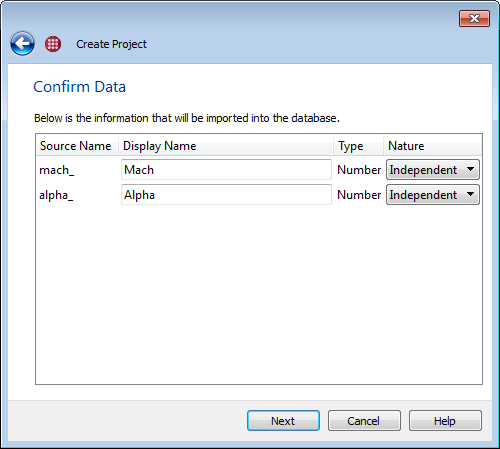
Tecplot Chorus now gives you a chance to confirm the data that will be imported. You may also edit the Display Name or Nature of any variable being imported.
- Display Name
-
The name by which a variable is known in Tecplot Chorus for axis labeling and all other uses. This feature can also be used to clarify names or make them more consistent; for example, if Mach number is "M" in your data files, you could reassign it to "Mach" in your project to make its meaning more apparent.
Tecplot Chorus does not allow leading or trailing spaces in variable names or display names and will strip any spaces from the beginning or end of variable names.
You may not use the names Case ID and Case Status for your variables. These names are reserved for internal Tecplot Chorus variables. If you have variables with these names in your data, you can use this feature to "rename" them inside Tecplot Chorus (perhaps prepending "External" or "Original"). - Nature
-
Each numeric variable can be independent (input), dependent (output), or other. "Other" implies that the variable is not an input or output variable calculated by the solver. String (text) variables always have the Other-nature, but numeric variables may as well.
You can change a variable’s nature after the project has been created by choosing . For more information, see Changing Variable Nature.
When you have edited your variables' Display Names and Natures as desired, click to close the wizard and perform the import. Nothing is actually imported until you click .
The new project automatically opens a Table View in the workspace. See Exploring Your Results for your next steps.
Appending To a Project
To add new cases, variables, or auxiliary files to an open project, choose . As when you initially created the project, you can append using the Delimited Text Reader or the File Crawler.
It is not necessary to use the same method when appending that you used when you created the project. In fact, a common work flow is to initially import independent variables and auxiliary files using the file crawler, then append dependent variables from a delimited text file. You may add additional cases, additional links to auxiliary image and data files for existing cases, additional variables for existing cases, or any combination of these.
Tecplot Chorus uses these rules when appending to a project:
-
If a case’s independent variables match a case already in the project, but there are new dependent variables or linked image or data files, these are added to the existing case.
-
If a case has a combination of independent variables that is not already in the project, it is considered a new case, and all variables and linked files associated with that case are added to the project.
-
If a new case’s independent variable values are already in the project, and one or more existing dependent variables have values different from the ones being imported, you’ll be asked how to proceed: apply the new values to the existing cases, or append duplicate cases to the project.
If you choose to add duplicate cases, you will have more than one case with the same combination of independent variables in the project. These cases may be distinguished by their Case ID, as this internal variable is unique for every case, even duplicates.
-
If a new case’s independent and dependent values all match an existing case, the new case is ignored.
The step-by-step procedure is identical to that used when initially creating the project. See Creating Projects for detailed instructions.
When importing using the File Crawler, you must re-specify variable names in exactly the same way as when the project was created so that any cases that already exist in the project can be detected and handled correctly.
For the Delimited Text Reader, use the same column names for variables that are already in your project. If the file being appended includes a second header row to specify variable natures, these will be ignored for existing variables, but will be respected for any new variables being added.
Calculated Variables
You can generate new variables by choosing , which opens the Calculated Variables dialog, shown below. The dialog displays any calculated variables that exist in the project and allows you to add new ones. The new variables are added only after you click .
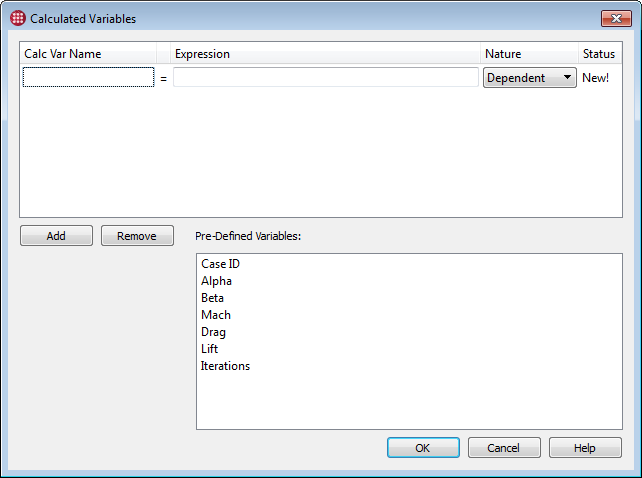
To add new calculated variables to the project:
-
Click the button to create a new blank row if one does not already exist.
-
Enter a name for the new variable in the Calc Var Name column.
Tecplot Chorus does not allow leading or trailing spaces in variable names and will strip any spaces from the beginning or end of variable names.
You may not use the names Case ID and Case Status for your variables. This are reserved for internal Tecplot Chorus variables. -
Enter an expression to be used to calculate the new variable in the Expression column. (See Expression Syntax for details of what you can enter.)
-
Choose the nature of the variable: Independent (input), Dependent (output), or Other.
-
If you wish to add another variable, go back to Step 1.
If you have entered a variable in error, click the button to remove it. You may not remove variables once they have been added to the project.
When you have finished adding calculated variables, click . Only at this point are the calculations actually performed for each case and the results added to the project. These calculations will also be performed automatically for any additional cases you may append later.
| Calculated variables may not be edited and are displayed with a lock symbol in table views. |
Expression Syntax
Expressions supported by Tecplot Chorus follow a syntax similar to popular programming and scripting languages.
Numbers
Both integers and floating-point numbers in standard or scientific notation, such as
3.1415927 or 6.02e23, may be used.
Variables
If a variable name does not contain any spaces or parentheses and is not the same as a
function name supported by Tecplot Chorus, it may be referenced in an equation simply
by typing its name. Otherwise, its name must be enclosed in backticks `like
this`. (The backtick character is typically located at the top left of the keyboard,
one row down from the Escape key, and should not be confused with the apostrophe.)
Variable names must match case: Alpha is not the same as alpha or ALPHA.
Operators
Tecplot Chorus supports arithmetic operations using the following symbols and the standard algebraic order of operations. Parentheses may be used to override order of operations.
| Operator | Meaning |
|---|---|
|
Addition |
|
Subtraction |
|
Multiplication |
|
Division |
|
Exponentiation |
Functions
The following functions are supported.
| Function | Meaning |
|---|---|
|
Square root of |
|
|
|
Natural logarithm of |
|
Base-ten logarithm of |
|
Sine, arcsine, hyperbolic sine or arcsine of |
|
Cosine, arccosine, hyperbolic cosine or arccosine of |
|
Tangent, arctangent, hyperbolic tangent or arctangent of |
|
Rounds |
|
Returns 1 if |
Changing Variable Nature
If you make a mistake when initially choosing the nature of a variable, you can change it after the project has been created by choosing . In the Change Variable Nature dialog, choose the desired nature from the pop-up menu to the right of the variable whose nature you wish to change. After completing your changes, click .
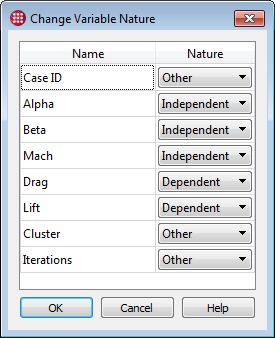
Changing a variable’s nature will affect any surrogate model that uses it.
Removing Links to Files
If you have tagged data or image files in error when creating or appending to a project, or if you simply no longer need access to particular linked files, you can delete the tags and the corresponding links. Removing a tag removes it, and all files linked under that tag, from all cases in the project.
| Removing tags and links does not remove the actual data or image files from their folder on your hard disk or network. Only the links to these files stored in the project are deleted. |
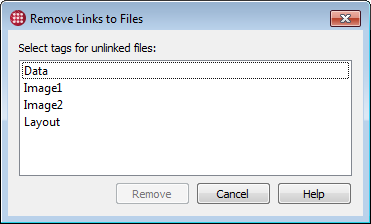
To remove links to files, choose from the menu, then choose one or more tags and click .
Exporting Projects
You can export data from Tecplot Chorus projects to a CSV file by choosing . The resulting CSV file will specify all values for all variables and the paths of all linked files in the project. This is a useful format for use with a variety of other software, including Microsoft Excel, for sharing with others, for further processing in your own scripts, or even for manual editing. The CSV file can be re-imported to Tecplot Chorus with minimal loss of information.
Exported projects do not include equations for calculated variables (the values of such variables are, however, included) nor data generated by a surrogate model. The internal Case ID variable maintained by Tecplot Chorus is also excluded. Case Status is exported only if there are inactive cases in the project. Currently, records that have multiple linked files per tag cannot be exported.
The exported CSV file has a second header that identifies the nature of each field (independent, dependent, other, or auxiliary file). In most software, this will appear as the first data row. It may be removed using a text editor if it interferes with the processing of the rest of the rows.
To export surrogate model data, use the button in the sidebar of a Line Plot or a 3D Scatter Plot (see Surrogate Models).
If you will send the exported project to someone who will not have your data and image files, you might create a compressed ZIP archive containing both the exported data and the necessary files.
Modifying the Root Path
Tecplot Chorus projects may store references to supporting files such as solution data and images as partial file paths relative to a root directory. If you must move the files associated with a project, or if you have received a project file from another Tecplot Chorus user, you may need to change the project’s root path to point to where the files are located on your system or network.
To do this, . Then either enter the new path, or click the button to navigate to the new root directory.
This function does not copy or move your auxiliary files to a new location. You must do this yourself in the usual way if it is necessary.