Use the Pick page of the Cell Blanking dialog to interactively remove a cell or group of cells. All functions that allow you to choose visible or unblanked cells will recognize cells blanked by Pick Blanking, including:
• Statistical Plots (to access, choose “Histogram/Cross Plot” in the Analyze menu)
• Performing Integrations (accessible by choosing “Integration” from the Analyze menu)
• Property Modifier (accessible by going to Data > Sim Input > Cells)
• Extract Data by Cell dialog (accessible by going to Data > Extract Cell Data > By Cell)
• KSum and KAvg toggles (3D Grid sidebar)
In general, you must blank the cells before choosing one of these functions, or click the Update / Refresh button in the corresponding dialogs after blanking the cells.
To access the Cell Blanking dialog, use the Data menu or the  button in the sidebar. The Pick page has the following options:
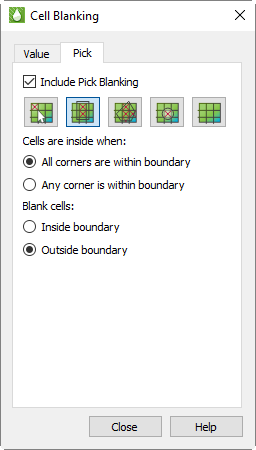
• Include Pick Blanking Toggle-on “Include Pick Blanking” to activate the pick blanking options and incorporate Pick Blanking into your plot.
•  Blank Individual Cells Click this button to use the pointer to select individual cells for blanking.
•  Blank Cells in a Rectangle Click this button to identify and blank a rectangular group of cells. Drag the selector tool in your plot to create the rectangle. Tecplot RS will blank the cells according to the selected criteria that displays below this button in the Pick page.
•  Blank Cells in a Polygon Click this button to identify and blank a polygonal group of cells. Use the left pointer button to define each corner of the polygon. To complete the polyline when you have created all desired edges, double-click.
When defining an irregular boundary using a polyline, you can work clockwise or counter-clockwise. You do not need to return to the starting point - Tecplot RS will close the boundary automatically.
Tecplot RS will blank the cells according to the criteria selected below this button on the Pick page.
•  Blank Cells in a Circle Click this button to identify and blank a circular group of cells. Your first pointer click will identify the center of the circle. Drag the pointer outward to extend the radius of the circle.
Tecplot RS will blank the cells according to the criteria selected below this button on the Pick page.
•  Undo Pick Blanking Click this button to remove all of your pick blanking selections.
• Cells are inside when Specify whether to blank cells when “any” corner is within a boundary or when “all” corners are within a boundary. This criteria applies only to rectangular, polygonal, and circular blanking.
• Blank cells Specify whether to blank the cells that are “outside” or “inside” of the rectangle, polygon, or circle.
Notes for rectangular or polygonal pick blanking
When working with rectangular, polygonal, or circular pick blanking, the following guidelines apply:
• The view orientation must be top-down (aerial view), and the cell corners must be in the XYZ coordinate system. This means that in 2D Grid views, the selected view plane must be "K - XY Axes" ("K - IJ Axes" will not work, nor will any of the I or J plane views).
In 3D Grid views, the view must be rotated to the Aerial view. If you click the button for picking cells in rectangular, polygonal, or circular shapes while in a non-aerial view, Tecplot RS will alert you that you must switch to an aerial view and will give you the option to automatically flip to that view. You can also select the appropriate view using 3D > View Presets > Aerial.
• When choosing multiple cells for pick blanking, the hole will "drill" through all K-planes in the grid. This feature works for both 2D and 3D Grid plot types.