WMF (Windows Metafile) is a vector graphics format and thus can be easily resized by the importing application. WMF files can be imported into many applications. As a vector format, WMF cannot accurately represent plots with translucency or smooth color gradations. Choosing WMF from the Export Format menu displays WMF options (as shown below).
You can choose from the following options:
• Region Choose to export only the active frame, or the smallest rectangle containing all frames.
• Color Toggle-on for color WMF output. Toggle-off for gray-scale.
• Force Extra Sorting for All 3D Frames Use this check box to instruct Tecplot RS to use extra sorting in all 3D frames. When printing 3D plots in a vector graphics format, Tecplot RS must sort the objects so that it can draw those farthest from the screen first and those closest to the screen last. By default, Tecplot RS uses a quick sorting algorithm. This method works quickly, but sometimes operates less accurately and fails to detect problems, such as intersecting objects. If you choose Extra Sorting, Tecplot RS uses a slower, more accurate approach that detects problems.
The Export dialog controls all image exports, but you can access additional animation export options from the Times region of the sidebar. See the following section for details.
E - 3 Exporting an Animation or Group of Images
 You can export an animation of your plot by using the Export button in the Times region of the sidebar for various plot types.
When you are viewing the plot type XY Variables, XY Entities, Custom XY Plots, 2D Grid Plots, or 3D Grid Plots, the sidebar includes a Times region with media buttons resembling DVD controls. In grid plots, these buttons control moving through multiple time steps, while in XY plots, they control cycling through successive variables or entities. These controls include:
• Next and Previous buttons to step through one page at a time,
• A Play button to review an entire series of plots in sequence,
• A Reverse button to review the series of plots in reverse sequence,
• A Stop button to stop an animation progression, and
• An Export button that opens a dialog to export an animation.
To export an animation from Tecplot RS, you could display each step of your animation and print or export the images. But the Export dialog provides a more efficient approach. With this feature, Tecplot RS exports each step of the animation to the chosen output format.
E - 3.1 Exporting a Video Format (AVI or MPEG-4)
To export a video, select one of the video formats from the “Export Format drop-down. The export dialog will then change to show video options. After selecting the video options, click the “Export” button. You will be asked for a filename and then the animation will be exported.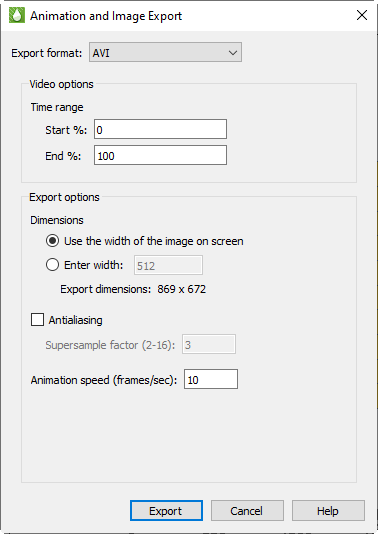
Time Range
The Time Range settings (the Start % and End % boxes) apply only to grid plots. They allow you to limit the range of time steps that Tecplot RS will animate. Starting and ending points are expressed as percentages of the total time span. For example, to output only the second half of the available time steps, set the Start % to 50 and the End % to 100.
You can also limit the time step increments on a grid by clicking the Details button in the Times region of the sidebar and choosing time steps to skip in the Time Options dialog. For XY plots, use the Filter button in the sidebar to control which entities and variables to include in the playback.
Width
You can control the size of the output image by specifying the width in pixels. The height will adjust to maintain the aspect ratio currently displayed on the screen.
When the export controls instruct Tecplot RS to resize an image to fit into the specified width, the export can suffer a loss of definition and edge sharpness, especially if it includes text. You can use anti-aliasing to reduce the impact of resizing. It does slow down the export process, but generally results in much better images. Use the Antialiasing check box to choose whether to include anti-alias computations.
Tecplot software uses a method called supersampling to perform anti-alias corrections. You can input the supersampling as a Factor in the text field. Accuracy increases as values increase, but so does the time and memory required to complete the operation. Generally, a value of 3 is sufficient. See Section E - 5 “Antialiasing Images” for more information on anti-aliasing and supersample factors.
Frames/Sec
When exporting in either AVI or MPEG-4 file format, you can specify the playback speed in frames per second. Values can range from 0.1 to 200.
Export
E - 3.2 When you have set all options as you wish, click OK to begin. Tecplot RS will step through each time step, entity, or variable, and create the plot and output to the file or printer, as appropriate.Exporting a Sequence of Images
As an alternative to exporting a video format, you may export the animation as a sequence of images.
For XY plot types, select the "Multiple Entities" radio button. When this is selected, the dialog will show a list of properties or entities to export as individual image files. You may select one or more of these properties or entities. You must select at least one, by default all are selected.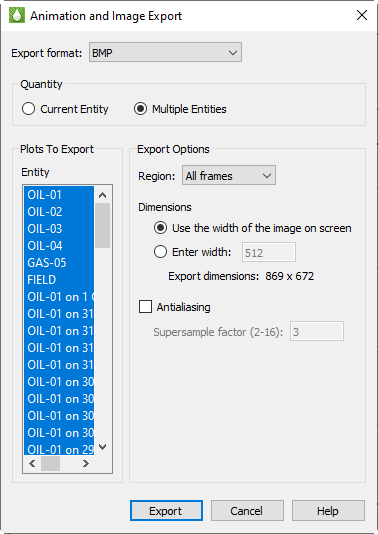
If the plot type is 2D or 3D, then select "Multiple Plots" to export an image for each time step.

After selecting the other export options, click the "Export" button. A file name will be requested. The filename is then used as the base filename for each image.
XY Formats
For XY formats, each file in the sequence is named as follows:
[filename]_[sequence]_[entity].[format]
where "filename" is the name selected, "sequence" is a 5 digit plot number starting at 00001, and "entity" is the name of the entity being plotted.
For example, if you plot 2 entitles "OIL-01", "OIL-02", as PNG, with the file name "untitled.png", then the following files are created:
untitled_00001_OIL-1.png
untitled_00001_OIL-2.png
2D/3D Formats
For 2D/3D, each file in the sequence is named as follows:
[filename]_[timestep].[format]
where "filename" is the name selected, and "timestep" is the 5 digit timestep number starting at 00001.