17 - 4 Axis Range Options for Polar Plots
Polar axes are different from any other axis type due to their cyclical nature. Each polar axis (Theta and R) has very different settings, unlike XY or XYZ axes. For the Theta-axis you can change the Theta Mode, Theta Period, and Theta Value on Circle Right; for the R-axis you can change the origin; and for both axes you can clip the data to the axes.
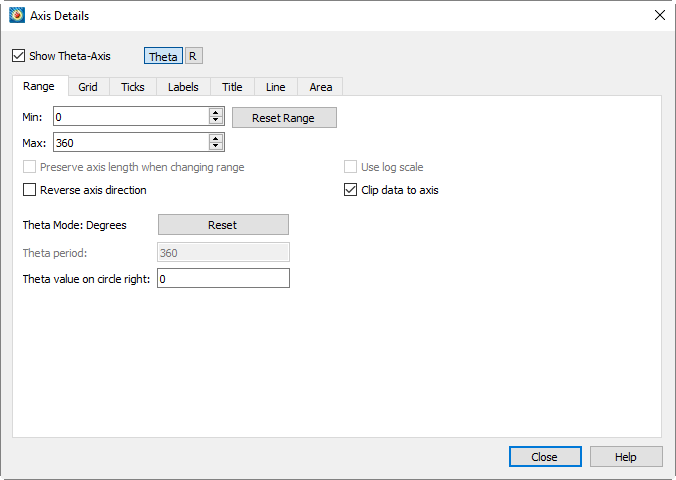
• Show Axis - Toggle-on this checkbox to show the selected axis on the plot. Use the buttons [Theta], [R], etc. to the right of this checkbox to select an axis.
• Min - Enter the minimum value of the axis range.
• Max - Enter the maximum value of the axis range.
• Reset Range - Reset the Max and Min fields by selecting one of three options from the drop-down menu:
• Reset to Entire Circle - Sets the range of Theta to encompass an entire circle.
• Reset to Nice Values - Sets the range to slightly larger than the current axis variable range in order to begin and end the axis at major axis increments.
• Set to Var Min/Max - Sets the range to the minimum and maximum variable values.
• Make Current Values Nice - Rounds the axis range to the nearest major axis increment.
• Preserve length when changing range - If toggled-on, changes to the Theta to R Ratio will affect the axes' range, but not their scale. Toggle-off to change both the axis range and axis scale simultaneously. See Figure 17-4 for an illustration of the difference.
• Use log scale - The R axis can have a linear scale (default) or a logarithmic scale. When "Auto Spacing" is selected with logarithmic scale, large numbers are displayed in scientific notation (i.e., 3.48x10⁵). It is strongly recommended that you use "Auto Spacing" with log axes. Navigate to the Ticks or Labels page of the dialog, and toggle-on "Auto Spacing" to use this option.
• Reverse axis direction - Toggle on to display the axis from high to low rather than from low to high. Not available for 3D Cartesian plots.
• Clip Data to axis - For Polar Line plots, it is possible to have data that extends beyond the edges of the axes. Use this feature to eliminate data drawn outside of the range of the axes. Clipping data can be set independently for each axis. To activate or deactivate clipping, toggle "Clip Data to Axis" on or off. This feature is illustrated in Figure 17-5.
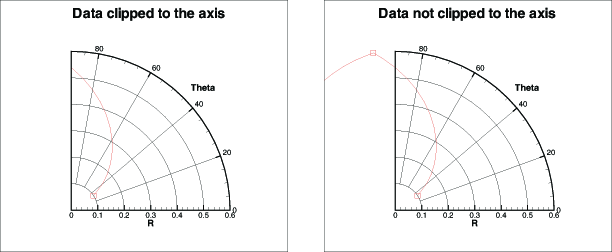
Figure 17-5. An example of clipping polar data to an axis.
• Theta Mode - By default, the Theta-axis is expressed in degrees mode with a range of 0 to 360. For the Theta axis, you can plot the angles in units of Radians, Degrees, or Arbitrary (where arbitrary sets the Theta range to the maximum and minimum values of the Theta-axis variable).
To set the Theta Mode, choose from the following options:
• 0 - 360 Degrees
• -180 – 180 Degrees
• 0 – 2Pi Radians
• Pi-Pi Radians
• Fit to Var Min/Max
Selecting any of these options changes the Theta Mode, resets the Theta-axis range, and resets the Theta Period. When the Theta Mode is Radians, Tecplot 360 EX draws Theta labels as fractional units of Pi.
• Theta Period - The Theta Period specifies the Theta range that is required to create a complete circle. If your Theta Mode is "Degrees", the Theta Period is forced to 360; for "Radians", the period is 2 Pi; for "Fit to Var Min/Max", the period can be set to any value.
• Theta Value on Circle Right - The "Theta Value on Circle Right" setting changes the orientation of the Theta-axis. By default, this value is zero, which means that the value zero (or equivalent value, 360 degrees, 720 degrees, and so forth) is displayed on the right hand side of the circle. You can change this value to change the orientation of the axis.
• R-origin - The R-origin specifies what value of R is represented at the center of the axis. The effect of changing the R-origin is displayed in Figure 17-6.
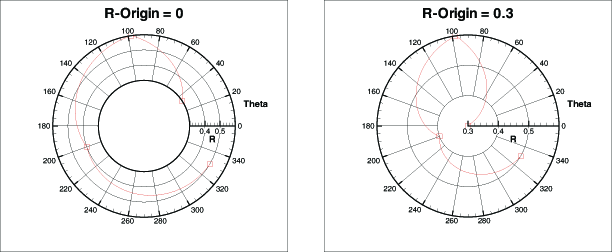
Figure 17-6. An example of changing the R-origin from a range of 0.3 to 0.6 on a polar plot.