The Text Details dialog has the following options:.
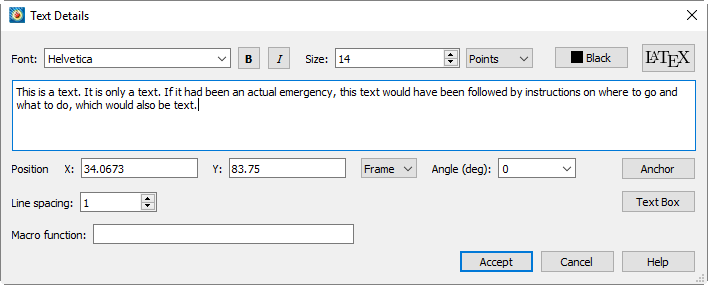
• Type the desired text in the large text field at the top of the dialog.
You can embed Greek, Math, and User-defined characters into English-font strings by enclosing them with text formatting tags, together with the keyboard characters. See Custom Character and Symbol Definition for more information on defining your own characters.
The text formatting tags and their effects are as follows (format tags are not case sensitive and may be either upper or lower case):
• <b>...</b> - Boldface
• <i>...</i> - Italic
• <verbatim>...</verbatim> - Verbatim
• <sub>...</sub> - Subscripts
• <sup>...</sup> - Superscripts
• <greek>...</greek> - Greek font.
• <math>...</math> - Math font.
• <userdef>...</userdef> - User-defined font.
• <helvetica>...</helvetica> - Helvetica font.
• <times>...</times> - Times font.
• <courier>...</courier> - Courier font.
|
|
 Not all fonts have Bold and/or Italic variants. For fonts that do not have these styles, the <b> and/or <i> tags may have no effect.
Embedding and escaping special characters work only in English-font text; they have no effect in text created in Greek, Math, or User-defined character sets.
You can produce subscripts or superscripts by enclosing any characters with <sub>...</sub> or <sup>...</sup>, respectively. Tecplot 360 EX has only one level of superscripts and subscripts; expressions requiring additional levels, such as  , must be created by hand using multiple Tecplot 360 EX text strings. If you alternate subscripts and superscripts, Tecplot 360 EX positions the superscript directly above the subscript. Thus, the string a<sub>b</sub><sup>c</sup> produces
  . To produce consecutive superscripts, enclose all superscript characters in a single pair of tags. The string x<sup>(a+b)</sup> produces
  in your plot.
To insert a tag into text literally, precede the first angle bracket with a backslash ("\"). To insert a backslash in the text, just type two backslashes ("\\"). In ASCII input files, the number of backslashes must be doubled (two to precede a special character, four to create a backslash) because the Preplot program also requires a backslash to escape special characters.
• Font - Select a font for the text. (See Section 18 - 1.2 “Font Folders and Fallback” for more information on how fonts work with Tecplot 360 EX.) You may click the B and I buttons as shortcuts for selecting a bold, italic, or bold italic variation of the chosen font.
|
|
 Not all fonts have Bold and/or Italic variants. For fonts that do not have these styles, the
 • Size - Select a character height unit from the drop-down menu, then enter the size in the associated field:
• Points - Specify character height in points. One point is 1/72nd of an inch.
• Frame% - Specify character height as a percentage of frame height.
• Grid - Specify character height in grid units. (Available only when Position By is set to Grid.)
• X/Y Position - Choose the position of the text element's anchor point (see Anchor button).
• Position by - Choose to position the text using the frame or grid coordinate system.
• Macro function - Enter the name of the macro function to be linked to this text object. See Section 18 - 3 “Linking Text and Geometries to Macros” for more information. To run the linked macro function, hold down Control while right-clicking the text object in the workspace. (On Mac, hold down Command while right-clicking.)
• Color - Select a color for the text using the Color Chooser.
• Angle (deg) - Specify the orientation of the text relative to the axis. The angle is measured in degrees counter-clockwise from horizontal. Horizontal text is at zero degrees; vertical text is at 90 degrees. You can either enter an angle in degrees, or select from one of the preset angles in the drop-down.
•  Line Spacing - Enter the line spacing when multiple lines of text are entered: 1 for single-spacing, 2 for double-spacing, etc. Fractional values are permitted.
• Text Box - Opens the Text Box dialog to specify the appearance of the box around the text (if any). See Section 18 - 1.3 “Text Box” for more information.
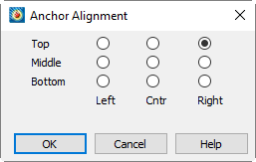
• Anchor - Choose how the text is aligned with the anchor point. As new text is added, the text expands away from the anchor point chosen in the Anchor Alignment dialog.
18 - 1.2 Font Folders and Fallback
Tecplot 360 EX supports TrueType (.ttf) and OpenType (.otf) fonts. Fonts installed in the standard folder for fonts on your operating system (for example, C:\Windows\Fonts on a Windows computer) appear in the font selection menu in the Select Font dialog and in other places where you choose a font.
If the fonts you want to use with Tecplot 360 EX are installed in other folders, or if your operating system does not have a default system location for fonts, you can edit the tecplot.cfg file in your Tecplot 360 EX installation directory, using Notepad or another text editor, to indicate the directories where the fonts you want to use are installed. Add a line like one of the following:
$!Interface FontPath = ' "/font/path" '
$!Interface FontPath = ' "C:\Windows\Fonts" "C:\More Fonts" '
$!Interface FontPath = ' "/first/path/" "/second/path" "/third/path" '
Replace the paths with the paths to the folders that contain the fonts you wish to use, taking special note of the single quote marks that wrap the entire list of folders and the double quotes around each folder's path. You can use just one or several font folders. As shown in the second example, if you wish to use your computer's standard fonts as well as fonts from other folders, you must manually specify the standard font folder along with the others.
If you open a layout that specifies a font that Tecplot 360 EX does not have access to on your system, the text "falls back" to Times. If the layout specifies a style you do not have (for example, a bold version of a font you have but which does not include a bold version on your system), the correct font is used, but the style (boldface, in this case) is not displayed.
It is possible to choose a font by typing its name directly into the font selection field in the Text Details dialog and other places where a font can be chosen, instead of choosing the desired font from the provided menu. If the font you specify in this way is not available to Tecplot 360 EX on your system, the text will appear as Times on your computer. However, the name you typed is recorded when you save a layout, and the text appears in the correct font if the layout is later opened on a computer on which the font is available.