You may rotate your 3D plots using the 3D Rotate dialog accessible via View>Rotate. The 3D rotation tools located in the toolbar are discussed in “Three-dimensional Rotation” on page 24. 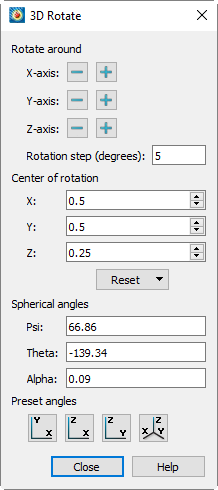
The 3D Rotate dialog has the following options:
• Rotate around
• Click the + or - buttons next to an axis to rotate the plot incrementally around that axis.
• The Rotation Step field specifies the increment by which each click of the + or - button rotates the plot.
• Center of Rotation
• X - Rotation of the eye/origin ray about the X-axis. Enter a value in the text field, or use the increase or decrease arrows at the right to specify a value.
• Y - Rotation of the eye/origin ray about the Y-axis. Enter a value in the text field, or use the increase or decrease arrows at the right to specify a value.
• Z - Rotation of the eye/origin ray about the Z-axis. Enter a value in the text field, or use the increase or decrease arrows at the right to specify a value.
• Reset - Use this drop-down to set the center of rotation to be the Center of Data (the center of the bounding box of the data) or Center of View (the point hit by a probe at frame coordinates 50%, 50%).
|
|
 Center of View can result in an error if there is no data in the center of the frame. In this situation, the center of rotation will not move.
• Spherical Angles - Eye origin view. The angular orientation of the plot is defined by three spherical rotation angles:
• y (Psi) - Tilt of eye origin ray away from Z-axis. (Range –720 to 720.)
• q (Theta) - Rotation of the eye origin ray about the Z-axis. (Range –720 to 720.)
• a (Alpha) - Twist about the eye origin ray. (Range –720 to 720.)
The eye origin ray is a line from the origin of the 3D object to your eye. The eye origin ray is perpendicular to the plane of the computer screen. These angles define a unique view. These angles are shown in Figure 7-9
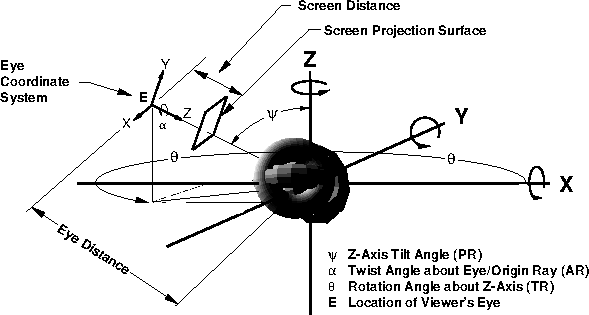
Figure 7-9. 3D angles and 3D projection.
• Preset Angles - Specify one of four pre-defined orientations: the XY-Plane, the YZ-Plane, the XZ-Plane; or a default orientation with a Psi=60, Theta=225, and Alpha=0).
Rotate About the Viewer Position
In addition to the rotation capabilities described above, you may also use the [Alt] key and mouse to rotate about the viewer (instead of rotating the object). Although you may use this feature while in orthographic projection, it is best suited for when perspective projection is being used. The [Alt] key and your middle mouse button may be used to simulate fly-through type motion. You may move closer to the object using the [Alt] key and middle mouse button, then turn your head using the [Alt] key and left mouse button.