Tecplot 360 EX's Macro Recorder records a macro as you perform a sequence of actions interactively. Macros can be recorded in either Tecplot (.mcr) or PyTecplot Python (.py) format. PyTecplot Python scripts run outside of Tecplot 360 EX, and may be run from either the command line or any Python IDE. See the PyTecplot Guide for more information.
After recording your macro, you can edit your macro file with a plain text editor to remove redundant operations, compress repetitive actions into loops, replace references to files with variable names, and otherwise modify the macro to make it more generic and flexible.
To record a macro with the Macro Recorder dialog, select "Record Macro" or "Record PyTecplot" from the Scripting menu. Specify a macro file name in the Write Macro File (.mcr) or Write Script (.py) dialog and click Save to initiate the recording. The Macro Recorder dialog remains open during the recording session.
|
|
 Auto Redraw is disabled during macro recording. If necessary, you can manually redraw your plot by clicking the Redraw button in the Plot sidebar.
While recording macros, you can use any of the following buttons on the Macro Recorder dialog to add specific macro commands to your macro: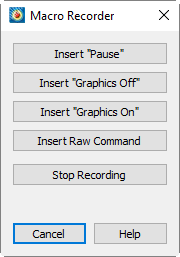
• Insert "Pause" - Adds a "pause" command to the macro. When you play a macro including a pause command, Tecplot 360 EX displays a message box when it reaches the pause command, and waits for you to click OK before continuing to process the macro.
• Insert "Graphics Off" - Adds a "graphics off" command to the macro. When you play a macro containing a "graphics off" command, Tecplot 360 EX stops displaying graphics in the workspace from the "graphics off" command until a "graphics on" command is encountered.
• Insert "Graphics On" - Adds a "graphics on" command to the macro.
• Insert Raw Command - Brings up a dialog in which you can enter any valid Tecplot macro command. For example, you can add "$!LOOP 10" at the start of a section you want to repeat 10 times, then "$!ENDLOOP" at the end. See the Scripting Guide for information on the Tecplot 360 EX macro language.
• Stop Recording - Select when you have completed the sequence of actions you want recorded.
The commands in a macro file typically rely on Tecplot 360 EX being in a particular state. It is a good practice to use commands at the start of a macro that force Tecplot 360 EX into a known state. For example, the $!NEWLAYOUT command deletes all data sets and frames and creates a single empty frame with a default size and position.
|
|
 Macros are guaranteed to be forward compatible (i.e. work with future releases of
 When editing a macro file in a text editor, you can add macro function definitions and macro function calls. Macro functions have the following form:
$!MACROFUNCTION
NAME = functionname
.
.
.
$!ENDMACROFUNCTION
Between $!MACROFUNCTION and $!ENDMACROFUNCTION, you can include any legal macro command except $!MACROFUNCTION.
For example, the following macro function turns on the Contour zone layer, turns off the Mesh zone layer, sets the contour plot type to Both Lines and Flood for zones 1, 2 and 3, then chooses gray scale color mapping:
|
$!MACROFUNCTION RETAIN = Yes $!FIELDLAYERS SHOWCONTOUR = YES $!FIELDLAYERS SHOWMESH = NO $!FIELDMAP [1-3] CONTOUR{CONTOURTYPE = BOTHLINESANDFLOOD} $!GLOBALCONTOUR 1 COLORMAPNAME = "Grayscale" $!REDRAW $!ENDMACROFUNCTION |
The RETAIN parameter tells Tecplot 360 EX to retain the macro function definition for use in subsequent macro calls; this allows you to define a macro function once in some macro you load every time you run Tecplot 360 EX, and continue to use it throughout your Tecplot 360 EX session.
Use the $!RUNMACROFUNCTION macro command to call your macro function. For example, to call the "graycontour" macro function defined above, use the following macro command:
$!RUNMACROFUNCTION "graycontour"
You can use the $!RUNMACROFUNCTION command within other macro functions; calls may be nested up to ten deep.
To access parameters from within a macro function use "|n|", where n is the parameter number (do not include the double quotes). For example, the following function uses two parameters for the assignments to SHOWCONTOUR and SHOWMESH:
|
$!MACROFUNCTION NAME = "AssignContourAndMesh" $!FIELDLAYERS SHOWCONTOUR = |1| $!FIELDLAYERS SHOWMESH = |2| $!ENDMACROFUNCTION . . . $!RUNMACROFUNCTION "AssignContourAndMesh" (YES,NO) |
26 - 1.2 Macro Linking to Geometries
Each geometry you create can be linked to a macro function. This macro function is called whenever the user holds down the control key and clicks the right mouse button on the geometry. Macro functions are specified with the Link to Macro function field in the Geometry dialog. Only one macro function may be specified for each geometry.
The macro function must be defined in a macro file using the $!MACROFUNCTION instruction as described in “Macro Functions” on page 409. The macro file containing the variable must then be executed so that the function is loaded into memory and available for use in the current Tecplot 360 EX session.
A convenient way to handle this is to record a macro that opens the layout that contains the linked objects and then edit this macro using a text editor to also include the necessary macro functions. You can also simply include the macro functions in your tecplot.mcr file.