Tecplot 360 EX can perform particle path and streakline calculations for unsteady flow solutions. To enable this feature, it must know which zones correspond to which solution time levels in your unsteady solution. Each solution time level may comprise one or more zones, which may be ordered, finite element, or both. Many data loaders supply this information. You may also enter it in the Unsteady Flow Options dialog.
For a layout with multiple datasets, separate settings are maintained for each dataset. You can copy the settings from one dataset to another using the Save Settings and Load Settings options in the Analyze menu. These actions also transfer the settings made in the Fluid Properties, Reference Values, Field Variables, and Geometry and Boundaries dialogs.
The Unsteady Flow Options dialog, shown below, is displayed by selecting Unsteady Flow Options in the Analyze menu.
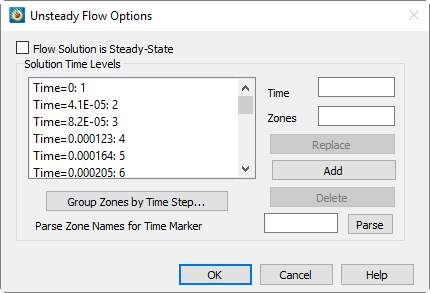
It contains an option allowing you to specify that your solution is steady-state, a list to display unsteady time levels you enter, as well as controls for entering new time levels.
21 - 5.1 Specifying a Steady-state Solution
To direct Tecplot 360 EX to treat your dataset as representing a steady-state solution, select the Flow Solution is Steady-State option. This setting disables the remainder of the dialog.
To direct Tecplot 360 EX to treat your dataset as an unsteady solution, toggle-off Flow Solution is Steady-State. This enables the remainder of the dialog, where you can identify your solution time levels.
An unsteady flow solution consists of a sequence of zones that represent successive solution times. Each time level may be represented by one or more zones. Identify solution time levels by entering the zone number(s) for a particular solution time level in the Zones text field and the time they represent in the Time text field, then selecting [Add]. The zones and associated time appear in the Solution Time Levels list. You may edit an existing time level by selecting it in the list. Its time and zones appear in the text fields, where you may edit them. Clicking Replace updates the currently selected list time level with the modified one.
By manually entering each time and associated zones in the text fields, you may identify all solution time levels in the current dataset. For large numbers of zones, two additional methods of entering time levels are provided. If your solution, or some portion of it was calculated with a constant time step, you may use the Group Zones by Time Step Dialog to enter all of these time levels at once. Alternatively, if your zone names contain the solution time each zone represents, you may enter all of your time levels by parsing the zone names for their corresponding solution time. These options are discussed below.